Have you ever clicked on a YouTube video, only to be greeted by a blurry mess? It can be frustrating, right? Blurriness can detract from the viewing experience, making it hard to follow along or appreciate the content. In this post, we’re going to dive into the nitty-gritty of video blurring issues, specifically on YouTube. We’ll explore why these issues occur and what you can do to fix them. Whether you're a content creator or just a viewer, understanding these problems is key to enjoying crisp, clear videos. So, let’s get started!
Understanding the Causes of Blurriness in YouTube Videos
Blurriness in YouTube videos can stem from several different factors. Let’s break down the main causes:
- Low Resolution: If a video is uploaded in low resolution (like 240p or 360p), it can look fuzzy and unclear. This is often due to the creator not uploading a high-quality version.
- Internet Speed: Your internet connection plays a big role in video quality. Slower connections may force YouTube to stream at a lower quality, resulting in blurriness.
- Encoding Issues: Sometimes, the encoding process during upload can introduce blurriness. This is more common with certain video formats or settings.
- Camera Quality: If the original video was shot with a low-quality camera, no amount of editing will make it crystal clear. The source material must be of good quality.
- Compression Artifacts: YouTube compresses videos to save space and bandwidth, which can lead to loss of detail and clarity.
Understanding these causes is the first step toward finding effective solutions. Whether you’re facing issues as a viewer or a content creator, knowing what leads to video blurriness will empower you to tackle the problem head-on. In the next sections, we’ll explore various techniques and tools to help you unblur those pesky videos!
Also Read This: How to Add a Link in Your Behance Project
Techniques for Unblurring YouTube Videos
Unblurring a YouTube video can seem like a daunting task, but with a few effective techniques, you can significantly enhance the clarity of blurred footage. Here are some tried-and-true methods you can leverage:
- Adjusting Brightness and Contrast: Sometimes, the blurriness in a video can be masked by tweaking the brightness and contrast settings. Increasing the contrast can help define edges, making the image appear sharper.
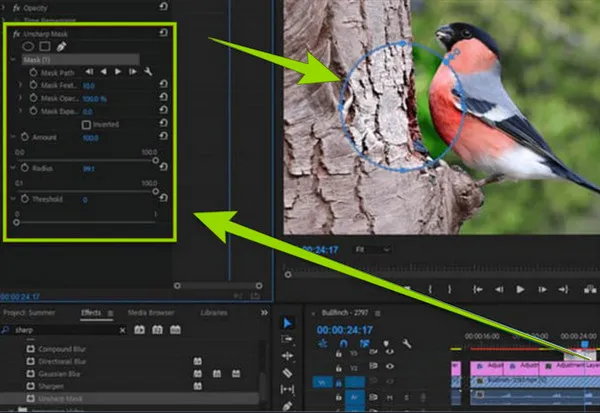
- Sharpening Filters: Most video editing software comes with sharpening tools. Applying a sharpening filter can enhance the details of your video. Be cautious, though, as over-sharpening can lead to unnatural artifacts.
- Stabilizing the Video: If the blur is due to camera shake, using a stabilization tool can help. Stabilizing the footage minimizes motion blur and can provide a clearer picture.
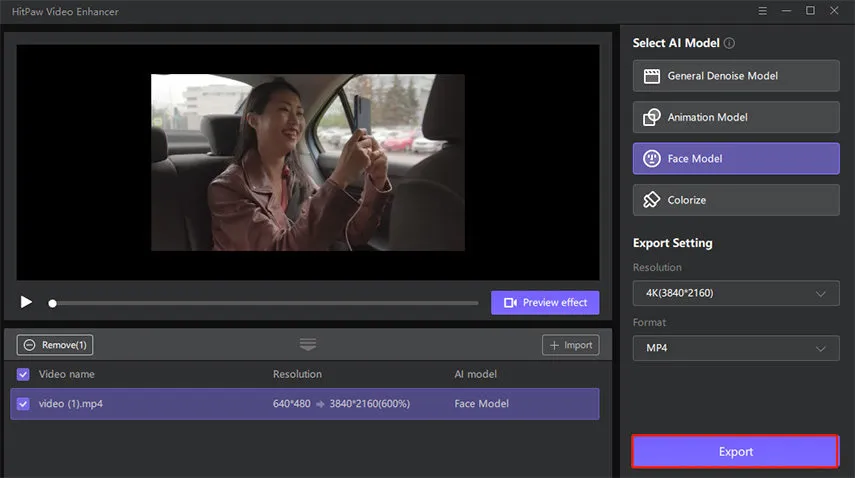
- Upscaling Resolution: Using software that can upscale the resolution of a video may also help. Some tools employ AI algorithms to add missing pixels and enhance overall clarity.
- Using De-noising Techniques: Noise in a video can contribute to its overall blurriness. Employing de-noising techniques or filters can help to clean up the image.
Remember, while these techniques can improve video quality, they might not completely eliminate the blur. The results will vary based on the original quality of the footage.
Also Read This: How to Stop YouTube from Auto-Pausing
Tools and Software for Enhancing Video Clarity
When it comes to unblurring YouTube videos, having the right tools can make all the difference. Here’s a list of popular software and tools that can help you enhance video clarity:
| Tool/Software | Key Features | Price |
|---|---|---|
| Adobe Premiere Pro | Advanced editing, sharpening, and noise reduction tools. | Subscription-based (Monthly or Annual) |
| Final Cut Pro | Powerful video editing with a range of filters and effects. | One-time purchase |
| HitFilm Express | Free version available, great for basic editing and effects. | Free (with optional paid upgrades) |
| DaVinci Resolve | Professional-grade color correction and video editing. | Free (with a paid studio version) |
| Video Enhancer AI | Uses AI to upscale and enhance video quality. | One-time purchase |
Each of these tools has its own unique features that cater to different editing needs. Whether you’re a beginner or a pro, there’s something here for everyone. The key is to experiment with different options to find what works best for your specific video.
Also Read This: Fixing Rating Unavailability in Fortiguard Downloader
5. Step-by-Step Guide to Unblurring a Video
Unblurring a video can seem like a daunting task, but with the right approach, you can improve the clarity of your footage significantly. Let’s break it down into simple steps:
- Identify the Cause of Blurriness:
Before you start unblurring a video, it’s essential to understand why it’s blurry. Common reasons include low resolution, camera shake, or poor lighting. Assessing the cause will help you choose the right tools and techniques.
- Choose the Right Software:
There are various software options available to help you unblur your video. Here are a few popular choices:
- Adobe Premiere Pro
- Final Cut Pro
- Avidemux
- HitFilm Express
- Import Your Video:
Once you’ve chosen your software, import the video file you want to unblur. This usually involves dragging the video file into the program's timeline or using the import option in the menu.
- Apply Sharpening Filters:
Most video editing software will have sharpening or clarity filters. Locate these in the effects panel and apply them to your video. Adjust the settings to find the right balance—too much sharpening can create noise and artifacts.
- Enhance Lighting and Contrast:
Sometimes, a video appears blurry due to poor lighting. Adjust the brightness and contrast settings to enhance the overall visibility. This can make a significant difference in the clarity.
- Export Your Video:
Once you’re satisfied with your edits, export the video in a high-quality format. Choose settings that maintain the clarity you’ve worked hard to achieve.
And there you have it! With these steps, you can effectively unblur a video and make it more enjoyable for your audience.
Also Read This: How to Sell Your Photos on 123RF for Beginners
6. Best Practices for Uploading Clear Videos on YouTube
To ensure your videos look as crisp and clear as possible on YouTube, following best practices during the upload process is crucial. Here are some tips to keep in mind:
- Use High-Quality Equipment:
Investing in a good camera, microphone, and lighting setup can drastically improve the quality of your videos. A clear picture and crisp audio make a world of difference.
- Choose the Right Resolution:
When uploading, opt for higher resolutions like 1080p or 4K if possible. YouTube compresses videos during the upload process, so starting with a higher resolution helps maintain clarity.
- Optimize Your Video Settings:
Before uploading, make sure your video settings are optimal. Use the following guidelines:
Setting Recommendation Frame Rate 30 or 60 fps Bitrate Use a high bitrate for better quality Format MP4 is preferred - Keep Your Videos Steady:
Camera shake is a common issue in videos. Use a tripod or stabilizer to keep your footage steady, ensuring a professional look.
- Edit for Clarity:
Before uploading, take the time to edit your video and enhance clarity, as discussed in the previous section. This can include sharpening the image and adjusting brightness and contrast.
By following these best practices, you can ensure that your videos are uploaded with the highest possible clarity, making them more appealing to viewers on YouTube.
Unblurring a Video on YouTube with Effective Techniques and Tools
Blurry videos can be frustrating, especially when they contain important information or entertaining content. Fortunately, there are several effective techniques and tools that can help you unblur a video on YouTube. This guide will explore various methods, from basic adjustments to advanced software solutions.
Techniques to Unblur YouTube Videos
Here are some techniques you can use to improve the clarity of a blurry YouTube video:
- Adjusting Playback Settings:
Sometimes, the resolution might be set to a lower quality. Ensure you are watching the video in the highest available resolution.
- Image Enhancement Tools:
You can use image enhancement software that specializes in video sharpening. Some popular options include:
- Adobe Premiere Pro
- Final Cut Pro
- DaVinci Resolve
- Video Editing Applications:
Consider editing the video yourself using software like:
Software Features Filmora Easy-to-use interface with built-in filters and effects HitFilm Express Free version with advanced editing features
Online Video Enhancers
There are several online tools that can help enhance video quality:
- Clideo: A user-friendly online tool for video sharpening.
- Kapwing: Offers various editing features including blur removal.
Conclusion and Final Thoughts
Improving the clarity of a blurry YouTube video is possible through various techniques and tools, whether you choose to adjust playback settings, utilize software, or employ online enhancers. By using the right approach, you can enjoy a clearer and more enjoyable viewing experience.