Welcome to the exciting world of video editing! If you’ve ever wanted to spice up your projects with music from YouTube, you’re in the right place. In this post, we’ll walk you through the process of importing music from YouTube into Adobe Premiere Pro, ensuring that your videos not only look great but sound fantastic, too. So, grab your headphones, and let’s dive into the details!
Understanding YouTube's Terms of Service
Before you start snipping and editing music from YouTube, it’s crucial to understand the platform's Terms of Service. YouTube offers a vast library of content, but using that content, especially music, comes with specific guidelines. Here’s what you need to know:
- Copyright Restrictions: Most music on YouTube is protected by copyright. This means you can't just download and use it freely without permission from the copyright holder. Violating these terms could lead to your video being taken down or even a copyright strike against your channel.
- Creative Commons Licenses: Some videos are released under Creative Commons licenses, which allow you to use the music with certain conditions. Make sure to check the license type and comply with its requirements, like providing attribution to the original artist.
- YouTube Audio Library: A treasure trove for video creators! YouTube has its own Audio Library where you can find royalty-free music and sound effects. These tracks are safe to use in your projects, so consider this option to avoid any legal issues.
- Fair Use Policy: While some creators attempt to use music under the "fair use" doctrine, this can be a gray area. Fair use typically applies to commentary, criticism, or educational purposes. But relying on it for background music in a video can be risky, so tread carefully.
By understanding and respecting YouTube's terms, you can create amazing content without the fear of legal repercussions. So, always do your homework before pressing download!
Also Read This: Downloading from PNGWing: A Quick Guide
Choosing the Right Tools for Downloading Music
When it comes to importing music from YouTube into Premiere Pro, the first step is selecting the right tools for downloading. With so many options available, it can be overwhelming. Let’s break down what you need to look for in a reliable music downloader.
- User-Friendly Interface: Pick a tool that is easy to navigate. A simple design allows you to focus on downloading music rather than figuring out how to use the software.
- Quality Options: Ensure the tool offers various audio quality settings. You want high-quality tracks to make your project sound professional.
- Format Flexibility: Look for a downloader that allows you to save music in multiple formats (MP3, WAV, etc.), compatible with Premiere Pro.
- Batch Downloads: If you need to download multiple tracks, choose a tool that supports batch downloads to save time.
- Legal Compliance: Make sure the tool respects copyright laws. Some tools provide access to royalty-free music, which is a better choice for your projects.
Popular options include 4K Video Downloader and YTMP3. They offer a balance of quality, ease of use, and compliance with legal standards. Choose the one that meets your needs best!
Also Read This: How to Download Comp Images from iStock for Your Drafting Projects
Steps to Download Music from YouTube
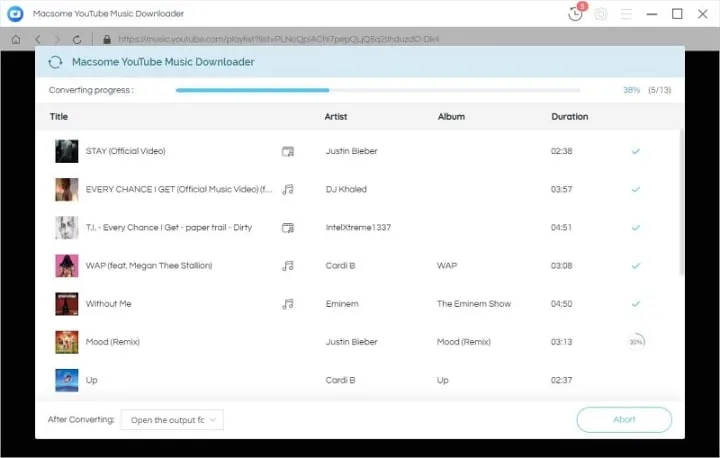
Now that you’ve selected your downloader, let’s dive into the steps to download music from YouTube. It's quite straightforward, and you’ll be ready to import your tracks into Premiere Pro in no time!
- Find Your Track: Go to YouTube and search for the music track you want to download. Once you find it, copy the URL from the address bar.
- Open the Downloader: Launch your chosen music downloader application or website. If it’s a web-based tool, navigate to the homepage.
- Paste the URL: Look for a field that says “Paste your link here,” and paste the YouTube URL you copied earlier.
- Select Format and Quality: Choose your desired audio format and quality settings. For example, opt for MP3 at 320kbps for high quality.
- Download the Track: Click the download button and wait for the process to complete. Your file will be saved to your designated folder.
- Open Premiere Pro: Now that your music is downloaded, open Premiere Pro and import the audio file into your project. You’re all set to enhance your video!
With these simple steps, you’ll efficiently bring the music you love into your editing projects. Happy editing!
Also Read This: Converting YouTube Videos to MP4 Format on a Mac
Importing Music into Premiere Pro
Importing music into Adobe Premiere Pro is a straightforward process, but it can be a game-changer for your video projects. Whether you're using royalty-free tracks or music imported from YouTube, the right audio can enhance your storytelling significantly. Here’s how to do it:
- Download the Music: First, ensure you’ve downloaded the music from YouTube. You can use various online tools to convert YouTube videos to audio files (like MP3). Just be wary of copyright issues and ensure you have the right to use the music.
- Open Premiere Pro: Launch Adobe Premiere Pro and open your project. If you’re starting fresh, create a new project and set your desired settings.
- Import the Audio File: Go to the Media Browser or click on File > Import. Locate your downloaded music file, select it, and click Import. You can also drag and drop the file directly into the project panel.
- Organize Your Audio: It's a good idea to keep your project organized. Create an Audio folder in the project panel to store all your music files. This way, you can easily find and manage your audio clips.
- Use Audio Waveforms: Once imported, you can see the waveform of your audio in the timeline, making it easier to identify beats and sync with video.
By following these steps, you’ll have your music ready to enhance your video project in no time!
Also Read This: How to Remove Web References and Work Experience from Your Behance Profile
Editing and Syncing Music in Premiere Pro
Editing and syncing music in Premiere Pro is where the magic happens. Getting the audio just right can transform your video into a professional masterpiece. Here’s a step-by-step guide to help you through the process:
- Drag Music to the Timeline: After importing, simply drag your audio file from the project panel to the timeline. Place it on an audio track beneath your video clips.
- Trim the Audio: If your music track is longer than your video, you can trim it. Hover over the end of the audio clip until you see a red bracket, then click and drag to shorten it. Alternatively, you can press C to use the Razor tool to cut the audio at specific points.
- Adjust Audio Levels: Click on the audio clip and go to the Effect Controls panel. Here, you can adjust the volume or add keyframes to create fades. For a smoother transition, try decreasing the volume towards the end of the clip.
- Sync with Video: Use the waveforms as a visual guide to sync your music with key moments in your video. You can also mark beats by pressing M to add markers at specific points where you want your cuts or transitions to align with the music.
- Apply Audio Effects: Premiere Pro offers various audio effects under the Audio Effects tab. You can add reverb or other effects to enhance the audio experience.
With these tips, you’ll be able to edit and sync your music seamlessly, creating a polished and engaging video that resonates with your audience!
Importing Music from YouTube into Premiere Pro
Importing music from YouTube into Adobe Premiere Pro can enhance your video projects significantly. However, it's essential to understand the legal implications and the process involved in doing so. Below is a comprehensive guide to help you navigate this task effectively.
Before diving into the steps, consider the following:
- Copyright Issues: Always check if the music is copyright-free or under a Creative Commons license. Using copyrighted music without permission can lead to your video being taken down or worse, legal action.
- Quality of Music: Ensure that the audio quality is acceptable for your project. Poor audio can detract from the overall production value.
Here’s a step-by-step guide to importing music from YouTube into Premiere Pro:
- Find the Music: Search for the desired music on YouTube.
- Download the Music: Use a reliable YouTube to MP3 converter. Websites like YTMP3 or software like 4K Video Downloader can help you extract audio from YouTube videos.
- Import to Premiere Pro: Open Premiere Pro and navigate to File > Import. Locate the downloaded audio file and click Open.
- Drag and Drop: Once imported, drag the audio file onto your timeline to sync it with your video.
Remember to adjust the audio levels and ensure that the music complements your video content.
| Step | Action |
|---|---|
| 1 | Search for music on YouTube |
| 2 | Download using a converter |
| 3 | Import into Premiere Pro |
| 4 | Drag to timeline |
By following these steps, you can effectively and legally import music from YouTube into Premiere Pro, enhancing your video projects with appropriate audio tracks.
In conclusion, while importing music from YouTube can elevate your video productions, it is crucial to respect copyright laws and choose quality tracks, ensuring a professional output.