Uploading videos to YouTube directly from your iPhone has never been easier, especially with the user-friendly YouTube app. Here’s a step-by-step guide to help you navigate through the process effortlessly.
- Open the YouTube App: Start by launching the YouTube app on your iPhone. If you haven’t installed it yet, head to the App Store and download it.
- Sign In: Make sure you’re signed in to your YouTube account. Tap on the profile icon at the top right corner and log in using your Google credentials.
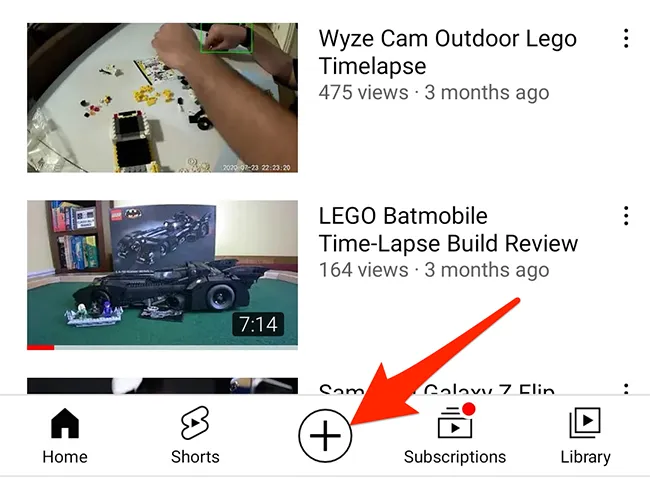
- Tap the Create Icon: Once you’re logged in, look for the “Create” icon, which resembles a camera with a plus sign. It’s typically located at the bottom center of the screen.
- Select Your Video: You’ll be given options to either record a new video or select one from your camera roll. Choose the video you want to upload.
- Edit Your Video: After selecting your video, you can add filters, music, and trim it if needed. Make it engaging and eye-catching!
- Add Title and Description: Fill in a catchy title and description for your video. This helps viewers understand what your video is about and improves its visibility.
- Set Privacy Settings: Choose your video's privacy setting—Public, Unlisted, or Private. Each option serves a different purpose, so select what fits best.
- Upload: Finally, hit the “Upload” button. Your video will begin uploading, and you'll receive a notification once it's live.
That’s it! Now you’re ready to share your creativity with the world. Happy uploading!
4. Alternative Method: Uploading via Safari

If you prefer using your browser or can't access the YouTube app, uploading videos via Safari is a great alternative. Here’s how you can do it smoothly:
- Open Safari: Launch the Safari browser on your iPhone and navigate to the YouTube website.
- Sign In: Make sure you log in with your YouTube account by tapping the profile icon and entering your credentials.
- Request Desktop Site: To ensure you have access to the full upload features, tap the “aA” icon in the URL bar and select “Request Desktop Site.” This will give you access to the desktop version of YouTube.
- Go to the Upload Page: Click on the camera icon or the “Upload” button that appears on the top right corner of the page.
- Select Your Video: Tap “Select Files” to choose a video from your photo library. You can only upload videos that are saved on your device.
- Edit Video Details: Similar to the app, you’ll need to provide a title, description, and tags. Make sure to optimize these for better visibility.
- Choose Privacy Settings: Decide on the privacy level for your video just like you would in the app.
- Upload: Click the “Upload” button to start the process. You’ll see a progress bar indicating how much of the video has been uploaded.
And there you go! With just a few taps, you can share your video content with the YouTube community, all through Safari. Enjoy the ease of uploading!
Also Read This: Can You Delete Messages on LinkedIn and Manage Conversations Effectively
5. Managing Your Video Settings
Once you've uploaded your video to YouTube from your iPhone, it's time to manage your video settings to ensure everything looks perfect before sharing it with the world. Here’s how you can do that:
- Title: Choose a catchy and descriptive title that will grab attention. Make sure it reflects what your video is about and includes relevant keywords for better searchability.
- Description: Write a detailed description of your video. This not only helps viewers understand your content but also aids in SEO. Include any links or resources mentioned in the video.
- Tags: Add tags to help categorize your video. Use tags that are relevant to your content, as these can help your video appear in search results.
- Thumbnail: Select an eye-catching thumbnail. YouTube allows you to customize your thumbnail, so take advantage of that to create something visually appealing that represents your video.
- Privacy Settings: Decide who can see your video. You can choose from options like Public, Unlisted, or Private. Public means anyone can see it, Unlisted means only those with the link can view it, and Private restricts the video to only you and those you invite.
- Advanced Settings: Dive into advanced settings if you want to adjust features like monetization, age restrictions, or enable subtitles. These options can enhance your video’s reach and compliance with YouTube’s policies.
Taking the time to manage these settings can significantly impact how well your video performs on YouTube!
Also Read This: Current Slowdowns on YouTube and Their Causes
6. Publishing and Sharing Your Video
After fine-tuning your video settings, it’s time to publish your video and share it with your audience! Here’s a quick guide on how to do it seamlessly:
- Hit the Publish Button: Once you’re happy with your settings, simply tap the 'Publish' button. Your video will be live for everyone to see!
- Share on Social Media: Don’t keep your masterpiece a secret! Share your video across social media platforms like Facebook, Twitter, and Instagram. You can easily copy the video link and paste it into your posts.
- Embed in Blogs or Websites: If you have a blog or a website, consider embedding your video there. This can drive traffic and increase views. YouTube provides an easy embed code for this.
- Email Notifications: Send out an email to your subscribers or friends with the link to your new video. Personal recommendations can boost views and engagement.
- Engage with Your Audience: After publishing, keep an eye on comments and feedback. Engaging with viewers can help build a community around your content and encourage more interaction.
Remember, the more you share your video, the more visibility it will gain. So don’t hesitate to shout it from the rooftops!
Also Read This: How to Identify Scammers on Telegram
Troubleshooting Common Upload Issues
Uploading videos to YouTube from your iPhone is generally a smooth process, but sometimes, you might run into a few hiccups. Don't worry; troubleshooting these common upload issues is easier than you think! Here are some frequent problems and solutions:
- Slow Upload Speeds: If your upload is taking forever, check your internet connection. A weak Wi-Fi signal or poor cellular data can slow things down. Try switching to a stronger Wi-Fi network or moving closer to your router.
- File Format Errors: YouTube supports a variety of video formats, but if your video isn’t in one of them (like MP4, MOV, AVI), it won’t upload. Use video editing apps to convert your video into a compatible format.
- Storage Issues: If your iPhone is running low on storage, it can affect your ability to upload videos. Make sure you have enough free space on your device by deleting unnecessary apps or files.
- App Crashes: Sometimes, the YouTube app may crash during an upload. If this happens, try restarting the app or your iPhone. If issues persist, consider reinstalling the YouTube app.
- Account Restrictions: If you’re having trouble uploading, it might be due to account limitations, especially for new users. Make sure your account is verified and in good standing.
By addressing these common upload issues, you can ensure a smoother experience when sharing your videos with the world!
Conclusion
Uploading videos to YouTube from your iPhone is a straightforward process that allows you to share your creativity with a vast audience. By following the steps outlined in this guide, you’re well on your way to becoming a YouTube content creator!
Remember, the key steps include:
- Recording your video using the iPhone camera.
- Downloading and opening the YouTube app.
- Uploading your video while adding relevant titles, descriptions, and tags.
And don’t forget to troubleshoot any issues along the way. Whether it's slow upload speeds or format errors, knowing how to tackle these problems will save you time and frustration.
So, gather your videos, unleash your creativity, and start uploading! You never know who might find your content inspiring or entertaining. Happy uploading!