Uploading videos from iMovie to YouTube can be a game-changer for creators looking to share their stories, tutorials, or creative projects with a wider audience. Whether you're a beginner or an experienced editor, this guide will help you navigate the process smoothly. From preparing your video in iMovie to the final upload on YouTube, we’ll cover all the essential steps to ensure your video shines. Let’s dive in!
Preparing Your Video in iMovie
Before you can upload your masterpiece to YouTube, it’s crucial to prepare your video properly in iMovie. This ensures that your content not only looks great but also meets YouTube's technical requirements. Here’s a step-by-step approach to get you started:
- Importing Your Clips: Start by importing your video clips into iMovie. You can do this by clicking on the File menu and selecting Import Media. Choose the clips you want to edit and click Import Selected.
- Editing Your Video: Once your clips are imported, drag them into the timeline. Here, you can trim, cut, and rearrange clips. Add transitions, titles, and effects to enhance your video.
- Audio Adjustment: Don’t forget about sound! Adjust audio levels for clarity and add background music if desired. You can find royalty-free music in the iMovie library or use your own tracks.
- Color Correction: Make sure your video looks vibrant! Use the color correction tools in iMovie to tweak brightness, contrast, and saturation, giving your video a polished look.
- Final Review: Before exporting, watch your video in full. Ensure everything flows smoothly and check for any mistakes. This is your last chance to make adjustments!
By following these steps, you’ll have a well-prepared video ready for YouTube. It’s all about making sure your content is engaging and visually appealing. Once you’re satisfied with your edited video, you’re ready to move on to the next stage: exporting it for upload!
Also Read This: Understanding YouTube TV's Sign-In Requests and Troubleshooting Tips
Exporting Your Video from iMovie
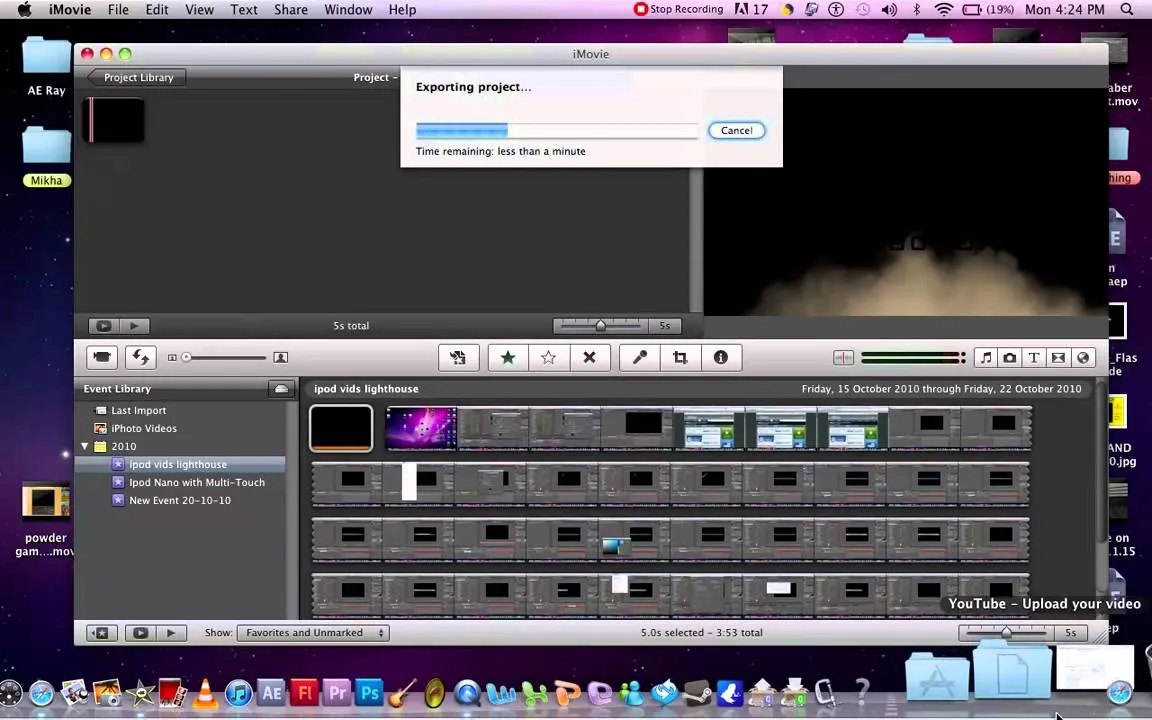
Alright, so you've finished creating your masterpiece in iMovie, and now it’s time to share it with the world! Exporting your video is a straightforward process, but it’s crucial to get it right for the best quality. Here’s how to do it:
- Open your project: Launch iMovie and open the project you want to export.
- Click on the “File” menu: At the top left corner of your screen, find and click on the “File” menu.
- Select “Share”: From the dropdown, hover over “Share” and select “File” from the subsequent options.
- Adjust settings: You’ll be presented with a dialog box where you can adjust:
- Resolution: Choose between 720p, 1080p, or 4K depending on your video quality needs.
- Quality: Select “High” or “Best” for video quality.
- Compression: Choose “Better Quality” for a high-quality output, though it may take longer to export.
- Export: Once you’ve set everything, click “Next,” choose a location to save your video, and hit “Save.”
And voilà! Your video is now exported and ready to be uploaded. Remember to check the file format; it should be in a format compatible with YouTube, like .mp4 or .mov.
Also Read This: Income Analysis on YouTube Per 10000 Views
Setting Up Your YouTube Account
Now that your video is exported, it’s time to get your YouTube account ready! If you already have one, great! If not, let’s walk through the setup process together:
- Visit YouTube: Head over to the YouTube website or open the app on your device.
- Sign in: If you have a Google account, click on the “Sign In” button in the top right corner. If you don’t have a Google account, you’ll need to create one.
- Create your channel: After signing in, click on your profile picture, then “Create a Channel.” You can choose to use your name or a custom name for your channel.
- Customize your channel: Add a profile picture and channel art that represents you or your content. This is your chance to make a good first impression!
- Settings: Click on the gear icon to access your channel settings. Here, you can adjust privacy settings, notifications, and link to your social media accounts.
And there you go! Your YouTube account is now set up and ready to go. You’re one step closer to sharing your iMovie creations with the world!
Also Read This: Access Free Flyer Templates with Canva Free Flyer Templates
5. Uploading Your Video to YouTube
Alright, so you've finished your masterpiece in iMovie! Now it's time to share it with the world on YouTube. The process may seem daunting, but don’t worry; I’ll walk you through it step-by-step.
First, let’s get your video ready:
- In iMovie, click on the Share button located in the top right corner.
- Select YouTube from the dropdown menu.
You'll be prompted to log in to your YouTube account if you haven’t already. Here’s what to do next:
- Resolution: Choose the resolution for your video. Higher resolutions like 1080p are preferable for better quality.
- Description: Write a catchy description that tells viewers what your video is about.
- Tags: Add relevant tags to help your video get discovered. Think keywords that people might search for.
- Privacy Settings: Decide if you want your video to be Public, Unlisted, or Private.
Once you've filled in all the details, hit the Upload button. Depending on your video size and your internet speed, this might take a few moments. Once it’s done, you’ll receive a link to your video! Voila, you’re now a YouTube content creator!
Also Read This: How Much Is Shutterstock Subscription
6. Optimizing Your Video for YouTube
Congratulations on uploading your video! But wait, there’s more you can do to make sure it reaches as many eyes as possible. Optimizing your video is key to gaining views and engagement.
Here are some crucial steps to optimize your YouTube video:
- Title: Create a captivating title that includes relevant keywords. Think about what a viewer would search for.
- Thumbnail: Design an eye-catching thumbnail. A compelling image can dramatically increase click-through rates.
- Description: Utilize the first few lines of your description wisely; they appear in search results. Include keywords and link to your social media or website.
- End Screens and Cards: Use these features to promote other videos of yours or encourage subscriptions.
Lastly, remember to engage with your audience through comments and ask them to like and subscribe to your channel. The more you connect with viewers, the higher your chances of building a loyal following!
Also Read This: Mastering the Use of the Lightroom Plugin with ShootProof
Troubleshooting Common Upload Issues
Uploading videos from iMovie to YouTube should be a smooth process, but sometimes things don’t go as planned. Here are some common issues you might encounter, along with solutions to help you get back on track:
- File Format Errors: Ensure your video is in a compatible format. YouTube supports formats like MP4, MOV, and AVI. If your video doesn’t match these, you may need to export it again in a compatible format.
- Slow Upload Speeds: A slow internet connection can hinder your uploads. Try switching to a wired connection or uploading during off-peak hours for better speed.
- Corrupted Files: If you’re getting error messages about file corruption, try re-exporting your project from iMovie. Occasionally, the export process might not finalize correctly.
- Account Issues: Make sure you’re logged into the correct YouTube account. Sometimes, users accidentally switch accounts and can’t find their videos post-upload.
- Privacy Settings: After uploading, check your video’s privacy settings. If it’s set to ‘Private,’ others won’t be able to see it until you change it to ‘Public’ or ‘Unlisted.’
If you encounter any other issues, the YouTube Help Center is a great resource for troubleshooting further. Don’t let technical hiccups discourage you!
Conclusion
Uploading videos from iMovie to YouTube opens up a world of sharing your creativity and storytelling. With its user-friendly interface and powerful editing tools, iMovie allows you to craft stunning videos that can captivate an audience. Here’s a quick recap of the process:
- Finish your project in iMovie.
- Export your video in the right format.
- Log into YouTube and select ‘Upload’.
- Adjust your video settings and share!
Remember, the journey doesn’t stop at uploading. Engaging with your audience through comments and updates can make your YouTube channel even more successful. So, what are you waiting for? Go ahead and share your creations with the world!