Unlisted YouTube videos are a fantastic way to share your content without making it publicly searchable. Think of it as a middle ground between public and private. When a video is unlisted, only those who have the link can view it, making it perfect for sharing with a select audience. Whether you're sharing a family video, a tutorial, or anything in between, unlisted videos give you control over your audience.
In this article, we'll walk you through how to upload an unlisted video from your iPhone. But first, let's delve into what unlisted videos are and why they might be the right choice for you.
- Privacy: Unlike public videos, unlisted videos don’t appear in search results or your channel. Only people with the link can view them.
- Control: You can easily share the link with friends, family, or colleagues without broadcasting to the world.
- Collaboration: Perfect for sharing work with collaborators or clients before going public.
So, whether you're looking to keep your video under wraps or just want to share it with a select group, understanding unlisted videos is essential!
Preparing Your Video for Upload
Before you hit that upload button on your iPhone, there are a few crucial steps to ensure your video is ready for the world (or a select few) to see. Preparing your video not only enhances its quality but also ensures it reaches your intended audience effectively.
Here’s what you need to do:
- Video Quality: Aim for high-quality videos. Most smartphones, including the iPhone, can shoot in 1080p or even 4K. Make sure your settings are optimized for the best quality.
- Editing: Utilize editing apps like iMovie or Adobe Premiere Rush to trim, add transitions, and make your video more engaging. Editing can drastically improve viewer experience.
- File Format: Ensure your video is in a compatible format. The most common formats for YouTube are .mp4, .mov, and .avi. Stick with .mp4 for best results.
- Title and Description: Craft a catchy title and a detailed description. Even though the video is unlisted, a good title can help keep your content organized.
- Thumbnail: Create an eye-catching thumbnail that reflects the content of your video. A great thumbnail can entice viewers to click on your link.
By following these steps, you’ll set your video up for success, ensuring it’s polished and ready for your audience, no matter how small! Now, let’s get into the exciting part—uploading your unlisted video from your iPhone!
Also Read This: Removing Obstacles: A Guide on How to Remove the Getty Images Watermark
Steps to Upload an Unlisted Video from iPhone
Uploading an unlisted video to YouTube from your iPhone is a straightforward process that allows you to share content without making it publicly available. Here’s how you can do it:
- Open the YouTube App: Launch the YouTube app on your iPhone. If you haven't installed it yet, download it from the App Store.
- Sign In: Make sure you’re signed in to your YouTube account. Tap on the profile icon at the top right, then log in if prompted.
- Tap the Create Button: Look for a plus (+) icon, typically located at the bottom of the app. This is where you can create new content.
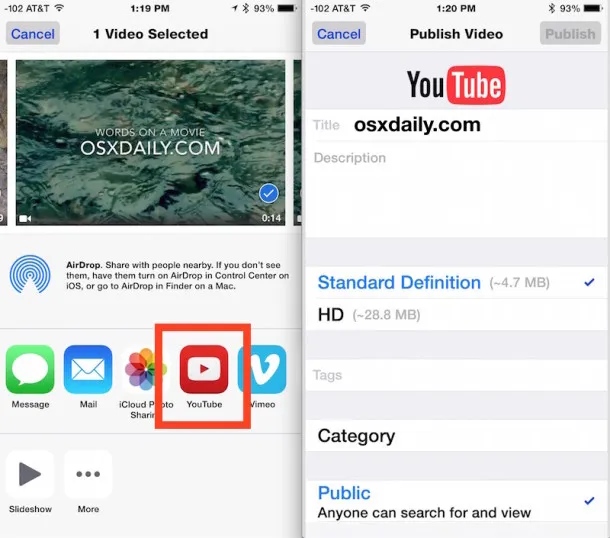
- Select Upload a Video: Choose the option to upload a video. Your iPhone’s gallery will pop up, allowing you to select the video you want to upload.
- Choose Your Video: Browse through your videos and tap on the one you'd like to upload. You can also trim or edit the video if needed before uploading.
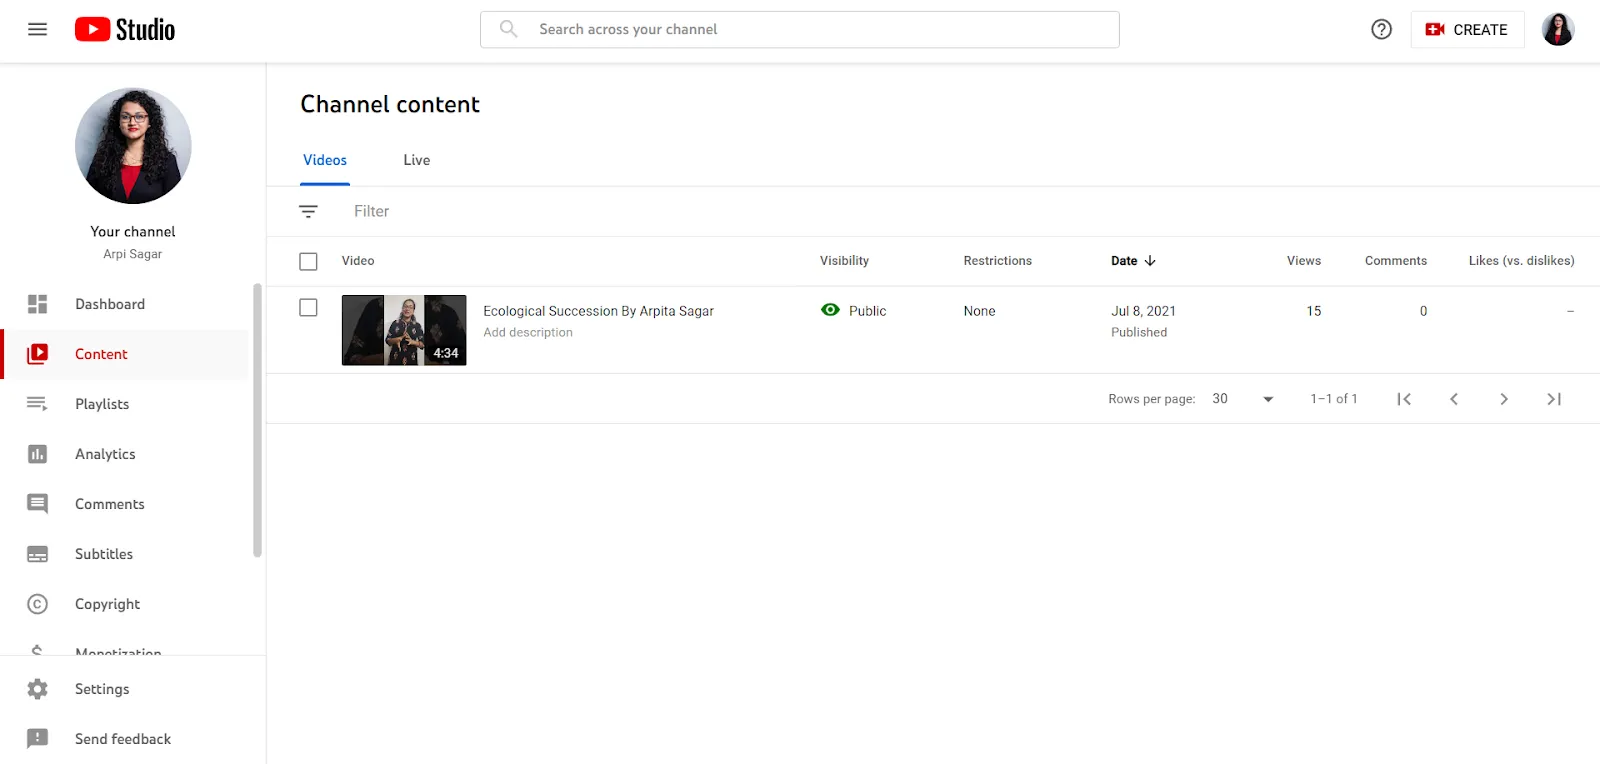
- Set to Unlisted: After selecting your video, you’ll be directed to the video details page. Here, you can change the privacy setting to "Unlisted." This means only people with the link will be able to view it.
- Upload: Finally, tap on the “Upload” button. You’ll see a progress bar as your video uploads. Once completed, a confirmation message will appear.
Also Read This: How to Sell Your Photos on Getty Images and Start Earning
Setting Video Details and Privacy Options
Once you've uploaded your unlisted video, it's crucial to set the right details and privacy options to ensure it reaches the right audience. Here’s what to consider:
- Title: Make sure your video has a clear and catchy title. This helps viewers understand what your video is about. For instance, "Amazing Summer Recipes" is more engaging than just "Recipes."
- Description: Write a detailed description of the video. Include keywords and relevant links. A good description enhances discoverability. For example, mention the main ingredients if it’s a cooking video.
- Tags: Utilize tags to help categorize your video. Tags like "cooking," "recipes," and "summer" can help the video appear in relevant searches.
- Thumbnail: Choose an attractive thumbnail. An eye-catching image can significantly improve click-through rates. You can either select a frame from the video or upload a custom image.
- Advanced Settings: Explore advanced settings such as allowing comments or embedding options. Decide if you want to allow viewers to comment on your video or share it on other platforms.
Setting these details ensures that your video reaches your intended audience effectively while maintaining the privacy you desire with the unlisted option!
Also Read This: How to Use a Selfie Stick for Android Tips for Perfect Selfies Every Time
5. Finalizing the Upload Process
So, you've uploaded your video and it’s time to make sure everything's just right before it goes live—well, sort of! Here’s how to finalize the upload process on your iPhone:
- Review Your Video Settings: After the initial upload, double-check your video settings. Make sure it’s set to "Unlisted" so only those with the link can view it.
- Add a Title and Description: Give your video a catchy title that reflects its content. The description should provide viewers with context, keywords, and any important links.
- Select a Thumbnail: Choose or upload an eye-catching thumbnail. This is the first impression viewers will have of your video, so make it appealing!
- Enable or Disable Comments: Decide if you want viewers to interact through comments. You can manage this in the advanced settings.
- Check Video Quality: Ensure your video has uploaded in the best quality possible. You might need to wait a bit for higher resolutions to become available.
Once you’ve reviewed all these settings and are happy with everything, hit that “Publish” button. Remember, you can always come back to edit these settings later if needed!
Also Read This: How Do You Use a Twitter Image Downloader to Enhance Your Marketing Campaigns?
6. Tips for Managing Your Unlisted Videos
Managing unlisted videos can be a breeze if you keep a few handy tips in mind. Here’s how to stay organized and make the most of your unlisted content:
- Create Playlists: Organize your unlisted videos into playlists for easier navigation. This way, you can group similar topics and share them all at once.
- Regularly Check Analytics: Use YouTube Analytics to see how your unlisted videos are performing. This can provide insights into viewer engagement and help you tweak future content.
- Share Strategically: Since unlisted videos are meant for a select audience, share the link only with those you want to view it. Consider using email or private messaging for sharing.
- Keep Track of Links: Maintain a document with all your unlisted video links for easy reference. This avoids the hassle of hunting down videos later.
- Update Content as Needed: If your video becomes outdated or needs a refresh, don’t hesitate to edit or replace it. You can upload a new version or tweak the existing one.
By following these tips, you can effectively manage your unlisted videos and ensure they serve their purpose without clutter!
How to Upload an Unlisted YouTube Video from iPhone
Uploading an unlisted YouTube video from your iPhone is a straightforward process that allows you to share videos with a selected audience without making them public. An unlisted video can be viewed by anyone who has the link, but it won't appear in search results or on your YouTube channel. Here’s a step-by-step guide to help you through the process:
- Open the YouTube App: Launch the YouTube app on your iPhone. If you haven't already installed it, download it from the App Store.
- Sign In: Make sure you are signed in to your YouTube account. If you don't have an account, you will need to create one.
- Tap the Camera Icon: Locate the camera icon at the top of the screen. This is where you can start the upload process.
- Select Your Video: Choose the video you want to upload from your camera roll. You can also record a new video directly from the app.
- Add Details: Fill in the title, description, and any tags for your video. This helps viewers understand what your video is about.
- Set Privacy to Unlisted: Under the 'Visibility' section, select 'Unlisted'. This option ensures that only people with the link can view the video.
- Upload the Video: Once you have configured all the settings, tap 'Upload' to start the process. Wait for the video to finish uploading.
After the video is uploaded, you can share the link with anyone you want to give access to, and they can view it without needing to subscribe or find it in searches.
Conclusion: Uploading an unlisted YouTube video from your iPhone is easy and provides a great way to share content privately with a select group of people, ensuring that your videos remain accessible yet exclusive.