YouTube TV has quickly become a popular choice for cord-cutters looking to enjoy live television without the hassle of traditional cable. One of its standout features is its ability to record shows and movies for later viewing. This means you can catch up on your favorite content at your convenience, without worrying about missing out on live broadcasts. In this section, we'll explore the recording features YouTube TV offers, how they can enhance your viewing experience, and why they're worth taking advantage of.
With YouTube TV, you get:
- Unlimited Cloud DVR Storage: Record as many shows as you want, with no storage limits. Your recordings are stored in the cloud, so you can access them from any compatible device.
- 9-Month Retention: Once recorded, your content is available for up to nine months. This gives you plenty of time to catch up on anything you may have missed.
- Easy Access to Recordings: Your recorded shows are easily accessible through the "Library" tab, making it simple to find what you want to watch.
- Record Entire Series: You can set up recordings for entire series with just a click, ensuring you never miss an episode.
- Skip Ads: For most recorded content, you have the option to skip ads, allowing for a more enjoyable viewing experience.
Overall, YouTube TV's recording features make it a fantastic option for those who want control over their viewing schedule. Whether you’re a sports fan, a binge-watcher, or just someone who wants to catch up on the latest episodes, YouTube TV has got you covered!
Setting Up Your YouTube TV Account
Getting started with YouTube TV is a breeze! Setting up your account is the first step to enjoying all those fantastic recording features we just discussed. Let's walk through the process step-by-step, so you can quickly dive into your favorite shows.
Here’s how to set up your YouTube TV account:
- Visit the YouTube TV Website: Go to the YouTube TV website or download the YouTube TV app from the App Store or Google Play.
- Click on “Try it Free”: YouTube TV typically offers a free trial for new users. Click on the “Try it Free” button to begin your sign-up process.
- Create a Google Account: If you don’t already have a Google account, you’ll need to create one. If you have one, just sign in to get started.
- Choose Your Subscription Plan: YouTube TV usually offers a single subscription plan that includes access to a variety of channels. Review the channels included in the plan and click “Next.”
- Enter Your Payment Information: To start your trial, you’ll need to provide payment details. Don’t worry; you won’t be charged until your free trial ends.
- Select Your Local Channels: Based on your location, YouTube TV will provide a list of local channels available for you. Choose any additional channels you’d like to add to your lineup.
- Complete Your Setup: Review your selections, agree to the terms of service, and click “Submit” to finalize your account setup.
Congratulations! You’ve now set up your YouTube TV account. You can start exploring the available channels, record your favorite shows, and enjoy all the content you love. Happy watching!
Also Read This: How to Download Videos from the Internet Tips for Downloading Content on Dailymotion
Navigating the YouTube TV Interface
Getting accustomed to the YouTube TV interface is your first step in mastering the recording process. The design is user-friendly, but let’s break it down so you can navigate it like a pro!
When you first log in, you'll be greeted by the home screen, which features several sections:
- Live TV: This section shows what’s currently airing across all channels. You can scroll through and see live programming options.
- Library: Here, you’ll find all your recorded programs, as well as those you've saved for later.
- Home: This is your personalized space where YouTube TV suggests shows and movies based on your viewing habits.
- Search: A handy tool where you can type in the name of any show or movie to find it quickly.
- Settings: This is where you can manage your account, adjust preferences, and check your subscription status.
To get to the recording features, you'll primarily be using the Library and the Live TV sections. To make your experience even smoother, familiarize yourself with the remote or the app's controls. Don't hesitate to explore; the more you poke around, the more comfortable you’ll become!
Also Read This: Creating a Facebook ID Without Using Phone Numbers on Dailymotion
How to Find and Select Programs to Record
Now that you’re familiar with the interface, it’s time to dive into how to find and select programs you want to record. The process is straightforward and only takes a few clicks!
Here’s how to go about it:
- Use the Search Feature: If you have a specific show in mind, just click on the magnifying glass icon and type in the show’s name. The search results will display relevant programs.
- Browse Through Live TV: If you're in the mood to discover something new, head over to the Live TV section. Scroll through the channels and see what’s playing right now.
- Check the Guide: You can also access the guide to see a full schedule of upcoming programs. This can be particularly useful if you want to plan your recordings in advance.
Once you find a program you want to record, follow these steps:
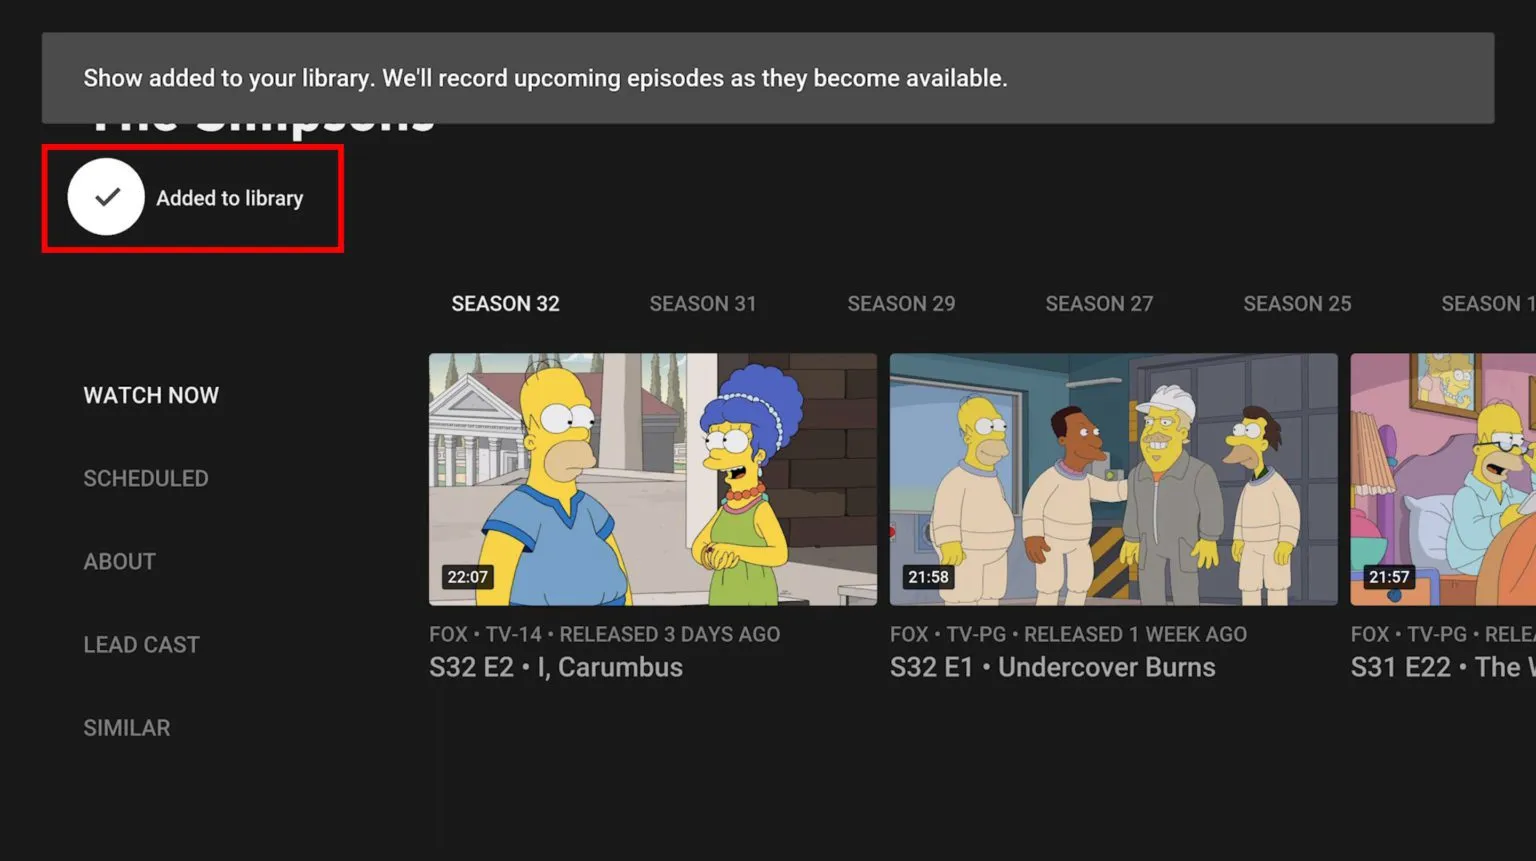
- Select the program by clicking on it.
- Look for the “Record” button (usually represented by a red dot).
- Choose whether you want to record just that episode or all episodes of the series.
- Confirm your selection, and voilà! The program is now set to record.
And that’s it! You’re now ready to enjoy your favorite shows anytime, even if you can’t watch them live.
Also Read This: Understanding the Super Rumble Trend on Instagram Stories
5. Managing Your Recordings
Once you've started recording your favorite shows on YouTube TV, it’s essential to know how to manage those recordings effectively. YouTube TV offers a user-friendly interface that makes it easy to find, organize, and delete your recordings. Let’s break down how to navigate this feature!
First, to access your recordings, simply click on the “Library” tab located at the bottom of your screen. This is your central hub for all recorded content. Here’s what you can do:
- View Your Recordings: All your recordings will be listed in chronological order. You can see the show title, episode details, and the date it was recorded.
- Watch Your Recordings: Just click on the title of the show you want to watch, and it will start playing. Easy peasy!
- Delete Recordings: If you want to free up some space, simply choose the recording you wish to delete, click on the three dots (more options), and select “Remove.” It’s as simple as that!
- Sort and Filter: You can sort your recordings by date or title, making it easier to find that specific episode you’re looking for.
One exciting feature of YouTube TV is the unlimited cloud DVR storage, which means you can record as many shows as you want without worrying about running out of space. However, remember that recordings are kept for nine months, so be sure to watch them before they expire!
Also Read This: How Long Does It Take Shutterstock to Approve Your ID and Start Selling
6. Troubleshooting Common Recording Issues
So, you've set up your recordings on YouTube TV, but what happens if something goes wrong? Don’t worry! There are some common issues that can pop up, and most of the time, they’re easy to fix. Let’s dive into some of these problems and how to troubleshoot them.
- Recording Not Starting: If your recording doesn’t start as scheduled, check to make sure that you have the correct time zone set in your account settings. Sometimes, scheduling conflicts can also occur, so ensure that no other recordings are overlapping.
- Missing Recordings: If you can’t find a recording that you know you scheduled, it’s possible it was cancelled or didn’t get recorded due to a technical glitch. Check your Library for any alerts or error messages.
- Poor Quality Recordings: If you notice that the quality of your recordings isn't up to par, try adjusting your streaming quality settings. Poor internet connection can also affect the recording quality, so ensure you’re connected to a stable network.
- Storage Issues: Although YouTube TV offers unlimited storage, you may run into issues if you have too many recordings nearing the nine-month expiration. Regularly check your Library to delete older recordings you no longer wish to keep.
Most of these problems can be resolved quickly, but if you’re still having trouble, don’t hesitate to reach out to YouTube TV’s customer support. They’re there to help you enjoy your viewing experience without a hitch!
How to Record Programs on YouTube TV - A Beginner's Step-by-Step Guide
YouTube TV offers a convenient and user-friendly way to watch live television, capturing the essence of traditional cable but with the flexibility of streaming. One of its standout features is the ability to record programs for later viewing. In this guide, we will walk you through the process of recording programs on YouTube TV, ensuring that you don’t miss your favorite shows, movies, or sports events.
Getting Started with YouTube TV
Before you can start recording, ensure that you have a subscription to YouTube TV. Here’s how to set up your account:
- Visit the YouTube TV website or download the app.
- Sign in with your Google account or create a new one.
- Select a subscription plan that fits your needs.
How to Record a Program
Once you have your account set up, follow these steps to record a program:
- Navigate to the program you want to record.
- Click on the program title to open its details.
- Select the “+” icon or the “Record” button.
- Choose to record the entire series or just that episode.
Managing Your Recordings
You can easily manage your recordings by following these steps:
- Go to the Library section of the app.
- Select Recordings to view all saved content.
- You can delete recordings by clicking on the trash icon.
Storage Capacity
YouTube TV offers unlimited cloud DVR storage, allowing you to record as many programs as you want. However, keep in mind:
- Recordings are saved for up to 9 months.
- After 9 months, recordings will automatically delete unless you renew them.
Conclusion
Recording programs on YouTube TV is a straightforward process that enhances your viewing experience. With its unlimited cloud DVR feature, you can capture all your favorite content and watch it at your convenience.
Additional Resources
For more information, check out: