Exporting your video from iMovie to YouTube is a seamless process that opens up your creative work to a broader audience. Whether you're sharing a memorable family event, a tutorial, or your latest travel adventures, getting your content online can be both exciting and rewarding. In this guide, we'll walk you through the steps to ensure your videos look great and reach viewers on YouTube without any hiccups.
Step-by-Step Guide to Exporting Your Video
Exporting your iMovie project to YouTube is straightforward. Just follow these simple steps:
- Finish Editing Your Video: Before exporting, make sure your video is polished. Check for any edits, transitions, and sound adjustments to ensure everything flows perfectly.
- Open the Share Menu: Click on the Share button located in the upper-right corner of the iMovie window. This is where you'll find all your export options.
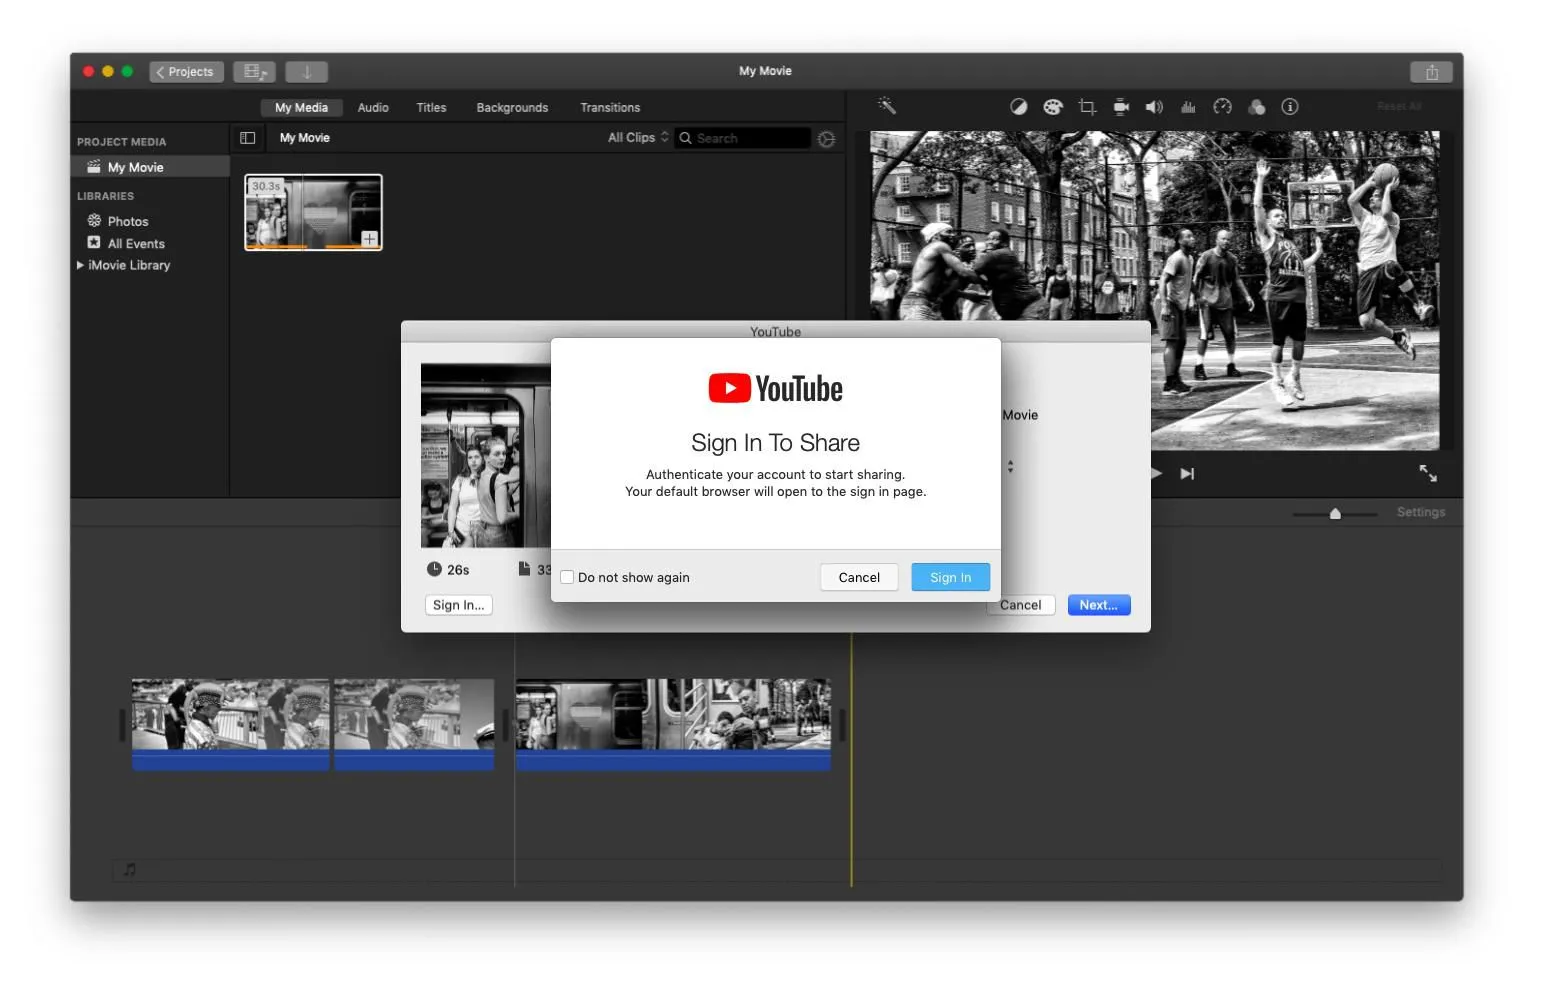
- Select YouTube: From the drop-down menu, choose the YouTube option. If it doesn't appear, make sure you have an active internet connection.
- Sign In to Your YouTube Account: If prompted, log in to your YouTube account. This step is crucial, as it allows iMovie to connect directly to your channel.
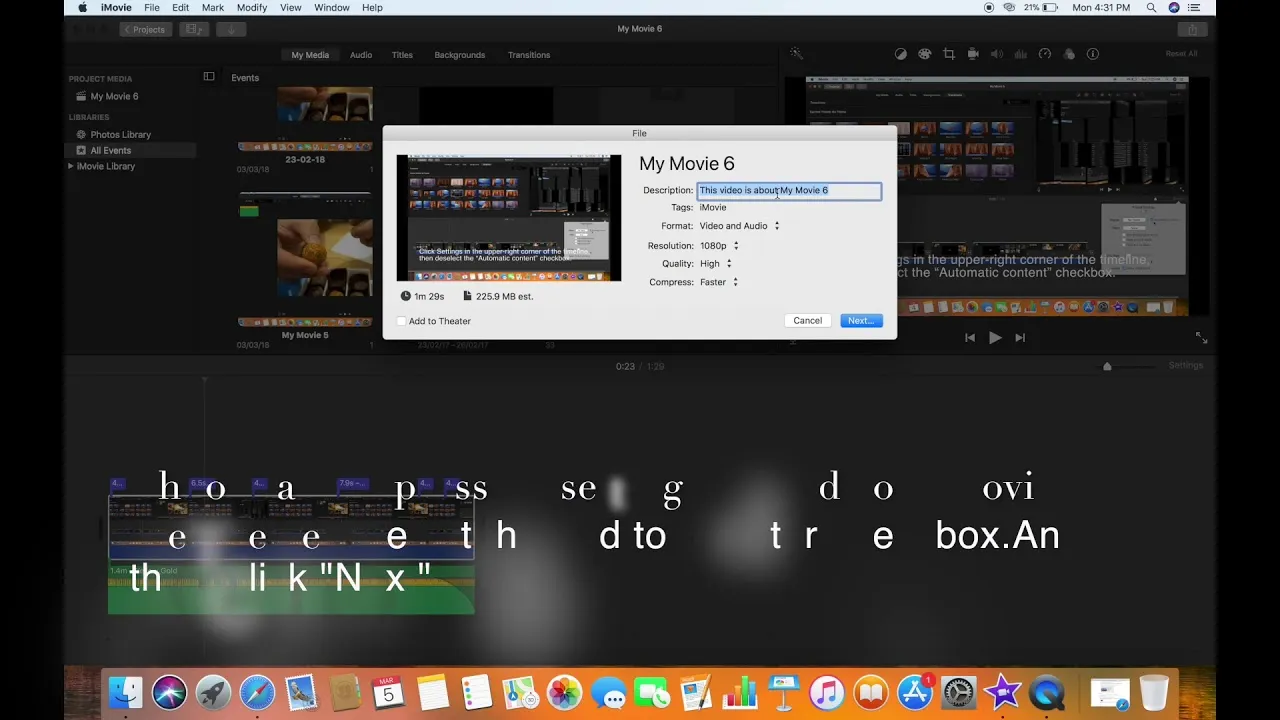
- Set Video Details: A window will pop up where you can set the following:
- Title: Give your video an engaging title.
- Description: Write a brief description to inform viewers about your video.
- Tags: Add relevant tags to help your video get discovered.
- Privacy Settings: Choose whether your video will be public, unlisted, or private.
- Choose Video Quality: Select the desired resolution (720p, 1080p, etc.) based on your needs and internet bandwidth.
- Export Your Video: Finally, click the Next button. iMovie will process your video and upload it to YouTube. This may take some time depending on the size of your file and your internet speed.
- Check Your YouTube Channel: Once the upload is complete, visit your YouTube channel to verify that your video appears as expected.
And there you have it! Your video is now live on YouTube, ready for the world to see. Happy sharing!
Also Read This: How to Become a YouTuber as a Kid with Tips and Advice for Young Creators
Choosing the Right Settings for YouTube
When you're ready to export your video from iMovie to YouTube, selecting the right settings is crucial for ensuring your video looks its best. You want your hard work to shine, right? Here’s how to navigate through the settings:
- Resolution: Aim for 1080p (Full HD) or 4K if your footage allows it. This gives you crisp visuals and keeps your audience engaged.
- Quality: Choose “High Quality” to optimize the video’s appearance. This setting balances file size and visual fidelity, which is ideal for YouTube.
- Compression: The export settings in iMovie automatically handle compression, but remember that a lower compression ratio generally results in better quality.
- Frame Rate: Stick to 30 fps or 60 fps, depending on your original footage. This helps maintain the smoothness of your video.
To access these settings, go to the “File” menu, select “Share,” and then “File.” From there, you can adjust the settings based on your content and audience needs. Remember, what works for one video might not work for another, so always consider your specific goals!
Also Read This: Boosting Your Foap Profile: Adding Tags and Descriptions
Uploading Your Video to YouTube
Once you've exported your iMovie project with the right settings, it's time to share it with the world by uploading it to YouTube. Let’s dive into the steps:
- Sign in to YouTube: Make sure you're logged into your YouTube account. If you don’t have one, creating an account is quick and easy.
- Click on the Upload Button: Look for the camera icon with a "+" sign at the top right corner of the YouTube homepage. This will lead you to the upload page.
- Select Your Video: Click on “Upload Video,” then drag and drop your exported file or click “Select Files” to browse your computer.
- Add Details: Fill in your video title, description, and tags. Make it engaging! A catchy title and a well-thought-out description can draw viewers in.
- Choose a Thumbnail: Upload a custom thumbnail or select one from the video. Thumbnails are the first impression, so choose wisely!
- Video Settings: Set your visibility to Public, Unlisted, or Private, depending on your preference.
- Publish: Once everything looks good, hit the “Publish” button, and voilà, your video is live!
Don’t forget to share your new video on social media to reach a wider audience. Happy uploading!
Also Read This: Where to Stream the Royal Rumble 2024
Troubleshooting Common Export Issues
Exporting your iMovie project to YouTube should be a smooth process, but sometimes, hiccups happen. Here are some common issues and effective solutions to get your video uploaded without a hitch:
- Slow export speed: If your export is taking longer than expected, check the following:
- Make sure your Mac has sufficient storage space.
- Close any other applications that might be using system resources.
- Consider reducing the resolution of your video for faster processing.
- Video quality issues: If the exported video quality isn't what you expected, try adjusting these settings:
- Go to the export settings and select a higher resolution, like 1080p or 4K.
- Ensure you’re using the right codec. H.264 is popular for high-quality video.
- Error messages during export: Encountering an error message can be frustrating. Here’s what you can do:
- Restart iMovie and try exporting again.
- Ensure that your macOS and iMovie are updated to the latest versions.
- If the issue persists, consider creating a new project and importing the clips again.
By being aware of these common issues and how to address them, you can streamline your export process and get your content on YouTube without undue stress!
Conclusion
In conclusion, exporting your masterpiece from iMovie to YouTube is an exciting step in sharing your creativity with the world. With the right knowledge and a few simple clicks, you can ensure your video reaches your audience in the best possible quality. Here's a quick rundown of what we've covered:
- Understanding the iMovie export settings.
- Choosing the right video format and resolution for YouTube.
- Troubleshooting common export issues that may arise.
Remember, practice makes perfect. Don’t be afraid to experiment with different settings and formats. And most importantly, enjoy the process! Once you’ve exported your video, share it with your friends and family, and watch as your hard work comes to life online. Happy exporting!