In today’s digital age, streaming platforms like YouTube have become essential for entertainment, education, and more. YouTube often offers trial periods for its premium services, allowing users to explore additional features without paying upfront. However, you might find yourself wanting to cancel the trial before it converts into a paid subscription. The great news is that you can do this without losing any of your data or preferences. Let’s dive into what
Understanding YouTube Trials
YouTube trials are promotional offers that allow users to experience YouTube Premium,
- Ad-Free Viewing: Enjoy uninterrupted videos without pesky ads.
- Background Play: Listen to your favorite music or content while using other apps.
- Offline Access: Download videos for offline viewing, perfect for travel or areas with poor connectivity.
- YouTube Originals: Access to exclusive shows and movies produced by YouTube.
To start a trial, users typically need to provide payment information, even though they won’t be charged until the trial period ends. This can sometimes lead to confusion. If you forget to cancel your trial, you might be automatically enrolled in a paid subscription, resulting in unexpected charges.
Cancelling a YouTube trial is straightforward, but understanding the terms and conditions is crucial. It’s essential to note that while the trial period is active, any preferences, watch history, and playlists you create will be preserved even after cancellation. This means you can return to your account later without losing any of your personalized content.
In summary, YouTube trials offer a risk-free way to explore premium features, but managing them effectively ensures you don’t incur unnecessary charges while keeping your data intact.
Also Read This: Embed YouTube Videos in Canva for Creative Projects
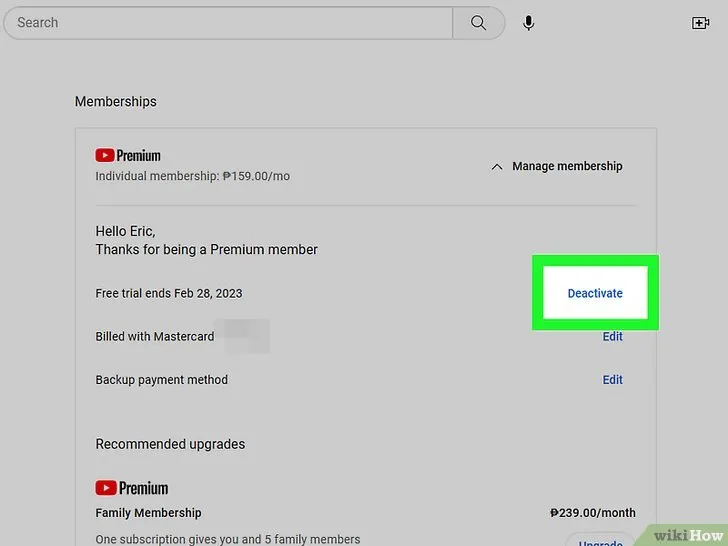
3. Step-by-Step Guide to Canceling Your YouTube Trial
Canceling your YouTube trial is a straightforward process, and I’m here to walk you through it step by step. Whether you're using a computer or a mobile device, you'll find the instructions easy to follow. So, let’s dive right in!
For Desktop Users:
- Open YouTube: Go to the YouTube website and log into your account if you aren’t already.
- Access Your Account Settings: Click on your profile picture in the top right corner and select “Settings” from the dropdown menu.
- Navigate to Purchases and Memberships: On the left-hand side menu, find and click on “Purchases and memberships.”
- Manage Your Membership: You’ll see your YouTube Premium trial listed here. Click on “Manage membership.”
- Cancel Your Trial: Click on “Cancel membership.” Follow the prompts to confirm your cancellation.
For Mobile Users:
- Open the YouTube App: Launch the YouTube app on your device and ensure you’re logged into your account.
- Go to Your Profile: Tap on your profile icon in the top right corner and select “Settings.”
- Find Memberships: Scroll down and tap on “Memberships.”
- Cancel Membership: Tap on “Cancel membership” and follow the on-screen instructions to finalize the cancellation.
And that’s it! You’ve successfully canceled your YouTube trial without any hassle!
Also Read This: Complete Guide to Uploading Videos on Dailymotion
4. Backing Up Your Data Before Cancellation
Before you hit that cancel button, it’s crucial to back up any data or content you don’t want to lose. YouTube may delete your watch history, liked videos, and playlists once your trial ends. Here's how to ensure your favorites are safe:
1. Download Your Playlists: You can use third-party services like YouTube Playlist Downloader to save your playlists. Simply enter your playlist URL and download it in a convenient format.
2. Save Your Watch History: You might want to keep track of what you’ve watched. Take screenshots or use the YouTube History feature to view and save your history.
3. Save Liked Videos: Make a list of your liked videos or use the “Liked Videos” playlist to note down the titles.
4. Export Your Watch Later List: Similar to playlists, you can manually note the videos in your “Watch Later” list or export them using certain browser extensions.
Here’s a simple table summarizing what to back up:
| Data Type | Backup Method |
|---|---|
| Playlists | Download using third-party tools |
| Watch History | Take screenshots or export |
| Liked Videos | Manually list or note titles |
| Watch Later List | Manually list or use extensions |
By taking these steps, you can ensure that all your favorite content remains accessible even after canceling your YouTube trial. Happy backing up!
Also Read This: Mastering Nunchaku with Essential Techniques for Beginners
What Happens to Your Data After Cancellation
When you decide to cancel your YouTube trial, it's natural to wonder what happens to your data. Will you lose your playlists, watch history, and subscriptions? Let’s break it down:
1. *Playlists: Your playlists will remain intact. Even after cancellation, any playlists you’ve created will still be accessible. You can enjoy your favorite songs and videos without interruption.
2. Watch History: Your watch history is also preserved. This means that when you return to YouTube in the future, you’ll still see the videos you've watched, making it easier to pick up where you left off.
3. Subscriptions: All your subscriptions will be retained. Whether you follow your favorite creators or channels, these will not disappear after canceling your trial.
4. Uploaded Content: If you have uploaded videos, don’t worry! They will remain on your channel. You will still have access to your content, and viewers can continue to find your videos.
5. Account Settings*: Your account settings, preferences, and notifications will stay the same. You won’t have to redo any of your configurations.
In summary, canceling your YouTube trial won’t erase your data. Instead, it allows you to take a break while keeping everything safe and sound for future use.
Also Read This: How to Block YouTube Ads on Xbox
Tips to Retain Access to Your Content
Even after canceling your YouTube trial, you might want to ensure that you still have access to your content and favorites. Here are some handy tips to help you retain access:
- Bookmark Your Favorite Channels: Make a list of channels you frequently watch and bookmark them in your browser. This way, you can easily access them anytime.
- Download Videos: If there are specific videos you love, consider downloading them for offline viewing. Just make sure to check the copyright rules!
- Create Playlists: Organize your favorite videos into playlists. This helps keep your content organized and easy to find, even after cancellation.
- Use the YouTube App: Stay logged into the YouTube app on your mobile device. This keeps your settings and preferences handy, even without the premium features.
- Follow Creators on Social Media: Many YouTube creators also share their content on social media platforms. Following them can keep you updated on new uploads and exclusive content.
By following these tips, you can ensure that your YouTube experience remains enjoyable, even after canceling your trial. Remember, your content is just a click away!
How to Cancel a YouTube Trial Without Losing Data
YouTube offers various subscription services such as YouTube Premium and YouTube Music, allowing users to enjoy ad-free content, background play, and offline downloads. However, if you’ve decided that the subscription is not for you, it’s essential to know how to cancel your trial without losing any valuable data. Here’s a step-by-step guide to ensure you keep your playlists, watch history, and preferences intact.
Follow these steps to cancel your YouTube trial:
- Open YouTube: Launch the YouTube app on your device or visit the YouTube website.
- Sign In: Ensure you are logged into the account that holds the subscription.
- Access Your Account: Click on your profile picture at the top right corner of the screen.
- Go to Purchases and Memberships: Select "Purchases and memberships" from the dropdown menu.
- Manage Membership: In the membership section, click on the "Manage" button next to your trial subscription.
- Cancel Membership: Follow the prompts to cancel your trial. Make sure to choose options that confirm you want to keep your data.
Important Note: After cancellation, your trial will remain active until the end of the billing cycle, allowing you to enjoy the benefits until then.
By following these steps, you can successfully cancel your YouTube trial while preserving your data. Remember, the key is to access the right settings and confirm that you want to retain your account information.
Conclusion: Canceling your YouTube trial is straightforward, and by following the outlined steps, you can ensure that your data remains safe and accessible, without losing any of your favorite content or preferences.