In today's digital age, we often find ourselves captivated by the wealth of music available on platforms like YouTube. But what if you want to take your favorite tracks offline and create your own CD? Burning a CD from YouTube can be a fun and rewarding project, but it's essential to navigate the process carefully. In this guide, we’ll walk you through each step, ensuring you get the most out of your music collection while being mindful of legalities. So, let’s dive in!
Understanding Copyright and Legal Issues
Before you start burning CDs from YouTube, it's crucial to understand the legal landscape surrounding copyright. Here’s what you need to know:
- Copyright Basics: Copyright law protects the original works of creators, which includes music, videos, and other artistic expressions. This means that the artists have exclusive rights to reproduce, distribute, and display their work.
- Fair Use Doctrine: While some uses of copyrighted material can fall under 'fair use,' this is often limited to commentary, criticism, or educational purposes. Simply burning a CD for personal enjoyment typically does not qualify as fair use.
- YouTube's Terms of Service: YouTube’s policies prohibit the downloading of content without permission. This means that using third-party software to extract audio from videos can put you at odds with these terms.
- Public Domain and Creative Commons: Some content on YouTube is available under Creative Commons licenses or has entered the public domain. These tracks can be legally downloaded and burned onto CDs without issues, but you must confirm their licensing.
In summary, while the idea of burning a CD from YouTube might seem straightforward, it's essential to respect artists’ rights and understand the legal implications. Ignoring these can lead to potential copyright infringement issues, so always do your research before proceeding. Your best bet? Stick to legal sources and respect the hard work of creators!
Also Read This: Getting Started with ShootProof: A Comprehensive Setup Guide
5. Converting Audio Files to CD Format

Once you've extracted audio from YouTube, the next step is to convert those audio files into a format suitable for burning onto a CD. The most commonly used format for audio CDs is WAV, but you can also use MP3 or WMA formats depending on your preferences and the software you’re using. Here's how to get started with the conversion process:
- Choose Your Conversion Software: There are many tools available for converting audio files. Some popular options include:
- Audacity (Free)
- Freemake Audio Converter (Free)
- VLC Media Player (Free)
- AnyBurn (Free)
Once you’ve decided on a converter, follow these simple steps:
- Install the Software: Download and install the software on your computer.
- Load Your Audio Files: Open the converter and import the audio files you extracted from YouTube. Most programs allow you to drag and drop files directly.
- Select Output Format: Choose the CD format (WAV, MP3, etc.) that you want to convert the files to. If you’re planning to create a standard audio CD, WAV is usually the best choice.
- Start the Conversion: Click on the 'Convert' button and wait for the process to finish. The time taken will depend on the number of files and their sizes.
And just like that, your audio files are ready to be burned onto a CD!
Also Read This: How to Make the Perfect Sweet Potato Pie with YouTube Cooking Tutorials
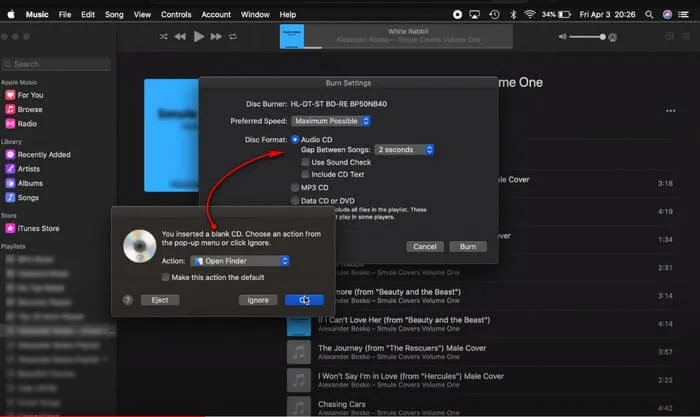
6. Burning the CD
Now that you have your audio files in the correct format, it’s time to burn them onto a CD. This might sound complicated, but trust me, it’s easier than it seems. Here’s a step-by-step guide to help you through the process:
- Gather Your Tools: You’ll need:
- A blank CD-R or CD-RW
- A CD burning software (like Nero, Windows Media Player, or ImgBurn)
- Your converted audio files
Follow these steps to burn your CD:
- Insert a Blank CD: Place your blank CD into the CD drive of your computer.
- Open Your CD Burning Software: Launch the software you've chosen for the burning process.
- Create a New Project: Select 'Audio CD' as your project type. This ensures compatibility with standard CD players.
- Add Your Audio Files: Import the audio files you converted earlier. You can usually drag and drop them into the project window.
- Arrange the Tracks: Organize the order of the tracks as you prefer. Most software allows you to simply click and drag to reorder them.
- Finalize the CD: Once you’re satisfied with the playlist, click on 'Burn' or 'Start.' The software will begin writing the files to the CD. This process may take a few minutes.
After burning, the software may give you the option to verify the burn for accuracy; it’s a good idea to do this. Once it’s done, you can safely eject the CD and enjoy your music!
Also Read This: Why Is YouTube Screen Small on TV and How to Fix Display Problems on Smart TVs
7. Testing Your CD
Once you've burned your CD, it's crucial to test it to ensure everything went smoothly. Nobody wants to go through the effort of creating a CD only to find out it didn’t work when they try to play it. Here’s how you can effectively test your CD:
- Insert the CD: Start by placing the CD into your computer's CD drive or a standalone CD player.
- Check for recognition: Make sure your device recognizes the CD. If it doesn’t, there might have been an issue during the burning process.
- Play the CD: If the CD is recognized, proceed to play it. Listen for any skips or interruptions. If everything sounds clear, you’re in good shape!
- Test on multiple devices: Try playing the CD on different CD players or devices to ensure compatibility. Sometimes, a CD may work on one player but not on another.
If you encounter any issues, don’t panic. It could be due to a few common problems:
- Burn speed was too high.
- Incompatible CD format.
- Scratches or fingerprints on the CD.
In such cases, consider re-burning the CD with adjusted settings. It’s all part of the process, so don’t lose heart!
8. Conclusion
Burning a CD from YouTube is not just a fun project; it’s a fantastic way to curate your favorite music, podcasts, or any audio you love. By following the steps we’ve discussed, you can enjoy your favorite content offline, whether you’re driving, working out, or simply relaxing at home.
Remember, the key steps include:
- Choosing the right software for downloading and burning.
- Ensuring you have the appropriate type of CD.
- Following the burning instructions carefully.
- Testing your CD to confirm it works correctly.
With a little patience and practice, you’ll become a pro at creating your custom CDs. Plus, there’s something undeniably nostalgic about flipping through physical CDs, right? So go ahead, start burning those CDs, and enjoy your personalized audio collection!