Before you hit that upload button on YouTube, it's essential to prepare your video properly. The preparation phase can make a significant difference in your video’s performance and viewer engagement. Here are some key steps to ensure your video is ready:
- Editing: Edit your video to remove any unnecessary parts. Aim for a polished final product by adding effects, transitions, and background music as needed. Use software like Adobe Premiere Pro, Final Cut Pro, or even free options like DaVinci Resolve.
- Choosing the Right Format: YouTube recommends using MP4, MOV, or AVI file formats. Each has its benefits, but MP4 is often preferred for its balance of quality and file size.
- Resolution and Aspect Ratio: Aim for HD quality (at least 1080p). The standard aspect ratio for YouTube is 16:9. Keeping this in mind ensures your video displays well on various devices.
- Creating Thumbnails: Thumbnails are the first thing viewers see, so make sure to design an eye-catching one. Ideally, your thumbnail should be 1280x720 pixels for optimal clarity.
- Adding Metadata: This includes a title, description, and relevant tags. Make sure your title is engaging and keyword-rich to improve searchability. The description should offer a summary of your video and contain relevant links or calls to action.
By giving attention to these details during the preparation phase, you're setting yourself up for a smoother upload and better viewer retention once your video goes live!
The Upload Process Explained

Now, let's break down the actual upload process on YouTube. This part is where you finally get your video out to the world! The upload itself is quite straightforward. Here’s how it typically unfolds:
- Sign In to Your Account: Before you can upload, ensure you’re logged into your YouTube account. If you don’t have one, it’s a quick and free process to create your channel.
- Click the Upload Button: Once signed in, click the camera icon with a "+" sign, usually found at the top right of the YouTube homepage.
- Select Your Video: You can drag and drop your video file or browse your computer to select the video you want to upload. Ensure that your file adheres to YouTube's limits (up to 256GB or 12 hours in length).
- Fill Out Video Details: As the video uploads, you’ll be prompted to provide the title, description, and tags. You can also choose a thumbnail during this stage.
- Choose Your Visibility Settings: Decide whether you want your video to be public, unlisted, or private. Public videos can be seen by anyone, while unlisted videos are only accessible via direct link. Private videos are restricted to selected individuals.
- Final Review and Publish: Once everything looks good, click the 'Publish' button. At this point, you can share your video link to social media or your website!
The upload process might take a few minutes depending on your internet speed and video size. After publishing, keep an eye on your analytics to see how viewers engage with your content!
Also Read This: Expert Services Offered by Fortiguard Downloader
5. Video Processing Time
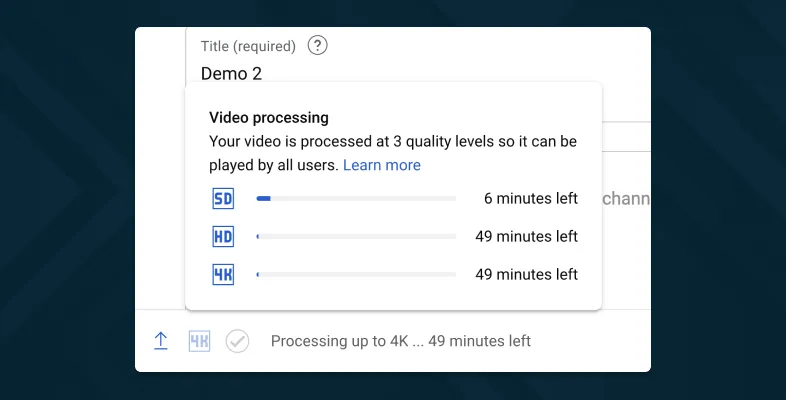
Uploading a video to YouTube is only half the battle; the real journey begins during the video processing phase. Once you hit that “upload” button, the platform begins converting your video into a form it can serve to viewers. But how long does this take? The answer isn't set in stone—it depends on various factors.
Here are some elements that impact video processing time:
- Video Length: Longer videos naturally take more time to process. A 10-minute video could finish processing quicker than a 60-minute documentary.
- Video Quality: Higher resolution videos (like 4K) require more processing power and time compared to standard HD formats.
- File Size: Larger files take longer to upload and process. So, if you're working with huge video files, patience is key!
- Current Load on YouTube Servers: If thousands of users are uploading videos simultaneously, it could slow down the processing time due to server traffic.
In general, most videos process in a matter of minutes, but it can take up to an hour or more for particularly large or high-quality videos. It’s always a good idea to keep an eye on the progress bar and maybe grab a snack while you wait!
Also Read This: Is SEC Available on YouTube TV?
6. Common Issues That Delay Uploads
While uploading videos to YouTube is usually a smooth experience, there are times when things don't go as planned. Here are some common issues that may delay your uploads:
- Internet Connection: A slow or unstable internet connection can significantly delay uploads. Make sure you have a strong Wi-Fi signal or a reliable wired connection.
- File Format Issues: YouTube supports various formats, but if your video file isn’t compatible, it can cause an upload failure. Always check for the accepted formats!
- Browser Problems: Sometimes, the browser you're using might cause hiccups in the upload process. Switching to a different browser can often resolve these issues.
- Account Restrictions: If your account has any strikes or restrictions, it may limit your ability to upload videos. Keep your account in good standing!
- Upload Limits: Though most accounts can upload a standard limit, there are caps on certain accounts based on their verification status. Verify your account for more flexibility!
If you encounter any of these issues, don’t panic! Most of them are easily fixable with a little patience and troubleshooting. Always check YouTube’s help resources for the latest tips and tricks!
Also Read This: The Best Ways to Buy Single Images from Shutterstock
7. Tips for Faster Uploads
Uploading videos to YouTube can sometimes feel like a waiting game, especially if you're eager to share your content with the world. To speed up the process and minimize those impatient moments, here are some handy tips you can consider:
- Optimize Your Video File: Before you hit that upload button, ensure your video file is optimized. Use formats like MP4, which offer a good balance of quality and file size. Keep the resolution as low as possible without sacrificing too much quality.
- Fast Internet Connection: Having a reliable and fast internet connection is crucial. Consider upgrading your plan or using a wired connection instead of Wi-Fi if possible. The faster your upload speed, the quicker your video will be on YouTube.
- Upload During Off-Peak Hours: Try uploading your videos during non-peak hours, usually late at night or early in the morning. Less internet traffic means faster upload times!
- Clear Your Cache: Before uploading, clear your browser’s cache. This can sometimes remove sudden slowdowns due to excessive cache buildup, helping the process to run more smoothly.
- Use YouTube's Upload Features: Take advantage of YouTube's upload features. For instance, use the "Scheduled Upload" option to set a time for your video to go live after it's been uploaded, allowing you to complete the upload process without worrying about the publishing time.
By following these tips, you can speed up your YouTube upload process and dive into the exciting world of video sharing with less waiting!
Also Read This: A New Way Out AMV – How Lemon Demon Captivated YouTube Fans
8. Post-Upload: What to Expect
Once you’ve successfully uploaded your video to YouTube, there’s much more to look forward to than just waiting for views. Here’s a glimpse of what happens post-upload and what to expect:
- Processing Time: After your video uploads, YouTube takes some time to process it. This can vary from a few minutes to several hours depending on the video size and format. Be patient, as your video might initially appear as “Processing” in your dashboard.
- Thumbnail Selection: YouTube will automatically generate thumbnails for your video, but you can also upload a custom thumbnail. Creating an eye-catching thumbnail is crucial, as it’s often the first thing viewers notice.
- Description & Tags: After uploading, take time to craft an engaging description and relevant tags. This helps with discoverability, meaning more potential viewers can find your content!
- Promotion: Once your video is live, promote it across social media platforms, or email newsletters. Engaging with your audience can also bring in more views and subscriptions.
- Engagement Metrics: Keep an eye on your video’s analytics post-upload. This includes watch time, likes, comments, and shares. Review this data to understand what content resonates with your audience and optimize future uploads.
Overall, while uploading your video is just the beginning, understanding and embracing the post-upload phase can significantly influence your success on YouTube!
```html
How Long Does It Take to Upload a YouTube Video? A Complete Timeline
Uploading a YouTube video involves several stages, each of which contributes to the overall time it takes before your content is available for viewers. The timeline for uploading a video can vary significantly based on various factors, including video length, file size, and your internet speed. Below is a breakdown of the entire process.
Factors Affecting Upload Time
- File Size: Larger video files take longer to upload. Generally, video files can range from a few megabytes (MB) for short clips to several gigabytes (GB) for high-definition (HD) content.
- Internet Speed: The speed of your internet connection plays a crucial role in upload time. A faster upload speed (measured in Mbps) reduces the time required to transfer files.
- Video Length: Longer videos often result in larger file sizes, which can increase upload times.
- Video Quality: High-quality videos (e.g., 4K) have larger file sizes compared to lower resolutions (e.g., 480p), affecting upload duration.
- Encoding: The time taken to encode your video before uploading can also add to the overall preparation time.
Estimated Upload Times
| Video Length | File Size | Internet Speed (Upload) | Estimated Upload Time |
|---|---|---|---|
| 5 minutes | 100 MB | 10 Mbps | Approx. 1-2 minutes |
| 10 minutes | 300 MB | 10 Mbps | Approx. 3-6 minutes |
| 30 minutes | 1.5 GB | 10 Mbps | Approx. 15-25 minutes |
| 60 minutes | 3 GB | 10 Mbps | Approx. 30-50 minutes |
Understanding these variables can help you manage your expectations when uploading videos to YouTube. Remember that the total time will also include video processing on YouTube’s end, which may take additional minutes. Therefore, from start to finish, it’s wise to allocate sufficient time for the entire upload process.
Conclusion: Managing Your Expectations
In conclusion, uploading a YouTube video can take anywhere from a few minutes to an hour or more, depending on various factors such as file size, internet speed, and video length. By considering these elements, you can better plan your content release and set realistic expectations for your audience.
```