Recording audio from YouTube can be a game changer for content creators, educators, or anyone looking to utilize video content in a fresh way. Whether you're aiming to extract background music, narration, or sound effects, having the right tools and techniques is essential. This guide will walk you through effective methods to ensure high-quality audio capture that suits your needs.
Understanding YouTube Audio Recording
Before diving into the actual recording process, it’s important to understand the fundamental aspects of YouTube audio recording. This will help you choose the right tools and techniques for your specific needs. YouTube audio can range from music tracks to commentary, and capturing it correctly means considering a few key factors:
- Audio Quality: YouTube compresses audio files, which can affect sound fidelity. Aim for tools that maintain quality during extraction.
- Legal Considerations: Always ensure that you're aware of copyright laws. Many videos are protected, so you should either seek permission or use content labeled for reuse.
- Format Preferences: Decide what format you want your audio in (MP3, WAV, etc.) as this can affect your choice of tools.
- Usage Intent: Are you using the audio for personal projects, podcasts, or commercial purposes? This can determine the legality and the method you should employ.
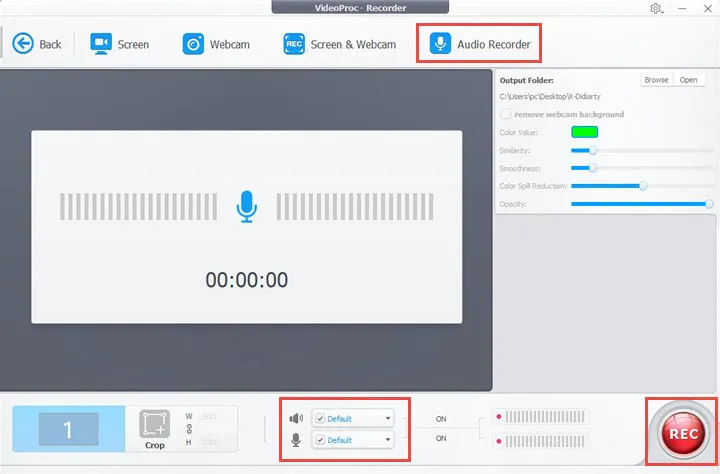
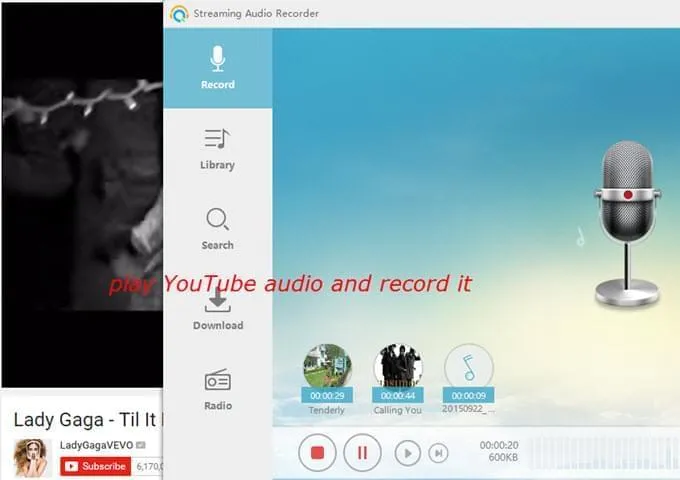
In terms of tools, there are numerous options available, ranging from software applications to online services. Each tool has its strengths, so it’s worth experimenting to find what suits you best. For instance, if you prefer a straightforward approach, applications like Audacity offer easy recording setups, while websites like YouTube Converter allow for quick online downloads.
In the next section, we’ll explore the various tools and techniques that will help you capture YouTube audio effectively.
Also Read This: Find Templates on Etsy Using Canva Templates Etsy
Essential Tools for Recording YouTube Audio
When diving into the world of YouTube, having the right tools can make all the difference in your audio quality. Let’s explore some essential tools that can help you achieve crisp, professional sound for your videos.
- Microphones:
- Dynamic Microphones: These are perfect for recording vocals, especially in noisy environments. The Shure SM58 is a popular choice.
- Condenser Microphones: Ideal for studio settings, they capture a wider frequency range. The Audio-Technica AT2020 is a favorite among YouTubers.
- Audio Interface: This device connects your microphone to your computer. The Focusrite Scarlett 2i2 is widely regarded for its quality and user-friendliness.
- Pop Filter: This accessory helps reduce plosive sounds (like ‘p’ and ‘b’), ensuring your audio remains clean. They’re inexpensive and can vastly improve sound quality.
- Headphones: A good pair of closed-back headphones, like the Audio-Technica ATH-M50x, allows you to monitor audio without feedback during recording.
- Recording Software: Software like Audacity (free) or Adobe Audition (paid) is essential for editing your audio tracks to perfection.
- Portable Recorder: For on-the-go recording, a device like the Zoom H1n is handy for capturing high-quality audio anywhere.
By investing in these tools, you can significantly enhance the quality of your YouTube audio, creating a more enjoyable experience for your viewers.
Also Read This: Editing Behance website guide
Step-by-Step Techniques for Recording
Now that you have your tools, let’s go through some practical steps to ensure your recording process runs smoothly. Each step is designed to help you capture the best audio possible.
- Choose Your Recording Space:
Find a quiet area with minimal echo. Soft furnishings like curtains and cushions can help absorb sound.
- Set Up Your Equipment:
Position your microphone correctly—about 6-12 inches from your mouth. Use a pop filter if you have one.
- Adjust Input Levels:
Before recording, test your audio levels. Ensure they’re not peaking into the red, which indicates distortion. Aim for a level around -12dB to -6dB.
- Record a Test Clip:
Always record a short test clip to check audio quality and make necessary adjustments before the final recording.
- Start Recording:
Once everything sounds good, hit record! Maintain a steady distance from the microphone and speak clearly.
- Edit Your Audio:
After recording, use your chosen software to edit out any mistakes or long pauses. You can also enhance the sound with equalization and compression.
- Export Your Final Audio:
Save your audio file in a suitable format (like WAV or MP3) and ensure it's compatible with your video editing software.
By following these steps, you can create high-quality audio recordings that will elevate your YouTube content and keep your audience engaged!
Also Read This: Understanding LinkedIn Connection Request Limits Per Week
5. Tips for High-Quality Audio Recording
When it comes to recording audio for your YouTube videos, quality is key! A crisp, clear sound can significantly enhance your content and keep your audience engaged. Here are some tips to help you achieve high-quality audio recordings:
- Choose the Right Microphone: Invest in a quality microphone that suits your recording needs. Options like condenser microphones are excellent for voiceovers, while dynamic mics work well for live recording.
- Control Your Environment: Find a quiet space to record, free from background noise. Consider using soundproofing techniques such as foam panels, carpets, or even hanging blankets to minimize echoes and disturbances.
- Use a Pop Filter: This simple tool helps eliminate plosive sounds (like 'p' and 'b' sounds) that can cause distortion in your recordings. It’s a small investment for a big improvement!
- Monitor Your Levels: Always check your audio levels while recording. Aim for levels that peak around -6dB to -3dB to avoid clipping and distortion.
- Consider Room Acoustics: Recording in a small, carpeted room can often yield better results than a large, empty space. Experiment with different areas until you find the best sound.
- Record in High Quality: Use the highest sample rate and bit depth your recording device allows to capture the most detail in your audio.
By following these tips, you'll be well on your way to creating professional-sounding audio for your YouTube videos!
Also Read This: Exploring Fun and Lighthearted Animated Content for Family Time on Dailymotion
6. Legal Considerations When Recording YouTube Audio
Recording audio for your YouTube content comes with its own set of legal considerations that you should be aware of to avoid potential pitfalls. Here’s a breakdown of the essential legal aspects:
- Copyright Issues: Ensure that any music, sound effects, or audio clips you use are either original, royalty-free, or have the proper licenses. Platforms like Epidemic Sound or AudioBlocks offer licensed tracks that can be safely used.
- Fair Use Doctrine: Familiarize yourself with the principles of fair use. This allows limited use of copyrighted material without permission under specific circumstances, but it can be tricky, so understanding the rules is crucial.
- Attribution Requirements: If you use Creative Commons audio, make sure to attribute the creator properly, as required by the license.
- Privacy Rights: If you’re recording interviews or conversations, obtain consent from all parties involved to avoid any legal complications.
- Trademark Considerations: Be cautious when mentioning brands or trademarks in your audio. Misuse can lead to legal challenges.
By keeping these legal considerations in mind, you can protect yourself and your content while creating amazing audio for your YouTube videos!
How to Record YouTube Audio with Effective Tools and Techniques
Recording YouTube audio can be an essential skill for content creators, educators, and anyone looking to share information in a more engaging way. With the right tools and techniques, you can capture high-quality audio that enhances your video content. Below are some effective methods and tools to help you get started.
Essential Tools for Recording YouTube Audio
To achieve the best results, consider using the following tools:
- Microphones:
- USB Microphone: Easy to use and plug-and-play.
- XLR Microphone: Requires an audio interface but provides superior quality.
- Audio Interface: Necessary for connecting XLR microphones to your computer.
- Recording Software:
- Audacity: A free, open-source audio editing software.
- Adobe Audition: A professional-grade audio editing tool (subscription-based).
- Headphones: To monitor your audio while recording.
Effective Techniques for Recording
Implement these techniques to improve your audio recordings:
- Choose a Quiet Environment: Minimize background noise by recording in a quiet room.
- Use Proper Mic Placement: Position the microphone 6-12 inches away from your mouth for optimal sound quality.
- Adjust Levels: Ensure your audio levels are not too high or too low to avoid distortion.
- Test Before Recording: Conduct a sound check to ensure everything is working correctly.
Tips for Post-Recording
| Action | Description |
|---|---|
| Editing | Remove unwanted noises and enhance the audio quality. |
| Export | Save your audio file in a suitable format (e.g., MP3, WAV). |
By following these tools and techniques, you can significantly improve the quality of your YouTube audio recordings, leading to a more professional and engaging viewer experience.
Conclusion: Mastering the art of recording YouTube audio requires the right tools and techniques; by investing in quality equipment and applying effective recording strategies, you can elevate your content and connect with your audience more effectively.