When you enter the realm of design, particularly using platforms such as Canva, you soon come to appreciate the significance of image sizes. Picture this after investing time crafting a beautiful design you discover that it appears blurry or distorted upon being shared on social media. That can be quite exasperating, right? While Canva allows for resizing and tweaking images understanding the fundamentals of width and height is essential to make your creations stand out.
Image size is typically measured in pixels (px) indicating the width and height of the picture. For example an image measuring 800 pixels in width and 600 pixels in height will have a different appearance compared to one that is sized at 1920 by 1080 pixels. Knowing these distinctions is important for crafting images that not only look appealing but also serve their intended purpose whether it's for a blog article a social media post or a promotional flyer.
Why Adjusting Width and Height Matters

Changing the size of your images goes beyond a necessity; it can have a significant impact on how your audience engages with your content. Let me share a tale from my own experience. When I began using Canva I used to pay little attention to image sizes. I recall sharing a well designed banner on my blog only to find out that it appeared strangely cropped on phones. This incident made me realize the significance of adjusting images correctly.
Here are some reasons why it is important to adjust the dimensions.
- Improved Aesthetics: Properly sized images enhance the overall look of your design.
- Better User Experience: Images that fit well on different screens ensure your audience has a pleasant viewing experience.
- Faster Load Times: Optimized images help your website load faster, which is essential for retaining visitors.
- Higher Engagement: Eye-catching visuals lead to better engagement on social media platforms.
When you’re working on something, whether it’s for yourself or for work, putting in the effort to tweak the dimensions can really impact the outcome.
Also Read This: How to Chromecast from Dailymotion for Seamless Streaming
How to Easily Change Image Dimensions in Canva
Resizing images in Canva is a breeze but getting it done correctly is crucial. Here’s my typical process for tackling this task.
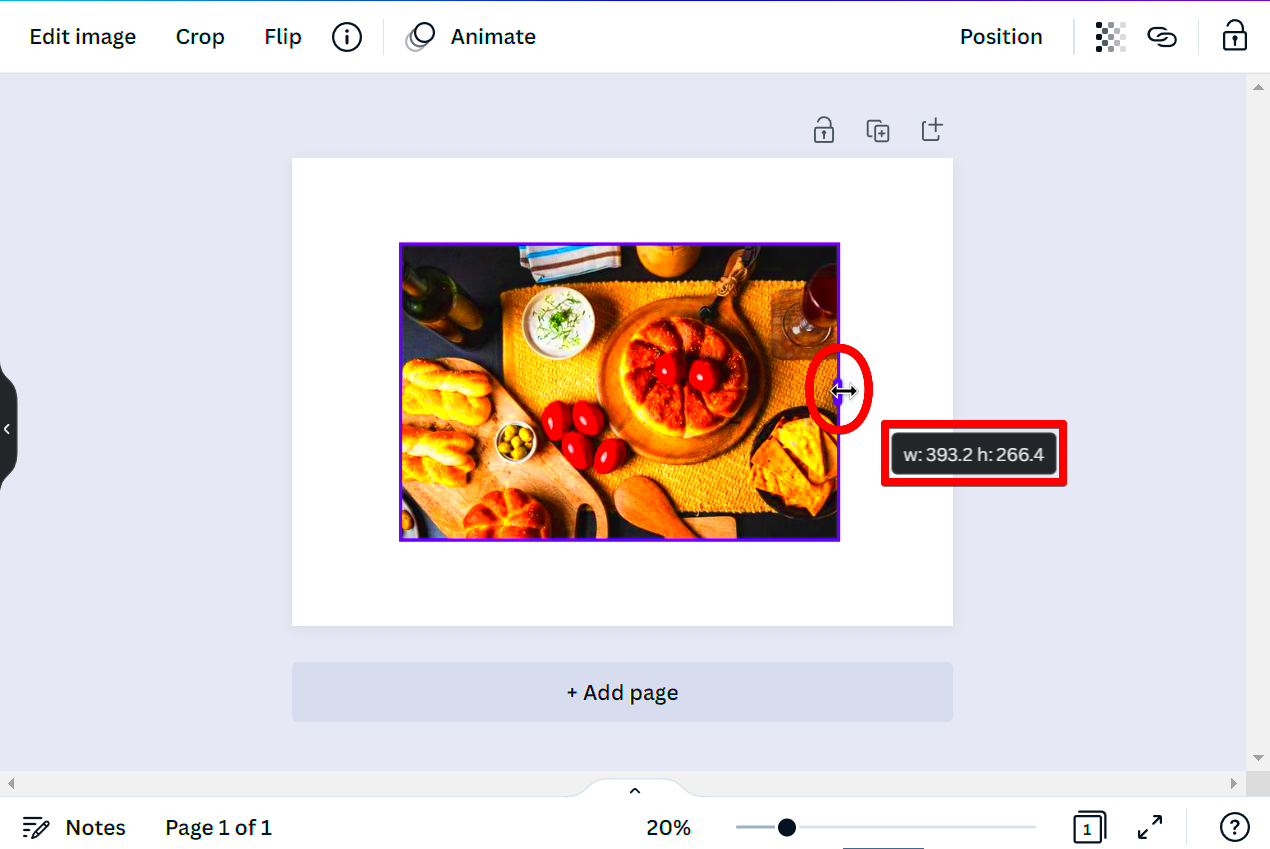
- Select Your Image: Start by clicking on the image you want to resize in your Canva project.
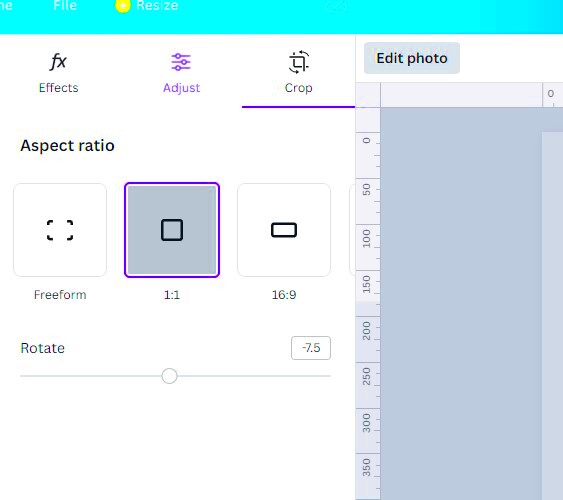
- Use the Resize Tool: At the top of the Canva interface, you’ll find the resize option. Clicking on it allows you to enter specific dimensions.
- Maintain Aspect Ratio: If you want to keep your image proportionate, make sure the “lock” icon is enabled. This prevents any distortion.
- Preview Your Changes: Always check how the resized image looks in the overall design before finalizing it. A quick preview can save you a lot of headaches!
- Download and Use: Once you’re satisfied, download your image in the desired format. Canva provides options like PNG, JPG, and PDF.
Resizing images is really easy and with some practice you'll get the hang of it in no time! Just keep in mind that spending a bit of time tweaking image sizes can greatly improve the overall quality of your projects.
Also Read This: Effective Ways to Reach Out to Recruiters on LinkedIn
Utilizing Canva’s Pre-set Dimensions
When I discovered Canva one aspect that really impressed me was the range of dimensions offered for different designs. This feature is a blessing for those of us who arent so great with numbers or measurements. Just picture this you can effortlessly whip up a Facebook post, an Instagram story or a YouTube thumbnail with a simple click! These pre set dimensions are not convenient but they also save you a chunk of time letting you concentrate on the creative side of things.
Canva provides a wide range of standard dimensions to ensure your designs are perfectly suited for various platforms. Here’s a brief summary of a few commonly used sizes.
| Platform | Dimensions (Width x Height) |
|---|---|
| Facebook Post | 940 x 788 px |
| Instagram Post | 1080 x 1080 px |
| YouTube Thumbnail | 1280 x 720 px |
| Twitter Header | 1500 x 500 px |
This functionality proves to be incredibly helpful when juggling tasks across different platforms. It also alleviates the stress of estimating sizes. I recall the sense of relief I experienced upon realizing that I could seamlessly transition between formats without having to begin anew. It deepened my appreciation for the consideration put into Canvajs design.
Also Read This: Is It Legal to Download Dailymotion Videos for Personal Use
Customizing Your Image Size for Different Platforms
In todays digital age a single picture can be shared on different platforms each having its own set of rules. Adjusting the size of your image to fit platforms is crucial for showcasing your work in its light. Its similar to choosing an outfit for an event you wouldnt show up to a wedding wearing pajamas would you?
When crafting posts for platforms it’s crucial to adjust your visuals to meet size requirements. This not boosts the aesthetic but also upholds a polished look. Here are a few tips for resizing your images.
- Know Your Platforms: Each platform has its own preferred dimensions. For instance, Instagram favors square images, while Facebook often uses landscape-oriented images.
- Use Canva’s Templates: Canva provides a variety of templates specifically designed for different platforms. This can save you a lot of hassle.
- Experiment and Adapt: Don’t hesitate to try different sizes and layouts. Sometimes, what works best is a result of trial and error.
- Prioritize Quality: Ensure your images are of high quality and don’t become pixelated when resized. Canva helps maintain image quality during resizing.
After dealing with the difficulties of adjusting images for different platforms, I can assure you that putting in the effort to tailor them to your audience's tastes really impacts how they view your brand or message.
Also Read This: How to Embed a YouTube Video in Canvas for Teachers and Students
Best Practices for Image Resizing
Resizing pictures may appear to be a simple job but there's an art to it that can elevate an average design to an exceptional one. After investing time tweaking sizes for various projects I've discovered some guidelines that have greatly improved my results. Lets explore these together!
When it comes to resizing your images here are some tips to keep in mind.
- Keep the Aspect Ratio: Always maintain the aspect ratio to prevent your image from looking stretched or squished. Canva has an option to lock the aspect ratio while resizing.
- Start with High-Resolution Images: It’s always better to start with high-resolution images. If you resize a low-quality image, it will only look worse.
- Preview Before Finalizing: Before downloading or publishing, preview your design. This allows you to spot any inconsistencies or issues that need addressing.
- Be Mindful of File Formats: Different platforms prefer different file formats. For instance, JPEGs are great for photos, while PNGs are better for graphics with transparency.
- Stay Organized: Keep track of your image sizes and formats in a document or spreadsheet. This can save time when creating similar content in the future.
By embracing these approaches, you can simplify your design workflow and enhance the overall quality of your end result. Keep in mind that every image you produce reflects your distinct flair and individuality, so be sure to make it worthwhile!
Also Read This: How Much Is Shutterstock Subscription
Common Challenges When Adjusting Sizes
When you venture into the realm of resizing images you may encounter some obstacles on your journey. I recall my experience when I attempted to resize an image for my blog. It felt like attempting to piece together a puzzle without having a clear vision of the end result. While adjusting image sizes may appear simple at first glance there are hurdles that can catch you off guard if you're not cautious.
Here are some hurdles you might encounter:
- Aspect Ratio Issues: Maintaining the correct aspect ratio can be tricky. If you’re not careful, you might end up with a stretched or squished image, which is never a good look!
- Pixelation: Resizing an image to a larger dimension can lead to pixelation, making it look blurry. Starting with a high-resolution image can mitigate this issue.
- Platform-Specific Dimensions: Each platform has its own ideal dimensions. Navigating these specifications can feel overwhelming, especially if you’re new to designing.
- File Format Confusion: Choosing the right file format is crucial. JPEGs, PNGs, and GIFs all have their pros and cons. Using the wrong format can compromise image quality.
- Finding the Right Balance: Sometimes, you may need to adjust an image to fit a specific space while retaining its impact. This balancing act can be challenging!
Even though there are obstacles along the way I have come to realize that with practice comes improvement. Each time I resize something it deepens my understanding of the subtleties involved and ultimately sharpens my design abilities. Keep in mind that every stumble is simply a stepping stone on the path to becoming a more skilled designer!
Also Read This: Assessing the Safety of Using 123RF for Your Creative Projects
Frequently Asked Questions
During my journey into the world of Canva and resizing images, I've come across numerous inquiries from fellow creators. It's intriguing to see how we tend to have worries. Let's take a moment to tackle some of the commonly asked questions to help clarify any uncertainties you may be facing.
- What is the best size for social media images?
Each platform has its own preferred sizes, but a common size for Instagram posts is 1080 x 1080 pixels, while Facebook posts typically are 940 x 788 pixels. - How do I maintain image quality when resizing?
Always start with a high-resolution image and use Canva’s resize tool to keep the aspect ratio locked. - Can I change the dimensions of an image after I’ve uploaded it?
Yes! You can easily resize any image after uploading it by selecting the image and using the resize options. - What formats should I use for different purposes?
For web images, JPEGs are often preferred for photos, while PNGs are better for graphics with transparency. - Is there a way to see the dimensions of my design?
Absolutely! Canva displays the dimensions at the top of the design interface, making it easy to keep track of your sizes.
Gaining a clear understanding of these aspects can boost your confidence as a creator. The better informed you are, the more self assured you'll become in your design process!
Wrapping Up on Canva Image Width and Height Adjustment
As we wrap up our deep dive into the world of Canva image tweaks I trust you’ve discovered useful perspectives and handy suggestions to enrich your creative path. Tweaking the dimensions may appear as a nuance but its influence on the perception of your visuals can be significant. Whenever I complete a project I take a moment to consider how these modifications have enhanced my work giving it a sleek and polished appearance.
Here are a few key takeaways to remember:
- Understand Dimensions: Knowing the basics of image dimensions is the first step towards creating stunning visuals.
- Use Pre-set Dimensions: Leverage Canva’s pre-defined sizes to save time and ensure your designs fit perfectly on various platforms.
- Customize for Each Platform: Tailor your images for different social media channels to maximize engagement.
- Practice Best Practices: Maintaining aspect ratios, using high-quality images, and choosing the right formats are essential for success.
Every designers path is distinct and every time you resize you’re not simply changing measurements; you’re shaping your artistic expression. So go ahead, explore new ideas and embrace the learning process. Remember that mistakes are merely stepping stones on your journey to honing your skills. Enjoy the design process!