
Shutterstock is a popular platform where photographers can sell their images. It connects creators with customers looking for high-quality visuals. As a contributor, you can earn money by uploading your photos, which buyers can license for various uses, including marketing and advertising. Let's explore some of the benefits of being a contributor on Shutterstock:
- Global Reach: Your photos can be seen by millions of potential buyers worldwide.
- Passive Income: Once your photos are uploaded, you can earn money whenever someone licenses them.
- Creative Freedom: You can upload images that reflect your unique style and interests.
- Community Support: Shutterstock offers resources and a community to help you succeed.
Preparing Your Photos for Upload
Before uploading your photos to Shutterstock, it's essential to prepare them properly. This ensures your images meet the platform's standards and increases your chances of sales. Here are some key steps to follow:
- Choose the Right Format: Save your images in JPEG format for optimal quality and compatibility.
- High Resolution: Ensure your photos have a minimum resolution of 4 MP to meet Shutterstock's requirements.
- Edit for Quality: Use photo editing software to enhance your images, adjusting brightness, contrast, and color balance.
- Remove Noise: Eliminate any unwanted noise or distractions in your images.
After preparing your photos, you can move on to the uploading process, knowing you’ve set yourself up for success.
Also Read This: Crafting an Origami Lion with Dailymotion Tutorials
Creating a Contributor Account on Shutterstock
To start uploading your photos, you need a contributor account on Shutterstock. The process is simple and quick. Here’s how to create your account:
- Visit the Shutterstock Contributor Page: Go to the Shutterstock website and navigate to the contributor section.
- Sign Up: Click on the "Join" or "Get Started" button to begin the registration process.
- Fill Out Your Information: Provide the required information, including your name, email address, and a password.
- Agree to Terms: Read and accept Shutterstock’s terms and conditions.
- Verify Your Email: Check your email for a verification message from Shutterstock and follow the instructions to confirm your account.
Once your account is set up, you’re ready to start uploading your photos and earning money!
Also Read This: How to Earn Money on Rumble and Turn Your Content into Revenue
Using the Shutterstock Uploader Tool
The Shutterstock Uploader Tool is your best friend when it comes to uploading photos efficiently. This web-based tool is designed to make the uploading process as smooth as possible. Here’s how to get started:
- Access the Uploader: Log into your Shutterstock contributor account and navigate to the uploader section.
- Drag and Drop: You can easily drag and drop your images into the upload window. This makes it quick to select multiple files at once.
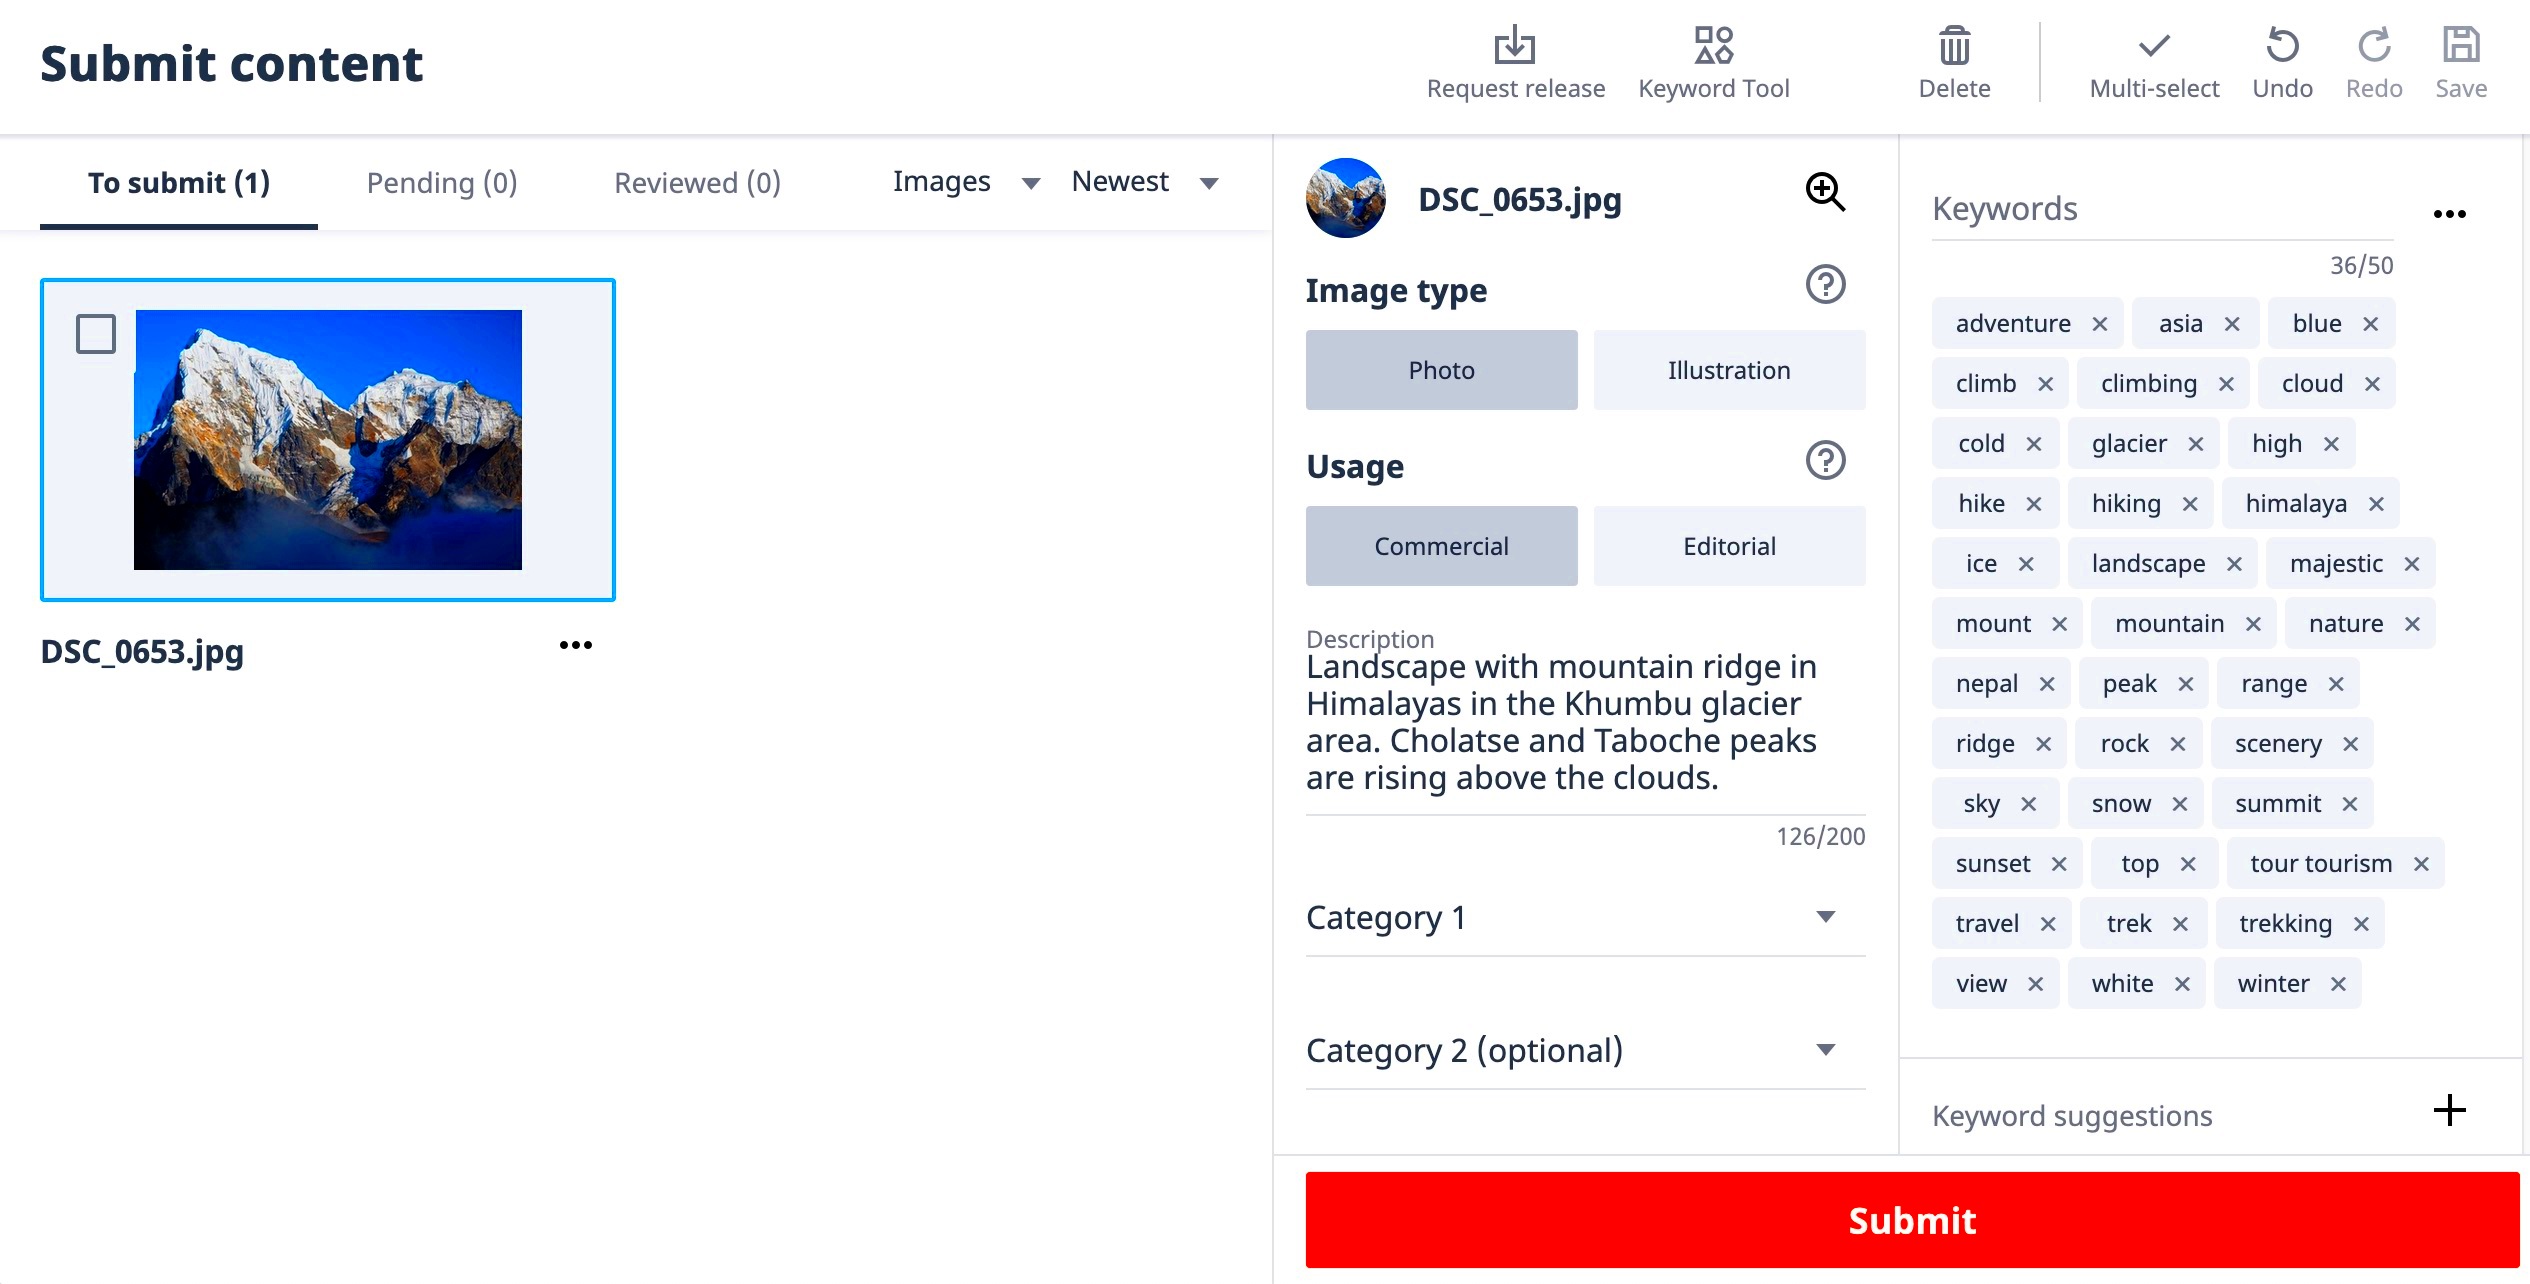
- Fill in the Details: For each photo, you'll need to provide information like titles, descriptions, and keywords. This helps buyers find your images.
- Submit for Review: After adding your details, click on the submit button. Your images will be sent for review before going live.
Using the Uploader Tool allows you to manage your uploads easily. Remember, quality and detail in your metadata can significantly affect your sales!
Also Read This: Stream A Silent Voice Free on YouTube
Uploading Photos via Mobile App
If you're on the go, the Shutterstock mobile app is a fantastic option for uploading your photos. It offers flexibility and convenience, allowing you to manage your contributions directly from your phone. Here’s how to upload using the app:
- Download the App: Install the Shutterstock Contributor app, available for both iOS and Android.
- Create an Account or Log In: Use your existing Shutterstock credentials or create a new account.
- Select Photos: Choose the images you want to upload from your phone’s gallery.
- Provide Metadata: Just like the web version, you’ll need to add titles, descriptions, and keywords for each photo.
- Submit for Review: Tap the upload button to send your photos for review.
The mobile app is perfect for capturing spontaneous moments and uploading them instantly, keeping your portfolio fresh and current.
Also Read This: Design Fake Plane Tickets with Canva Fake Plane Ticket Template
Tips for Optimizing Your Photos for Better Visibility
Optimizing your photos is crucial to enhance their visibility on Shutterstock. Here are some tips to help your images stand out:
- Use Relevant Keywords: Include keywords that accurately describe your images. Think about what potential buyers might search for.
- Write Engaging Descriptions: Provide clear and concise descriptions that tell a story about your image.
- Select the Right Categories: Choose categories that best fit your photos to improve discoverability.
- High-Quality Thumbnails: Ensure that your thumbnails are eye-catching, as they play a big role in attracting buyers.
- Stay Current with Trends: Keep an eye on current trends in photography to understand what types of images are in demand.
By following these tips, you can increase the chances of your photos being seen and, ultimately, sold!
Also Read This: Unveiling the Truth About the Royal Rumble and Its Scripted Nature
Common Uploading Issues and How to Fix Them
Uploading photos to Shutterstock should be a straightforward process, but sometimes things don’t go as planned. If you encounter issues, don't worry; you're not alone! Here are some common problems and how to fix them:
- File Size Limit Exceeded: Shutterstock has a maximum file size limit. If your image is too large, try compressing it using photo editing software.
- Incorrect File Format: Ensure your images are in JPEG format. If you're using another format, convert them before uploading.
- Low Resolution: Images should be a minimum of 4 MP. If your photo doesn’t meet this requirement, consider using a higher resolution version.
- Metadata Missing: Each photo requires titles, descriptions, and keywords. If you skip this step, your upload may be rejected. Take your time to add accurate information.
- Connection Issues: If your internet connection drops during the upload, you may need to restart the process. Make sure you have a stable connection before uploading.
By being aware of these common issues and their solutions, you can make your uploading experience much smoother.
Also Read This: Creating Flying Paper Lanterns for Dailymotion
Frequently Asked Questions
Many new contributors have questions about the Shutterstock uploading process. Here are some frequently asked questions that might help you:
- What is the approval process like?
- The approval process can take up to 72 hours. Shutterstock reviews your photos for quality and compliance with their guidelines.
- Can I edit my photos after uploading?
- No, once you submit your images for review, you cannot make changes. Ensure everything is correct before submitting.
- How often can I upload photos?
- You can upload photos anytime you want! There’s no limit on how many images you can submit.
- What happens if my photo is rejected?
- If your photo is rejected, you’ll receive feedback on why. You can make adjustments and try uploading it again.
- Can I use my photos elsewhere?
- Yes, you retain the rights to your photos. However, if you sell them on Shutterstock, ensure they’re exclusive to that platform.
Conclusion
Uploading your photos to Shutterstock can be a rewarding experience, both creatively and financially. By understanding the platform, preparing your images properly, and optimizing your uploads, you can maximize your chances of success. Remember to stay patient through the review process and learn from any feedback you receive. Whether you're a hobbyist or a professional photographer, Shutterstock offers a fantastic opportunity to share your work with a global audience. So, get out there, capture those moments, and start sharing your unique vision with the world!