Have you ever felt overwhelmed by managing your uploads to Adobe Stock? If so, you’re not alone! Many creatives struggle with the process, especially when it comes to efficiently transferring files. That’s where FTP, or File Transfer Protocol, comes into play. It’s a powerful tool that can simplify how you upload your stunning images and videos to Adobe Stock, making your workflow smoother and more efficient.
FTP allows you to transfer files directly from your computer to Adobe Stock’s servers, bypassing the usual web upload interface. This can save you time and make it easier to manage larger batches of uploads. In this blog post, we’ll dive into how you can leverage FTP for your Adobe Stock needs, enhancing your upload experience and overall productivity.
Setting Up Your FTP Client
Now that you understand the benefits of using FTP for Adobe Stock, let’s get into the nitty-gritty of setting it up. Choosing the right FTP client is essential, as it will be your main tool for managing uploads. Here’s a simple guide to help you get started:
- Choose an FTP Client: There are various FTP clients available, both free and paid. Some popular options include:
- FileZilla (Free)
- Cyberduck (Free)
- Transmit (Paid, Mac only)
- WinSCP (Free, Windows only)
- Download and Install: Once you’ve chosen your client, download it from the official website and follow the installation instructions. It’s generally a straightforward process.
- Gather Your Credentials: Before you can connect to Adobe Stock, you’ll need your FTP login credentials. This typically includes:
- Host Name (ftp.adobe.com)
- Username (your Adobe Stock account username)
- Password (the password for your Adobe Stock account)
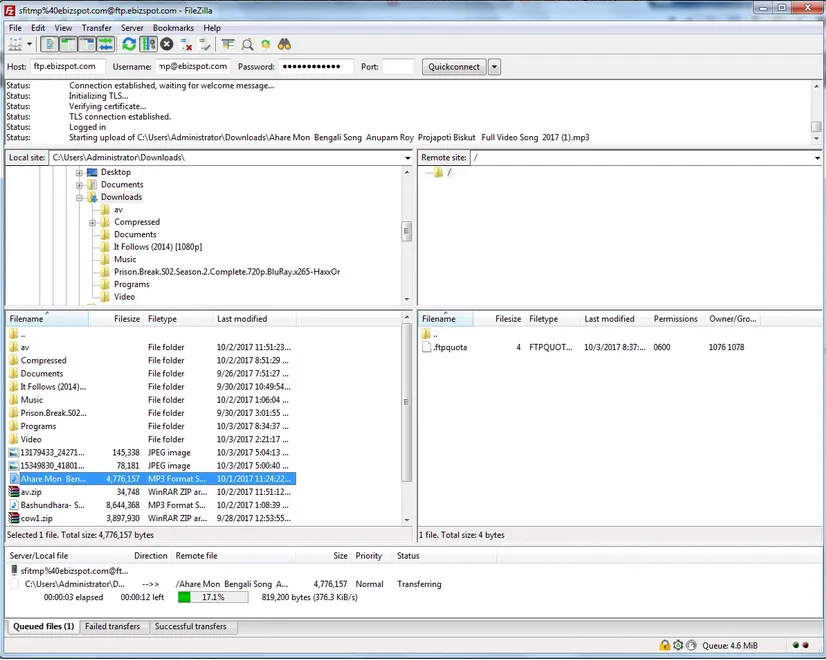
- Configure Your Client: Open your FTP client and enter your credentials in the designated fields. Make sure to select the correct protocol (usually FTP or SFTP).
- Connect: Click the connect button. If everything is set up correctly, you should see your local files on one side and the Adobe Stock server on the other.
Once connected, you can begin transferring your files seamlessly. With your FTP client set up, you’re one step closer to managing your Adobe Stock uploads like a pro!
Also Read This: Top 10 Tips for Capturing Stunning Landscape Photos
Connecting to Adobe Stock via FTP
Connecting to Adobe Stock via FTP is a straightforward process, but it’s essential to follow the correct steps to ensure everything goes smoothly. First, you’ll need to gather some information before you get started:
- FTP Host: This is typically something like ftp.adobe.com or a similar address provided by Adobe Stock.
- Username: Your Adobe Stock contributor account username.
- Password: The password associated with your Adobe Stock account.
- FTP Client: Software like FileZilla, Cyberduck, or WinSCP will do the job.
Once you have these details, follow these simple steps to connect:
- Open your FTP client of choice.
- In the host field, enter the FTP Host address.
- Fill in your Username and Password.
- Select the port number (usually 21 for FTP).
- Click on the “Connect” button.
After a successful connection, you’ll see the directories on the Adobe Stock server. From here, you can navigate to the appropriate folder designated for your uploads. If you encounter any errors, double-check your login credentials and ensure your internet connection is stable.
Also Read This: How to Upload Video from iPhone to YouTube
Uploading Your Files
Now that you’re connected, it’s time to upload your files to Adobe Stock! This part is where you can showcase your creativity and hard work. Here’s a step-by-step guide to help you:
- Navigate to the folder where you want to upload your files. This is usually marked as “uploads” or something similar.
- On your local computer, find the files you want to upload. These could be images, videos, or other content.
- Drag and drop your files from your local directory into the Adobe Stock FTP window.
- Wait for the upload to complete. You’ll see a progress bar indicating the upload status.
- Once uploaded, it’s a good idea to refresh the directory to ensure your files appear.
And voila! Your creative content is now on Adobe Stock, ready for review and sale. Remember, it’s crucial to adhere to Adobe’s file guidelines regarding size and format to avoid any upload issues. Happy uploading!
Also Read This: How to Edit Freepik Mockup in Photoshop: A Step-by-Step Guide
Managing Your Uploaded Content
Once you’ve uploaded your images or videos to Adobe Stock via FTP, it’s crucial to manage that content effectively. Proper management ensures that your uploads are organized, easily accessible, and compliant with Adobe's quality standards. Here’s how to keep everything in check:
- Organize Your Files: Create a clear folder structure on your local system before uploading. For example, you might have separate folders for different categories like Nature, Business, and Abstract. This makes it easier to locate and manage your files later.
- Use Descriptive Filenames: File names should be descriptive and keyword-rich. Instead of naming your file IMG_1234.jpg, consider a name like Sunset_Beach_California.jpg. This not only helps you but also makes it easier for potential buyers to find your content.
- Regularly Review Your Uploads: Check your uploaded content periodically to ensure everything meets Adobe's submission standards. Remove any outdated or low-quality files to keep your portfolio fresh.
- Track Your Sales: Monitor which images or videos are performing well and which aren’t. Adobe Stock provides analytics that can guide your future uploads and help you understand market trends.
- Use Keywords and Metadata: After uploading, make sure to add relevant keywords and metadata in your Adobe Stock dashboard. This increases the chances of your content being discovered by buyers.
By following these steps, you can manage your uploaded content efficiently, ensuring that your portfolio remains appealing and relevant in the competitive world of stock photography.
Also Read This: How to Use Twitter Lists to Organize Your Followers and Maximize Engagement
Troubleshooting Common FTP Issues
Let’s face it: technology can be tricky sometimes. When using FTP for Adobe Stock, you may encounter a few hiccups along the way. Here are some common issues and how to resolve them:
| Issue | Solution |
|---|---|
| Connection Timeout | Ensure that your internet connection is stable. If problems persist, try reconnecting or using a different FTP client. |
| Failed Uploads | Check your file size and format. Adobe Stock has specific requirements, so make sure your files meet those standards. |
| Permission Denied | Double-check your FTP credentials. A simple typo in your username or password can lead to access issues. |
| Slow Upload Speed | Try uploading during off-peak hours when internet traffic is lower. You can also consider compressing your files before upload. |
| Incompatibility with FTP Clients | Ensure that your FTP client is updated to the latest version. Some older clients might not support the latest protocols. |
If you encounter any issues that aren’t listed here, don’t panic! Most problems can be resolved with a little patience and troubleshooting. You can also refer to Adobe Stock’s support resources or community forums for additional help.
How to Use FTP for Adobe Stock: Managing Your Uploads Effectively
Managing your uploads to Adobe Stock can be a streamlined process when using FTP (File Transfer Protocol). FTP allows you to upload multiple files quickly and efficiently, which is particularly useful for stock photographers and designers who often deal with a large volume of media. Here’s how to effectively manage your uploads using FTP:
Setting Up FTP for Adobe Stock
Before you start using FTP, you’ll need to set up an FTP client. Follow these steps:
- Choose an FTP client: Popular options include FileZilla, Cyberduck, and WinSCP.
- Install the chosen FTP client on your computer.
- Obtain your FTP login credentials from Adobe Stock, including server address, username, and password.
Uploading Files Using FTP
Once you have everything set up, follow these steps to upload your files:
- Open your FTP client and enter your login credentials.
- Connect to the Adobe Stock server.
- Navigate to the designated upload folder.
- Select the files you wish to upload from your local directory.
- Drag and drop the files into the FTP client to initiate the upload.
Best Practices for Managing Your Uploads
- Organize Your Files: Use folders to categorize your uploads by theme or project.
- Optimize File Names: Use descriptive and relevant file names for easier identification.
- Check File Sizes: Ensure files meet Adobe Stock’s size requirements to avoid upload issues.
- Regular Maintenance: Periodically review and update your uploads for relevance and quality.
Conclusion
Using FTP for managing your Adobe Stock uploads can greatly enhance your workflow efficiency. By following the setup and best practices outlined, you can ensure that your uploads are organized, optimized, and effective, ultimately leading to a more successful experience on the platform.