In a world where notifications constantly vie for our attention, LinkedIn is no exception. While it’s a fantastic platform for networking and professional growth, the flood of notifications can quickly become overwhelming. If you find yourself distracted by alerts about job postings, connection requests, or updates from your network, you're not alone. Fortunately, turning off LinkedIn notifications is a straightforward process that can help you reclaim your focus and productivity. In this article, we’ll guide you through understanding
Understanding LinkedIn Notifications
Before diving into the specifics of turning off notifications, it’s essential to understand what they are and why they matter. LinkedIn notifications are alerts that inform you about various activities on the platform. These can include:
- Connection Requests: Notifications when someone wants to connect with you.
- Messages: Alerts for new messages from your connections.
- Engagements: Updates when someone likes, comments on, or shares your posts.
- Job Recommendations: Suggestions based on your profile and interests.
- Group Activities: Notifications about discussions and events in groups you’re part of.
While these notifications can be helpful, they can also lead to constant distractions. Each ping can pull you away from important tasks, making it hard to concentrate. Understanding the types of notifications you receive is the first step in managing them effectively.
LinkedIn offers a variety of settings that allow you to customize your notification preferences. You can choose to receive alerts via email or through the app, and even specify which types of notifications you want to see. This level of customization is key to reducing distractions while still staying informed about relevant updates.
In the following sections, we will explore how to adjust these settings, so you can enjoy a more focused and productive LinkedIn experience.
Also Read This: Resolving YouTube Access Issues on Safari
Reasons to Manage Your Notifications
Managing your LinkedIn notifications is more important than you might think. In today's fast-paced world, distractions can significantly hinder your productivity. Here are a few compelling reasons why you should take control of your LinkedIn notifications:
- Enhanced Focus: Constant notifications can break your concentration. By managing them, you allow yourself to focus on tasks that matter without unnecessary interruptions.
- Reduced Stress: An overflowing inbox can be overwhelming. By limiting notifications, you can create a more manageable environment, reducing anxiety associated with keeping up.
- Better Time Management: Notifications often draw you into a rabbit hole of browsing or responding. By turning them off, you can allocate time more effectively, ensuring you’re working on your priorities.
- Improved Engagement: When you're not bombarded with alerts, you're more likely to engage meaningfully when you do check in. This can lead to better networking opportunities and interactions.
- Personalized Experience: Customizing your notifications allows you to receive updates that truly matter to you, making your LinkedIn experience more relevant and enjoyable.
Managing your notifications isn't just about reducing noise; it's about creating a more purposeful and productive online environment. So, it’s definitely worth considering!
Also Read This: Effective Messaging Tips for Engaging a Hiring Manager on LinkedIn
Steps to Turn Off LinkedIn Notifications
If you’re ready to take charge of your LinkedIn notifications, you’re in the right place! Follow these simple steps to turn them off and reclaim your focus:
- Log into Your LinkedIn Account: Open your web browser or app and log into your account using your credentials.
- Access the Settings: Click on your profile picture at the top right corner of the page. From the dropdown menu, select "Settings & Privacy."
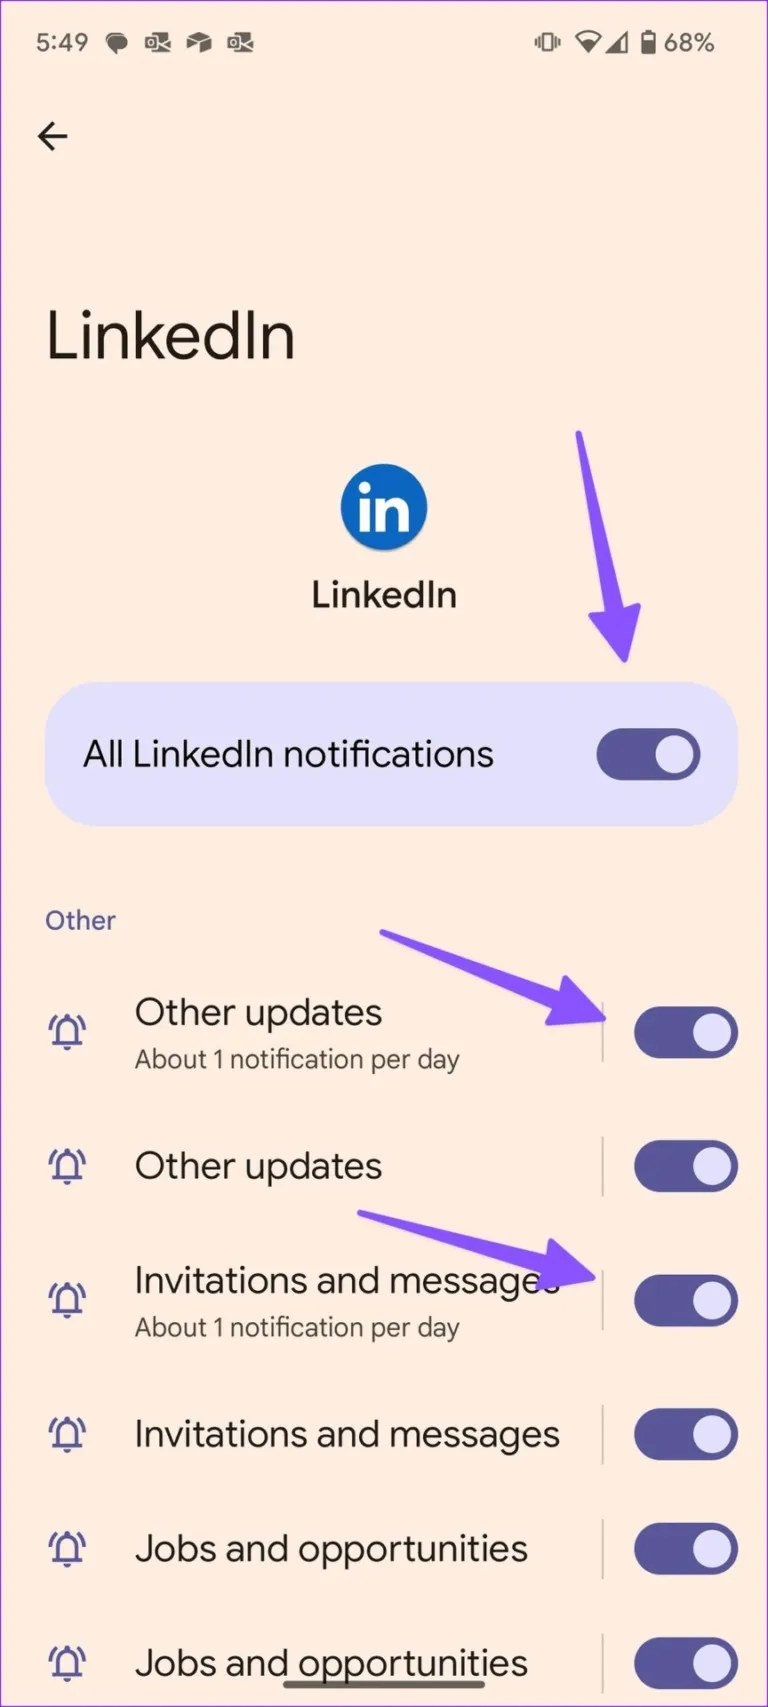
- Navigate to Notifications: In the settings menu, find the "Communications" tab and click on "Notifications." This will take you to a detailed page of your notification settings.
- Customize Your Preferences: Here, you’ll see various categories of notifications like "Messages," "Connections," and "Engagement." You can toggle off notifications you don’t want or adjust them according to your preference.
- Save Your Changes: After making your selections, ensure you save any changes. This will finalize your notification settings!
And there you have it! By following these straightforward steps, you can significantly reduce distractions from LinkedIn, allowing you to focus on what truly matters. Happy networking!
Also Read This: Simple Steps to Enjoy Dailymotion on Your TV with Easy Tutorials
Customizing Notification Preferences
When it comes to managing your LinkedIn experience, customizing notification preferences is a game changer. LinkedIn offers a variety of notifications that can flood your inbox, but not all of them may be relevant to you. By fine-tuning these settings, you can focus on what truly matters and reduce unnecessary distractions.
To customize your notification preferences, follow these simple steps:
- Log in to your LinkedIn account.
- Click on the “Me” icon at the top of your LinkedIn homepage.
- Select “Settings & Privacy” from the dropdown menu.
- In the left sidebar, click on “Communications.”
- Under “Notifications,” you’ll see various categories such as “On LinkedIn,” “Email,” and “Push notifications.”
Here, you can toggle notifications on or off according to your preference. For example:
- Connections: If you’re tired of seeing notifications about every new connection request, you can turn this off.
- Job Alerts: Customize your job alerts to only receive the most relevant postings.
- Engagement: Limit notifications about likes, comments, and shares to reduce the noise.
Remember, the goal is to create a notification environment that supports your professional growth without overwhelming you. Take a few moments to explore these settings and tailor them to your needs. Your future self will thank you!
Using Do Not Disturb Features
Sometimes, the best way to manage distractions is to hit the pause button entirely. LinkedIn offers a "Do Not Disturb" feature that allows you to silence notifications for a specified period. This can be especially useful during focused work sessions or when you need to disconnect from your professional network for a while.
Here’s how to enable the “Do Not Disturb” feature on LinkedIn:
- Open your LinkedIn app or website and log into your account.
- Click on the “Me” icon at the top right corner.
- Select “Settings & Privacy” from the dropdown.
- In the “Communications” section, look for “Do Not Disturb” settings.
- Choose how long you want to enable the feature—whether it's for a few hours, a day, or more.
While this feature is active, you won't receive any notifications, allowing you to concentrate on your tasks without interruption. You might find it helpful to use this feature during:
- Deep Work Sessions: When you need to focus on a project without external distractions.
- Meetings: To ensure you’re not disturbed while engaging with colleagues or clients.
- Personal Time: When you want to unwind and take a break from professional networking.
With the "Do Not Disturb" feature, you’re in control. It’s your time, and you deserve to spend it without the constant ping of notifications. Remember to use it wisely, and don’t hesitate to toggle it back on when you’re ready to re-engage with your network!