When it comes to uploading images to Adobe Photo Stock, quality is key. You want your pictures to stand out, but sometimes the original size just doesn't cut it. So, how can you make your pictures bigger without sacrificing quality? In this blog post, we’ll explore some practical tips and techniques that will help you upscale your images while maintaining their clarity and detail. Let's dive in!
Understanding Image Resolution
Before we jump into the methods of enlarging your images, it's essential to grasp the concept of image resolution. In simple terms, resolution refers to the amount of detail an image holds. It’s measured in pixels and usually expressed as width x height (e.g., 1920 x 1080). The higher the resolution, the more detail your image has, which translates to better quality, especially when printed or displayed on high-resolution screens.
Here are a few key terms to know:
- Pixels: The smallest unit of a digital image, essentially tiny dots of color that combine to form a complete picture.
- DPI (Dots Per Inch): A measurement of printing resolution, indicating how many dots of ink will be placed in a one-inch space. For high-quality prints, aim for at least 300 DPI.
- Aspect Ratio: The proportional relationship between the width and height of an image, which needs to be maintained to avoid distortion when resizing.
When you enlarge an image, you’re essentially increasing the number of pixels, but this can lead to a loss of quality if not done correctly. If you’re working with a low-resolution image and blow it up too much, you might end up with a pixelated or blurry result. So, understanding your image’s resolution before trying to make it larger is crucial.
In the next sections, we’ll go over various tools and techniques you can use to increase the size of your images while keeping their quality intact. Stay tuned!
Also Read This: How to Embed a PDF for Behance
Choosing the Right Software
When it comes to enlarging images for Adobe Photo Stock without sacrificing quality, selecting the right software is crucial. Not all programs handle image upscaling the same way, so you’ll want to choose one that maintains detail and sharpness.
Here are some popular options to consider:
- Adobe Photoshop – This is the gold standard for image editing. With its advanced algorithms, Photoshop can resize images effectively while preserving quality. The 'Preserve Details 2.0' feature is particularly useful for enlargements.
- GIMP – A free alternative to Photoshop, GIMP offers powerful tools for image manipulation. It might require a bit more manual adjustment, but it's a solid option for those on a budget.
- Topaz Gigapixel AI – This specialized software uses artificial intelligence to upscale images. It's designed specifically for enlarging photos without losing clarity, making it a favorite among photographers.
- Photopea – An online editor that mimics Photoshop, Photopea is a great choice if you're looking for something accessible without the need for installation. It supports various formats and offers many editing tools.
Before making your choice, consider your budget, ease of use, and the specific features you need. Many of these programs offer free trials, so why not experiment a bit? You'll soon find the perfect fit for your upscaling needs!
Also Read This: How to Make a Contract Template in ShootProof
Techniques for Upscaling Images

Once you've chosen the right software, it's time to dive into the techniques for upscaling your images effectively. Here’s a rundown of some tried-and-true methods that will help you maintain quality while enlarging your pictures.
1. *Bicubic Smoother Resampling: Most image editing programs, including Photoshop, offer various resampling methods. Bicubic Smoother is particularly effective for enlarging images and helps to keep edges smooth.
2. Preserve Details 2.0 in Photoshop: This feature is a game-changer. When you go to Image > Image Size, make sure to select 'Preserve Details 2.0' in the resample option. This keeps more details intact while enlarging your image.
3. Using AI Upscaling Tools: Software like Topaz Gigapixel AI utilizes artificial intelligence to analyze your image and intelligently add details as it enlarges. This can result in stunning improvements in quality.
4. Sharpening After Upscaling: After you’ve enlarged your image, applying a little sharpening can enhance detail and clarity. Just be careful not to overdo it, as this can introduce noise.
5. Test Different Formats*: Sometimes, the format you save your image in can affect quality. Experiment with saving in different formats (like TIFF or PNG) to see which one provides the best results after upscaling.
By applying these techniques, you can confidently enlarge your images for Adobe Photo Stock while keeping them looking crisp and professional. Happy editing!
Also Read This: Mastering Dailymotion Floating Mode with Step-by-Step Video Guidance
5. Using Adobe Photoshop for Image Enlargement
When it comes to enlarging images without sacrificing quality, Adobe Photoshop stands out as one of the best tools in the game. Its advanced algorithms help maintain clarity and detail, making it a go-to choice for graphic designers and photographers alike. Let’s dive into how you can effectively use Photoshop for this purpose.
Here’s a simple step-by-step guide:
- Open your Image: Start by launching Photoshop and opening the image you want to enlarge.
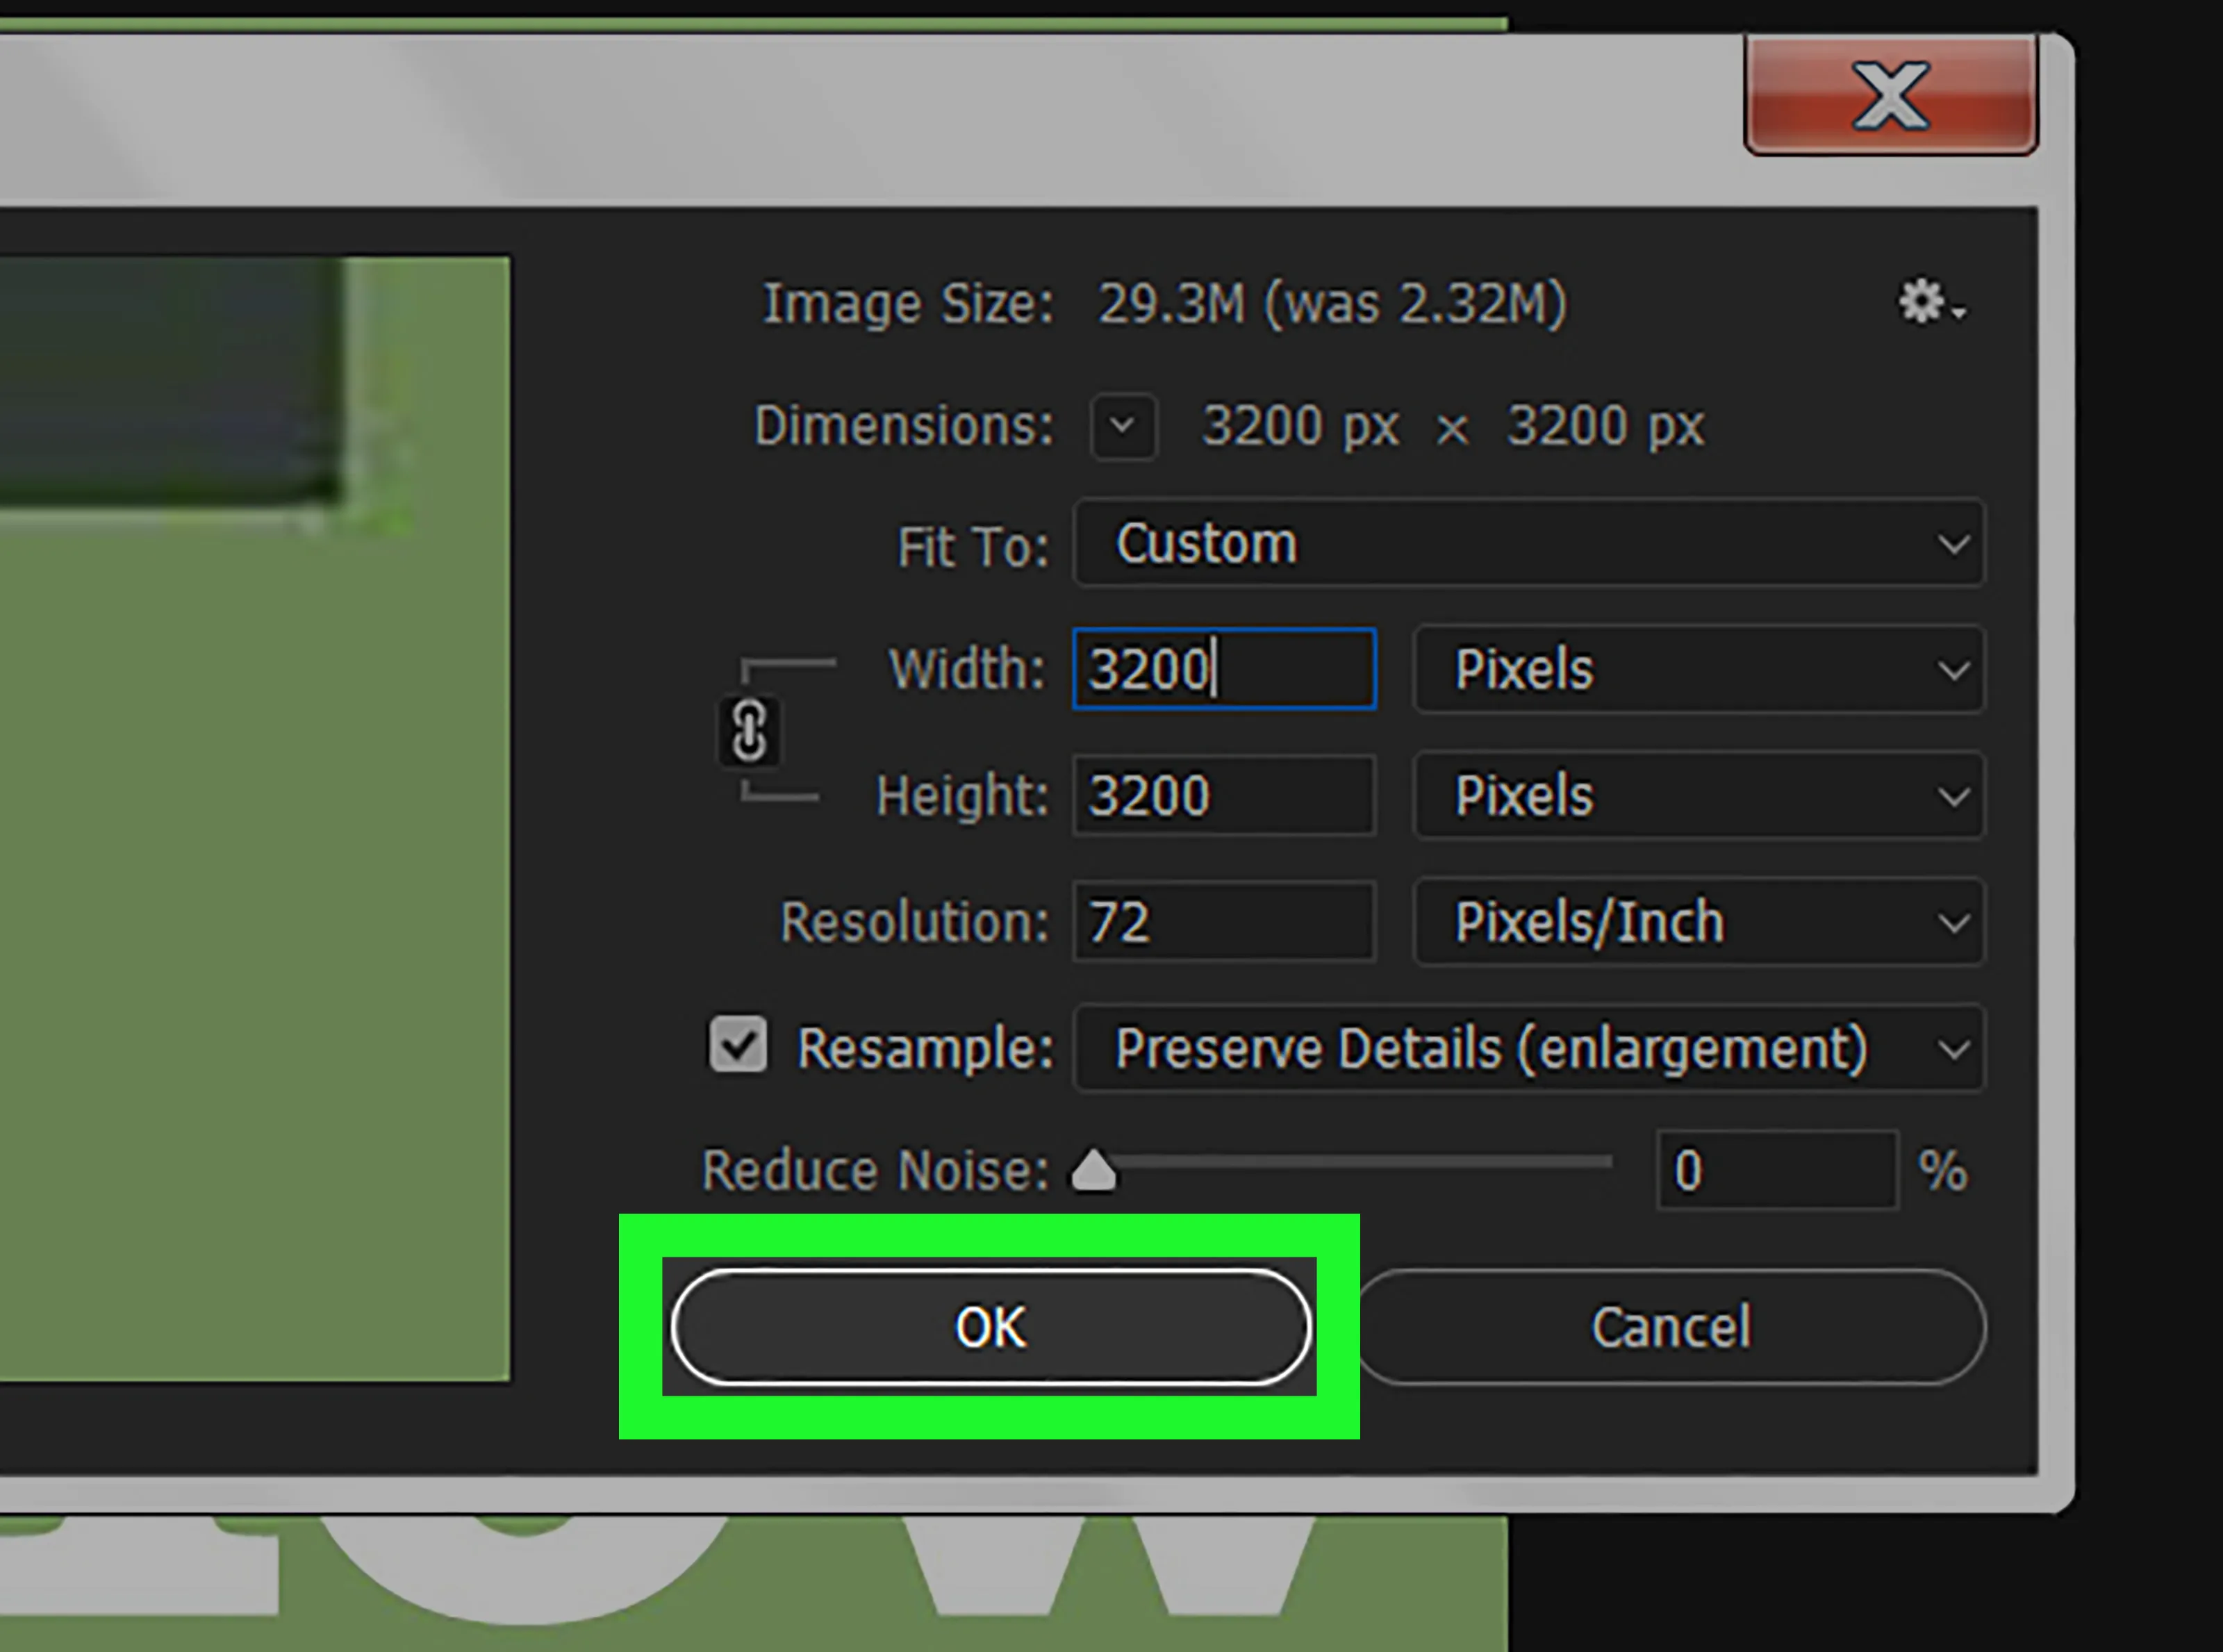
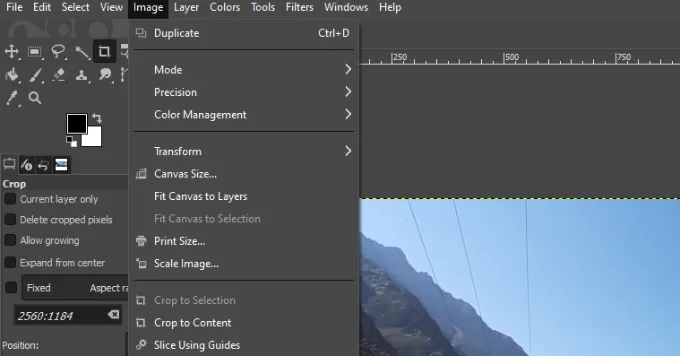
- Access Image Size: Navigate to the top menu and click on Image, then select Image Size. This opens a dialog box where you can adjust the dimensions.
- Adjust Dimensions: Enter your desired width and height. Ensure that the Constrain Proportions option is checked so that your image doesn’t get distorted.
- Select Resampling Method: Under the Resample dropdown menu, choose Preserve Details 2.0 for the best quality. This method uses sophisticated algorithms to upscale your image while maintaining detail.
- Apply Noise Reduction: You can also adjust the Reduce Noise slider to help maintain smoothness in your image.
- Click OK: Once you’re satisfied with the adjustments, hit OK, and Photoshop will process the enlargement.
With these simple steps, you can make your images bigger without compromising on quality, ensuring they look stunning on Adobe Photo Stock!
Also Read This: Logging out of Behance
6. Alternative Tools for Image Scaling
If you don’t have access to Adobe Photoshop or prefer to explore other options, there are plenty of alternative tools available that can help you enlarge images without losing quality. Here’s a breakdown of some popular choices:
| Tool Name | Features | Best For |
|---|---|---|
| GIMP | Open-source, supports various file formats, resampling options | Budget-conscious users |
| Let’s Enhance | Online tool, AI-based enhancement, batch processing | Quick and easy online scaling |
| PhotoZoom Pro | Specialized enlargement, support for various formats, noise reduction | Professional photographers |
| Pixlr | Web-based editor, user-friendly, basic image editing tools | Casual users |
These tools offer a range of features that can meet different needs. Whether you're looking for a robust solution like GIMP or a quick fix with Let’s Enhance, you can achieve impressive results that keep your images crisp and clear. Remember, the key is to experiment with different tools to find the one that best suits your workflow!
Also Read This: Is Slottet Available on Dailymotion for Streaming
7. Best Practices for Maintaining Image Quality
When it comes to making pictures bigger for Adobe Photo Stock, maintaining image quality is crucial. Nobody wants to submit an image that looks pixelated or blurry. Here are some best practices to keep in mind:
- Start with High-Resolution Images: The higher the resolution of your original image, the better the final result will be when you enlarge it. Aim for images that are at least 300 DPI (dots per inch).
- Use Lossless Formats: When saving your images, opt for lossless formats like TIFF or PNG. These formats preserve image quality better than lossy formats like JPEG.
- Utilize Image Editing Software: Tools like Adobe Photoshop and Lightroom offer features to help enlarge images without losing quality. Use the "Image Size" tool in Photoshop and select "Preserve Details" for the best results.
- Avoid Over-Editing: While it's tempting to apply numerous filters and adjustments, over-editing can degrade quality. Stick to essential edits and keep it simple.
- Sharpen After Resizing: Resizing can sometimes make images look soft. Applying a bit of sharpening after enlarging can help bring back some of the lost clarity.
- Check Compatibility: Different stock photo websites may have specific requirements for image quality and size. Always check their guidelines to ensure compliance.
By following these practices, you can significantly improve your chances of submitting high-quality images that stand out on Adobe Photo Stock.
8. Conclusion
In conclusion, enlarging images for Adobe Photo Stock doesn’t have to be a daunting task. With the right techniques and tools at your disposal, you can create stunning, high-quality visuals that meet the platform’s standards. Remember, it all starts with your original image. The better the quality you begin with, the better the end result will be.
Utilizing software like Adobe Photoshop, sticking to lossless formats, and knowing when to sharpen your images are just a few of the steps you can take to ensure your images look their best.
So, whether you're a seasoned photographer or just starting, don’t shy away from experimenting with these tips. The world of stock photography is competitive, and presenting high-quality images can make all the difference in attracting potential buyers.
Now, go ahead and give your photos the upgrade they deserve!