Editing and removing elements from Adobe Stock images can be a game-changer for your creative projects. Whether you're enhancing an image for a marketing campaign or personalizing a graphic for social media, knowing how to manipulate stock images effectively is essential. In this post, we’ll explore the ins and outs of editing Adobe Stock images, guiding you step-by-step to achieve professional results. Let’s dive in!
Understanding Adobe Stock Images
Adobe Stock is an extensive library filled with high-quality images, videos, and templates, making it a go-to resource for designers, marketers, and content creators. Here’s what you need to know:
- Quality and Variety: Adobe Stock boasts millions of assets, including photos, illustrations, vectors, and 3D models. This variety ensures that you can find the perfect image for any project.
- Licensing: When you purchase or subscribe to Adobe Stock, you're granted a license to use the images in your projects. It's important to understand the different licensing options—standard and extended—to ensure you comply with usage rights.
- Integration with Adobe Creative Cloud: The seamless integration with Adobe Creative Cloud applications like Photoshop and Illustrator allows for easy importing and editing of images directly within your preferred software.
- Customization: Many stock images can be customized to fit your needs. You can change colors, crop, and, importantly, remove elements to create a unique version of the original image.
By understanding these key aspects of Adobe Stock images, you set yourself up for success in your editing journey. Remember, the goal is to create something that resonates with your audience while maintaining the quality and integrity of the original asset.
Also Read This: Can You Lose a Crown in Team Rumble? Understanding Victory Crowns and Their Rules
3. Tools Required for Editing
Editing images from Adobe Stock can be an exciting journey, but having the right tools is crucial for achieving the best results. Here’s a handy list of essential tools you’ll need:
- Adobe Photoshop: This is the industry standard for image editing. With features like layers, masking, and a vast array of filters, Photoshop allows you to manipulate stock images with precision.
- Adobe Lightroom: Ideal for color correction and enhancing details, Lightroom is perfect for photographers who want to fine-tune their images before sharing or printing.
- GIMP: If you’re looking for a free alternative, GIMP is a powerful open-source image editor that offers many features similar to Photoshop.
- Canva: For those who prefer simplicity, Canva provides user-friendly tools to edit images quickly, perfect for social media graphics or marketing materials.
- Image Editing Apps: If you’re on the go, consider mobile apps like Snapseed or Adobe Photoshop Express for quick edits right from your smartphone.
These tools will equip you to make the most out of your Adobe Stock images, helping you unleash your creativity and achieve professional results!
Also Read This: Understanding the Duration and Schedule of the Royal Rumble Event
4. Step-by-Step Guide to Editing Images
Ready to dive into the editing process? Follow this straightforward step-by-step guide to edit and remove elements from your Adobe Stock images!
- Choose Your Image: Start by selecting the Adobe Stock image you want to edit. Download it in the appropriate resolution for your needs.
- Open in Your Editing Tool: Launch Photoshop or your choice of editing software and open the image file.
- Duplicate the Layer: Always work on a duplicate layer to preserve the original image. Right-click on the layer and select “Duplicate Layer.”
- Use the Lasso or Pen Tool: To remove unwanted elements, select the Lasso or Pen Tool to outline the area you want to erase.
- Apply Content-Aware Fill: For seamless removal, go to Edit > Fill and choose “Content-Aware.” This will intelligently fill the selected area with surrounding pixels.
- Refine Edges: Use the Clone Stamp or Healing Brush tools to clean up any rough edges or imperfections left from the removal.
- Adjust Colors and Contrast: Enhance your image by adjusting brightness, contrast, and saturation. Explore filters and presets to achieve the desired look.
- Save Your Work: Once satisfied with your edits, save the image in the preferred format (JPEG, PNG, etc.) and resolution.
With these easy steps, you’ll transform your Adobe Stock images into personalized works of art! Happy editing!
Also Read This: Understand Plagiarism Concerns with Canva Templates with Is Using Canva Templates Plagiarism
Removing Unwanted Elements
Removing unwanted elements from an Adobe Stock image can significantly enhance your visual content. Whether it’s a distracting object or an unwanted background, the process is straightforward. Here’s how you can effectively remove those pesky distractions:
- Use the Clone Stamp Tool: This tool allows you to sample pixels from one area of the image and paint over the unwanted element. Select the Clone Stamp Tool, hold down the Alt key to choose a source area, and click to paint over the element you want to remove.
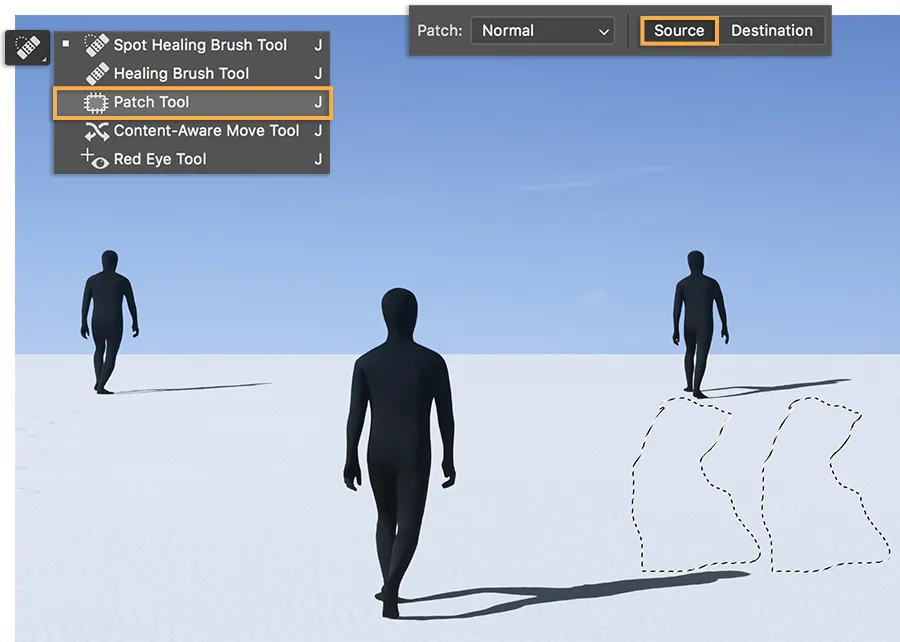
- Healing Brush Tool: Perfect for minor imperfections, the Healing Brush tool blends the surrounding pixels seamlessly. Just like the Clone Stamp, hold down the Alt key to select a source area, and then brush over the unwanted element.
- Content-Aware Fill: For larger areas, consider using the Content-Aware Fill feature. Select the area you want to remove, then go to Edit > Content-Aware Fill. This feature uses Adobe's advanced algorithms to fill in the area based on surrounding content.
- Layer Masks: Using layer masks can give you more control. Create a mask for the layer containing the unwanted element, paint with black on the mask where you want to hide parts of the image, and white where you want to reveal it.
Remember, taking your time and zooming in will help you get those details just right. With a little practice, you’ll be a pro at cleaning up your images!
Also Read This: How to Contour a Square Face with a Complete Makeup Guide
Saving and Exporting Your Edited Image
Once you’ve perfected your image, it’s time to save and export your masterpiece. Here’s a simple guide to ensure your edited image retains its quality and is ready for use:
| Format | Best For | Advantages |
|---|---|---|
| JPEG | Web and Social Media | Smaller file size, good quality. |
| PNG | Images with Transparency | Supports transparency, lossless compression. |
| TIFF | High-Quality Prints | Retains high quality, supports layers. |
| PSD | Future Editing | Keeps layers intact for further editing. |
To save your image, go to File > Save As and choose your desired format. If you want to maintain the ability to make changes later, save a copy as a PSD. For sharing online, a JPEG or PNG is usually best.
Lastly, check the resolution and dimensions to ensure they meet your needs, especially if you're aiming for print quality. Happy editing!
How to Edit and Remove Elements from an Adobe Stock Image
Adobe Stock provides a vast collection of high-quality images that can enhance your design projects. However, you may sometimes want to customize these images by editing or removing specific elements. This guide will walk you through the essential steps to effectively edit and remove unwanted elements from an Adobe Stock image using Adobe Photoshop.
Tools Required
- Adobe Photoshop (latest version recommended)
- Adobe Stock account
- Basic understanding of Photoshop tools
Steps to Edit an Adobe Stock Image
- Download the Image: Purchase and download the desired image from Adobe Stock.
- Open in Photoshop: Launch Photoshop and open the downloaded file.
- Use Selection Tools: Utilize tools like the Magic Wand or Quick Selection Tool to select the areas you want to edit.
- Remove Elements: Once selected, press the Delete key to remove the unwanted parts.
- Clone Stamp Tool: For finer edits, use the Clone Stamp Tool to clone adjacent areas over the removed element.
- Adjustment Layers: Adjust colors and tones using Adjustment Layers to blend the edited area with the rest of the image.
Final Touches
Once you are satisfied with your edits, save your work in the desired format. It's advisable to keep a copy of the original image for future reference or further modifications.
Tips for Effective Editing
- Zoom in for detailed work to ensure precision.
- Use layers for non-destructive editing.
- Regularly save your progress.
By following these steps, you can effortlessly edit and remove elements from Adobe Stock images, tailoring them to fit your unique project needs.
Conclusion: Editing and removing elements from Adobe Stock images can greatly enhance your creative projects, allowing you to customize visuals to suit your brand or message effectively.