Editing a post on LinkedIn can be essential for maintaining a professional online presence. Whether it’s a typo, an outdated statistic, or simply a desire to refine your message, knowing how to make those adjustments is key. In this guide, we’ll explore the reasons you might find yourself editing a post and the steps to do it effectively. Let’s dive in!
Why You Might Need to Edit a Post
There are several reasons why you may find it necessary to edit a post on LinkedIn. Here are some of the most common scenarios:
- Typographical Errors: We’ve all been there. A simple typo can undermine your credibility. Whether it’s a misspelled word or a grammatical mistake, editing allows you to correct these errors promptly.
- Updating Information: LinkedIn is a platform that thrives on current and relevant information. If you’ve shared statistics that have since changed or if a project has evolved, editing ensures your audience receives the most accurate data.
- Clarifying Your Message: Sometimes, what you initially wrote may not fully convey your intended message. Editing allows you to refine your words for clarity and impact.
- Adding Additional Insights: As you reflect on your post or gather feedback, you may realize there are more points you want to include. Editing lets you enhance your post with new insights or perspectives.
- Changing Tone or Style: Perhaps your original tone didn’t resonate with your audience. Editing gives you the chance to adjust your writing style to better match your professional brand.
In summary, editing a post on LinkedIn is a practical way to ensure your content stays polished, relevant, and impactful. Whether correcting mistakes or enhancing your message, it’s a valuable skill to master!
Also Read This: Mastering My Hero Ultra Rumble: Team Up with Friends for Victory
Step 1: Locate Your Post
Finding your post on LinkedIn is the first crucial step in the editing process. It’s simple, but knowing where to look is key!
To locate your post, follow these steps:
- Go to Your Profile: Click on your profile picture or the "Me" icon at the top of your LinkedIn homepage. This takes you directly to your profile where all your shared content lives.
- Scroll Down: As you scroll through your profile, keep an eye out for the "Activity" section. This is where you'll find all of your posts, comments, and likes.
- Click on 'See All' under Activity: If you want a more detailed view, click on the "See All" link. This will take you to a page that lists all of your recent activities, including your posts.
Once you spot the post you want to edit, you’re one step closer! If you’ve posted a lot recently, it might take a moment, but remember to be patient.
Also Read This: Using Google Play Gift Cards for YouTube Premium Subscription
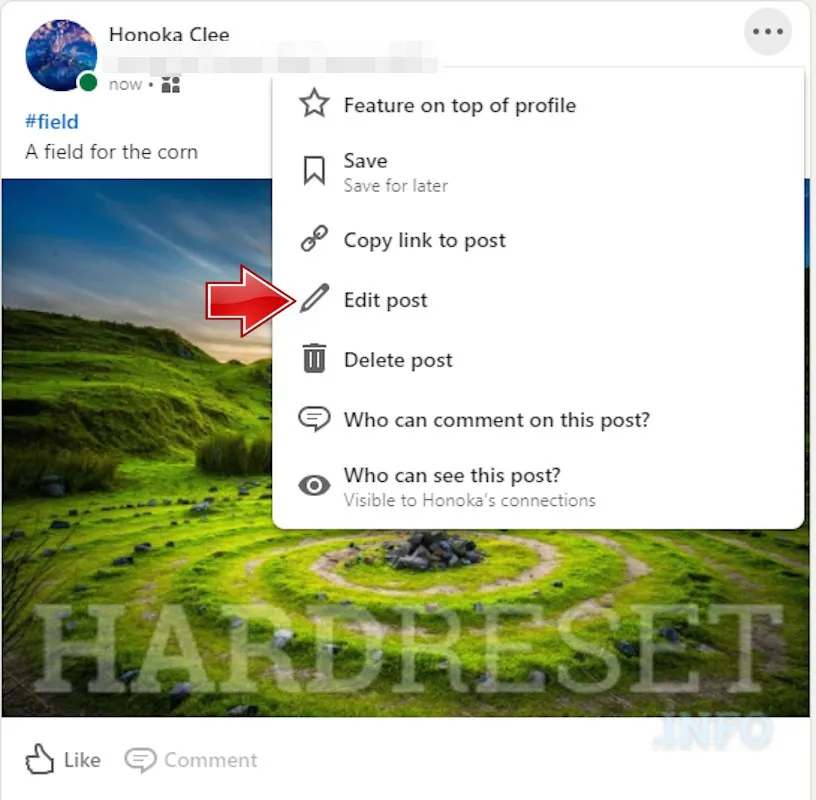
Step 2: Click on the Options Menu
Now that you've found your post, it’s time to access the options menu to make your edits. This menu is your gateway to modifying your content easily.
Here’s how to navigate to the options menu:
- Hover Over Your Post: Move your cursor over the post you want to edit. This will bring up several icons at the top right corner of the post.
- Click on the 'More' Icon: Look for the three dots (⋮) icon. This is the 'More' option that gives you additional choices for your post.
- Select 'Edit Post': When you click on the 'More' icon, a dropdown menu will appear. Here, you’ll see the option to 'Edit Post.' Click on it to begin making changes.
And just like that, you’ve opened the door to editing! It’s straightforward, and you’re now ready to refine your message or update any information as needed.
Also Read This: How to Sell My Photos to Getty Images as a Photographer
Step 3: Select 'Edit Post'
Alright, you’re almost there! Once you've identified the post you want to edit, the next step is to select 'Edit Post'. This is an essential part of the editing process and it’s super easy to do.
Here’s how you can find the option:
- Navigate to your LinkedIn homepage.
- Scroll through your feed until you spot the post you wish to edit.
- Click on the three dots (•••) located at the top right corner of your post.
Once you click on those dots, a dropdown menu will appear. Look for the 'Edit Post' option and click on it. This will take you to the editing interface where you can make the necessary changes. It’s that simple!
Just a quick reminder: you can only edit posts that you’ve created. If you’re trying to edit someone else’s post, you’ll have to ask them directly. Now, let's move on to the fun part—making those edits!
Also Read This: Is It Possible to Download Videos from YouTube Legally?
Step 4: Make Your Edits
Time to roll up your sleeves and dive into the editing process! After selecting 'Edit Post', you’ll see your original content pop up in a text box. This is your chance to refine your message or update any information. Here’s how to approach it:
- Content Changes: Type or paste your new text directly into the box. Whether you want to add a new thought, provide more context, or simply correct a typo, this is where it happens.
- Formatting: Consider using bullet points or numbered lists to make your post more readable. If your post contains links or hashtags, double-check that they work and are relevant.
- Visuals: If you want to change the image or video associated with your post, simply click on the media icon and upload a new file.
Once you’re satisfied with the changes, don’t forget to hit the 'Save' button! This is crucial; otherwise, all your hard work will go to waste. And there you have it! Your post is now updated and ready to shine on LinkedIn!
Also Read This: How to Search for People on LinkedIn: Tips for Finding People Using LinkedIn’s Search Features
7. Step 5: Save Your Changes
Once you've made all the edits to your LinkedIn post, the next crucial step is saving your changes. This may seem straightforward, but it’s vital to ensure that you don’t accidentally lose your hard work. Here's how to do it:
- Review Your Edits: Before hitting that save button, take a moment to review your content. Make sure you’re happy with the text, images, or any tags you've added.
- Click the Save Button: Look for the “Save” option, usually located at the bottom of the edit window. This is your green light to finalize your changes.
- Confirmation: After clicking save, LinkedIn typically provides a quick notification confirming that your changes have been saved. Keep an eye out for this to ensure everything went through smoothly.
Remember, once your changes are saved, they will be visible to your connections and followers. If you’re unsure about something, you might want to consider saving it as a draft first if that option is available, allowing you to come back and revise it further.
Also Read This: Your Complete Guide to Joining iStock Photo as a Photographer
8. Common Issues When Editing Posts
Editing a post on LinkedIn is generally a smooth process, but sometimes you might run into a few hiccups. Here are some common issues people face and how to tackle them:
| Issue | Possible Solutions |
|---|---|
| Changes Not Saving | Check your internet connection, refresh the page, and try saving again. If problems persist, try logging out and back in. |
| Formatting Errors | Ensure you're using compatible formats for your images or links. Sometimes, copying and pasting from external sources can cause formatting glitches. |
| Post Visibility Issues | Make sure your privacy settings allow your connections to see the post. If you’ve set it to private, they won’t be able to view changes. |
If you encounter any other issues, don’t hesitate to consult LinkedIn's Help Center or community forums for additional support. Remember, you’re not alone in this!
How to Edit a Post on LinkedIn
Editing a post on LinkedIn is a straightforward process that allows you to refine your content, correct any mistakes, or update information after it has been published. Whether you're a professional sharing insights or a company promoting services, maintaining the quality of your posts is essential. Here’s a step-by-step guide to help you edit your LinkedIn posts effectively.
Step-by-Step Guide to Editing Your Post
- Log into Your LinkedIn Account: Start by signing into your LinkedIn profile using your credentials.
- Navigate to Your Profile: Click on your profile picture or the “Me” icon at the top of the LinkedIn homepage.
- Find the Post: Scroll down to the “Activity” section and click on “See all” to view all your posts.
- Edit the Post: Locate the post you want to edit. Click on the three dots in the upper right corner of the post and select “Edit post” from the dropdown menu.
- Make Your Changes: Modify the text, images, or hashtags as needed. Ensure that the content is clear and aligns with your message.
- Save Your Edits: Once you are satisfied with the changes, click “Save” to update your post.
Things to Consider When Editing
- Be Mindful of Engagement: Editing a post can affect its engagement metrics.
- Time Sensitivity: Consider the relevance of the information you are updating.
- Notify Your Audience: If the changes are significant, consider informing your audience in the comments.
Editing a post on LinkedIn is a simple process that can greatly enhance the quality and relevance of your content. Regular updates ensure that your posts remain informative and aligned with your professional goals.