Drawing is one of the most accessible forms of art, inviting everyone to explore their creativity. Whether you’re doodling in a notebook or aiming for a masterpiece, the journey of drawing can be incredibly fulfilling. It allows you to express your thoughts, emotions, and ideas visually, bridging the gap between your imagination and reality.
In this guide, we'll explore how you can transform your drawing skills from basic to stunning. We’ll break down the process into manageable steps, making it easy for you to follow along. So grab your pencil, and let’s embark on this creative journey together!
Essential Drawing Materials

Before diving into the world of drawing, it’s important to gather the right materials. Having the right tools can significantly enhance your experience and the quality of your artwork. Here’s a handy list of essential drawing materials you might consider:
- Pencils: Start with a range of pencils, from H (hard) to B (soft). For example, H pencils are great for fine lines, while B pencils are perfect for shading.
- Erasers: Invest in both a kneaded eraser for gentle lifting and a vinyl eraser for more aggressive corrections.
- Paper: Choose sketch paper for practice. If you’re aiming for detailed work, consider using heavier-weight drawing paper.
- Sharpener: A good sharpener is crucial. Look for one that keeps your pencils sharp without breaking them.
- Blending tools: Tools like blending stumps or tortillons can help create smooth transitions in your shading.
Here’s a simple table summarizing these materials:
| Material | Purpose |
|---|---|
| Pencils | For sketching and shading |
| Erasers | Correct mistakes and refine details |
| Paper | Surface for your artwork |
| Sharpener | Keep pencils ready for use |
| Blending Tools | Create depth in shading |
With these materials in hand, you’re ready to start your drawing adventure. Remember, the right tools can make a world of difference in your artistic journey!
Curl error: transfer closed with outstanding read data remaining
Also Read This: How to Block Ads in the YouTube App on Android
Understanding Basic Drawing Techniques
Diving into the world of drawing can be incredibly rewarding, and getting a grip on basic techniques is essential for any budding artist. Let’s explore some fundamental methods that will elevate your sketches from simple doodles to stunning pieces of art!
- Line Quality: The way you draw lines can convey emotion and depth. Experiment with thick and thin lines to create contrast. For instance, bold outlines can make elements pop, while lighter lines can add subtlety.
- Shading: Adding depth to your drawings is all about mastering shading. Use techniques like hatching (parallel lines) and cross-hatching (intersecting lines) to create texture. Practice shading a sphere to understand light and shadow.
- Perspective: Understanding perspective is crucial for creating realistic depth. Start with one-point perspective by drawing a simple road that narrows towards the horizon. This technique gives a three-dimensional feel to your artwork.
- Proportions: Getting proportions right can make or break your drawing. Use the “sight-size” method where you hold your pencil at arm's length to compare sizes of different elements. This helps maintain balance in your work.
By grasping these basic techniques, you’ll lay a solid foundation for your artistic journey. Remember, practice makes perfect—so don’t hesitate to repeat these techniques until they feel second nature!
Also Read This: How to Remove a LinkedIn Post with Easy Steps for Profile Management
Step-by-Step Guide to Creating Your First Drawing
Ready to put your newfound knowledge to the test? Let’s walk through a simple step-by-step guide to creating your very first drawing. Grab your materials—paper, pencils, and erasers—and let’s get started!
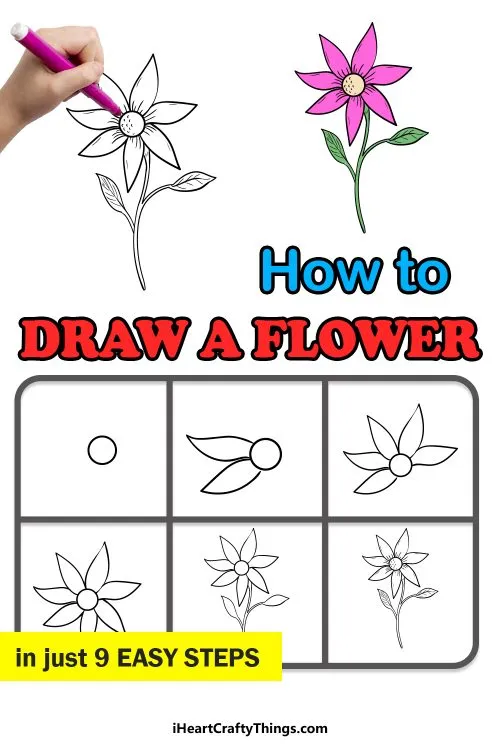
- Choose Your Subject: Start by selecting a simple subject, like a fruit or a basic object. A classic choice is an apple, as it has distinct shapes and shadows.
- Sketch the Outline: Lightly sketch the basic shape of your subject. Focus on getting the proportions right, using simple shapes like circles and ovals as guides.
- Add Details: Once the outline is in place, add details. For the apple, draw the stem and any dimples or highlights. Pay attention to how these features affect the shape.
- Apply Shading: Now, it’s time to give your drawing depth. Identify the light source and start shading the areas that would be in shadow. Use the hatching technique to add texture and realism.
- Refine and Finish: Clean up your lines and enhance the final details. Don’t be afraid to use an eraser to lighten areas or correct mistakes. Your drawing is now complete!
Congratulations! You’ve just created your first drawing. Remember, every artist has their own style, so don’t be discouraged if it doesn’t look perfect. Keep practicing, and most importantly, have fun with it!
Also Read This: Enhancing Your LinkedIn Profile by Adding Skills to Showcase Expertise
5. Exploring Different Drawing Styles
Drawing is a versatile art form, and there are countless styles to explore! Each style offers a unique way to express creativity. Let's dive into some popular drawing styles and what makes them special.
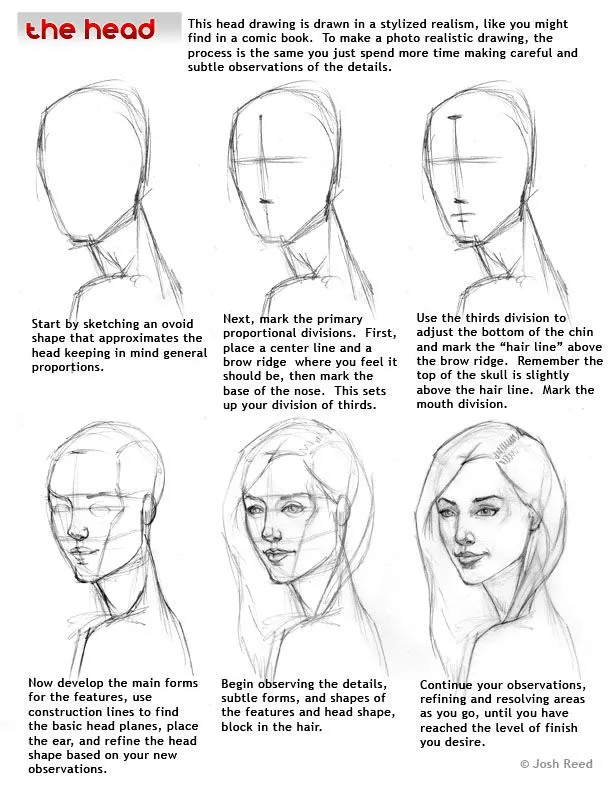
- Realism: This style focuses on capturing subjects as they appear in real life. Artists pay close attention to detail, shading, and proportions to create lifelike representations. Think of portrait artists who can make their subjects look like photographs!
- Cartooning: Cartooning is a playful and exaggerated style. It simplifies forms and uses bold lines and colors, making it ideal for comics and animations. This style allows for a lot of creativity and fun!
- Abstract: Abstract drawing moves away from reality, focusing instead on shapes, colors, and forms to express emotions or concepts. It encourages artists to break out of traditional forms and think outside the box.
- Surrealism: Surrealism combines dream-like imagery with reality. Think of melting clocks or whimsical creatures. This style invites viewers to experience the bizarre and fantastical!
- Sketching: Sketching is often a preliminary step that captures the essence of a subject quickly. It’s less about perfection and more about getting ideas down on paper. It’s a fantastic way to loosen up before creating a more polished piece!
Exploring these styles can help you find your artistic voice. Try experimenting with a few to discover what resonates with you!
Also Read This: Save YouTube Shorts to Your Camera Roll in a Few Easy Steps
6. Using Dailymotion for Drawing Tutorials
Dailymotion is a fantastic platform for finding drawing tutorials that cater to all skill levels. Whether you’re a beginner looking for basic techniques or an experienced artist seeking advanced tips, Dailymotion has you covered!
Here’s how to make the most of Dailymotion for your art journey:
- Search for Specific Styles: Use keywords like "realism drawing tutorial" or "cartoon character drawing" to find content tailored to your interests.
- Follow Artists: Many talented artists share their processes on Dailymotion. Follow them to receive updates on new tutorials and insights into their methods.
- Join Art Communities: Engage with other art enthusiasts in the comments. Sharing your thoughts and asking questions can enrich your learning experience!
- Utilize Playlists: Some creators organize their videos into playlists based on themes or skill levels. This makes it easy to progress through lessons in a structured manner.
So, grab your sketchbook and explore the myriad of drawing tutorials available on Dailymotion. You’ll surely find inspiration and guidance to enhance your artistic skills!
Also Read This: DIY Hair Puff Tutorials with Video Guides on Dailymotion
7. Tips for Improving Your Drawing Skills
Improving your drawing skills is a journey filled with exploration, practice, and a sprinkle of creativity. Here are some practical tips to help you along the way:
- Practice Regularly: Dedicate time each day to draw, even if it's just for 15-30 minutes. Consistency is key!
- Study the Basics: Focus on mastering basic shapes and forms. Everything in drawing is built on these fundamentals.
- Use References: Draw from life or use reference images. This helps improve your understanding of proportions and perspectives.
- Experiment with Different Mediums: Try pencils, charcoal, ink, or digital tools. Each medium offers unique benefits and effects.
- Learn from Others: Watch tutorials or follow artists on platforms like Dailymotion. Observing techniques can spark new ideas.
- Keep a Sketchbook: Document your progress and ideas. It's a safe space for exploration without the pressure of perfection.
- Seek Feedback: Share your work with friends or online communities. Constructive criticism can provide insights you might not see yourself.
Remember, improvement comes with patience and practice. Embrace your unique style, and don’t shy away from mistakes—they're part of the learning process!
8. Conclusion and Encouragement to Keep Practicing
As we wrap up this art guide, remember that the journey to becoming an accomplished artist is filled with ups and downs. What truly matters is your passion for drawing and the joy it brings you.
Every drawing you create adds to your experience and skillset. Here’s a motivational reminder:
| Key Takeaway | Encouragement |
|---|---|
| Practice Makes Perfect | Keep drawing, even when it feels challenging! |
| Embrace Mistakes | Learn from them; they’re stepping stones to improvement. |
| Celebrate Small Wins | Every completed drawing is a victory worth acknowledging. |
So, grab your sketchbook, put on some music, and let your creativity flow. The world of art is vast and inviting—dive in and enjoy every moment of your artistic journey!