Changing your primary email address on LinkedIn can feel like a daunting task, especially if you’re not sure where to start. Whether you’ve switched jobs, want to enhance your online security, or simply prefer a different email provider, updating your primary email is essential for ensuring you stay connected on the platform. In this guide, we’ll walk you through the reasons you might want to make this change and the steps involved in doing it smoothly.
Why You Might Want to Change Your Primary Email Address
There are several reasons someone might decide to change their primary email address on LinkedIn. Understanding these can help you determine if it’s the right move for you. Here are a few common scenarios:
- Job Changes: If you’ve recently changed jobs, it’s likely that you want to update your email to reflect your new workplace. This not only makes your profile more accurate but also helps with networking.
- Improved Security: Many people choose to switch to a more secure email provider. If you’ve been using a less secure service, transitioning to a provider with better security features can safeguard your LinkedIn account more effectively.
- Consolidation: Perhaps you’ve accumulated multiple email addresses over time. By changing your primary email to your most frequently used one, you streamline your online identity.
- Professional Image: Using a custom domain email address (like [email protected]) can enhance your professionalism and make a good impression on potential employers or clients.
Ultimately, changing your primary email on LinkedIn ensures that you stay connected, maintain security, and present a professional front in your networking efforts.
Also Read This: The Best Stock Image Websites for Finding Unique and High-Quality Photos
Steps to Change Your Primary Email Address
Changing your primary email address on LinkedIn is a straightforward process, designed to keep your account secure and up-to-date. Here’s a step-by-step guide to help you through it:
- Log In to Your LinkedIn Account: Start by signing into your LinkedIn account using your current email and password.
- Access Your Settings: Click on the “Me” icon at the top of your LinkedIn homepage, then select “Settings & Privacy” from the dropdown menu.
- Navigating to Email Addresses: In the settings menu, go to the “Account” tab and find the “Email addresses” section.
- Add a New Email Address: Click on “Add email address.” Enter the new email you want to use as your primary address, then click “Send verification.”
- Verify Your New Email: Check your new email inbox for a verification email from LinkedIn. Click on the link provided to confirm your new address.
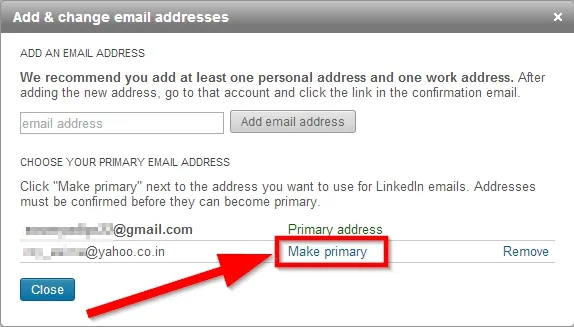
- Set as Primary: Once verified, return to the email addresses section. You should see your new email listed. Click on “Make primary” next to it to set it as your primary address.
- Remove Old Email (Optional): If you wish, you can also remove the old email address by clicking “Remove” next to it.
And there you have it! Your primary email address on LinkedIn is now updated. It’s always a good idea to keep your contact information current to stay connected with your network.
Also Read This: Guide to Watching the Olympics on YouTube Without Missing Events
Verifying Your New Email Address
Verifying your new email address is a crucial step in ensuring that your LinkedIn account remains secure and that you can receive important notifications. Here’s how to do it:
- Check Your Inbox: After you've added your new email address, look for an email from LinkedIn in your inbox. Sometimes, it might land in the spam or promotions folder, so be sure to check those as well!
- Open the Verification Email: The email will contain a verification link. Click this link to confirm that you have access to this new email address.
- Confirmation Message: Upon clicking the link, you should see a confirmation message that your email has been verified. This step is vital, as it ensures your account is secure and you receive notifications.
- Try Logging In: To further ensure everything is working smoothly, try logging into your LinkedIn account using the new email address.
Verification not only helps secure your account but also ensures you won’t miss out on any updates or messages from your connections. It's a small step that adds an extra layer of security to your online presence!
Also Read This: Adding Images to a Picfair Album: What You Need to Know
Troubleshooting Common Issues
Changing your primary email address on LinkedIn can sometimes lead to unexpected issues. Don’t worry; you’re not alone! Here are some common problems users face and how to resolve them:
- Verification Email Not Received: If you don’t see the verification email in your inbox, check your spam or junk folder. Sometimes, email providers mistakenly filter these important messages. If it’s not there either, try resending the verification email on LinkedIn.
- Unable to Set New Email as Primary: If LinkedIn won’t let you set your new email as primary, ensure that it’s verified. You can only make it primary after confirming your new email through the verification link.
- Login Issues: If you’ve changed your primary email but can’t log in, try using your old email address. LinkedIn usually allows login with both old and new addresses for a short period after the change. Once logged in, you can update your information if needed.
- Account Lockouts: Sometimes, security measures may lock your account after multiple failed login attempts. If this happens, follow LinkedIn’s recovery process, which usually involves verifying your identity through an alternate email or phone number.
If you encounter other problems not listed here, check LinkedIn’s Help Center or reach out to their customer support for assistance. They are quite helpful in resolving any technical hiccups!
Conclusion
Changing your primary email address on LinkedIn is a straightforward process that helps keep your professional connections secure and accessible. Following the steps outlined in this guide ensures a smooth transition. Here’s a quick recap:
- Log into your LinkedIn account.
- Add your new email in the settings.
- Verify the new email address.
- Set it as your primary email.
Staying up-to-date with your contact information is crucial for networking, especially in today’s digital landscape. If you run into any issues along the way, remember the troubleshooting tips we discussed. A little patience and persistence can go a long way!
By keeping your email current, you ensure that you never miss out on important notifications, job opportunities, or messages from connections. So go ahead, make that change, and stay connected!