Changing your email on LinkedIn might seem like a small task, but it can have a significant impact on your networking experience. Whether you’ve switched jobs, want to keep your professional life organized, or simply wish to update your contact information, knowing how to change your email can keep you connected to your professional network. In this guide, we’ll walk you through the process step-by-step.
Why You Might Want to Change Your Email on LinkedIn
There are several reasons why updating your email on LinkedIn can be beneficial. Here are some of the most common scenarios:
- Job Transitions: If you've recently changed jobs, it’s a good idea to update your email to reflect your new position. This helps your connections stay in touch with you.
- Personal vs. Professional: You might want to separate your personal and professional communications. Using a dedicated work email can help you manage messages more effectively.
- Increased Security: If you suspect that your current email has been compromised, changing it can enhance your account security and protect your professional information.
- Streamlined Communication: Updating to an email that you check more frequently can help you respond to connection requests and job opportunities promptly.
- Brand Consistency: For freelancers or business owners, you may want to use an email that matches your brand, which can contribute to a more professional image.
In summary, keeping your email address up-to-date on LinkedIn is essential for maintaining your professional relationships and ensuring you don’t miss any important updates. Whether for personal reasons or professional strategy, it’s a simple but crucial step in managing your online presence effectively.
Also Read This: Canva Image Animation
Step 1: Log into Your LinkedIn Account

First things first, let’s get you logged into your LinkedIn account. This is the gateway to your professional network, so make sure you have your credentials handy!
Here’s how to do it:
- Open your preferred web browser and go to the LinkedIn website.
- In the top right corner, you’ll see the “Sign In” button. Click on that.
- A login form will pop up. Enter your email address and password associated with your LinkedIn account.
- Click the “Sign In” button to access your profile.
If you’ve forgotten your password, don’t worry! Just click on the “Forgot password?” link and follow the prompts to reset it.
Once you’re logged in, take a moment to familiarize yourself with your homepage. You’ll see your connection requests, messages, and notifications. Now that you're in, it’s time to take the next step!
Also Read This: How to Hide YouTube Thumbnails for a Cleaner Channel Display
Step 2: Access Your Account Settings
Now that you’re logged into LinkedIn, the next step is to access your account settings. This is where all the magic happens—where you can manage your email address, privacy settings, and more.
Here’s a simple guide to finding your account settings:
- Look for your profile picture in the top right corner. Click on it, and a dropdown menu will appear.
- From the dropdown menu, select “Settings & Privacy.”
- You’ll be directed to a new page that contains various settings options. This is your control center!
Once you're on the settings page, you’ll see sections such as Account, Privacy, and Communications. Each section is designed to help you customize your LinkedIn experience. Now you’re all set to update your email!
Also Read This: Mastering LinkedIn for Effective Professional Networking
Step 3: Find the Email Addresses Section
Once you're logged into your LinkedIn account, the next step is to locate the email addresses section. This is where all the magic happens! Don’t worry; it’s quite straightforward.
First, navigate to your profile by clicking on your profile picture or the “Me” icon at the top of your LinkedIn homepage. From there, look for the “Settings & Privacy” option. You can usually find this in the drop-down menu.
Now that you’re in the settings page, look for the “Account preferences” on the left-hand side. Under this section, you’ll find “Email addresses.” This is your destination!
Here’s a quick checklist to help you:
- Click on your profile picture or “Me” icon.
- Select “Settings & Privacy.”
- Look for “Account preferences.”
- Find the “Email addresses” section.
Once you reach this section, you should see a list of all the email addresses currently associated with your LinkedIn account. This is where you can manage your email settings efficiently, ensuring that you don’t miss important notifications or messages.
Also Read This: Mastering Your Digestive Symphony and Unveiling Its Causes
Step 4: Add a New Email Address
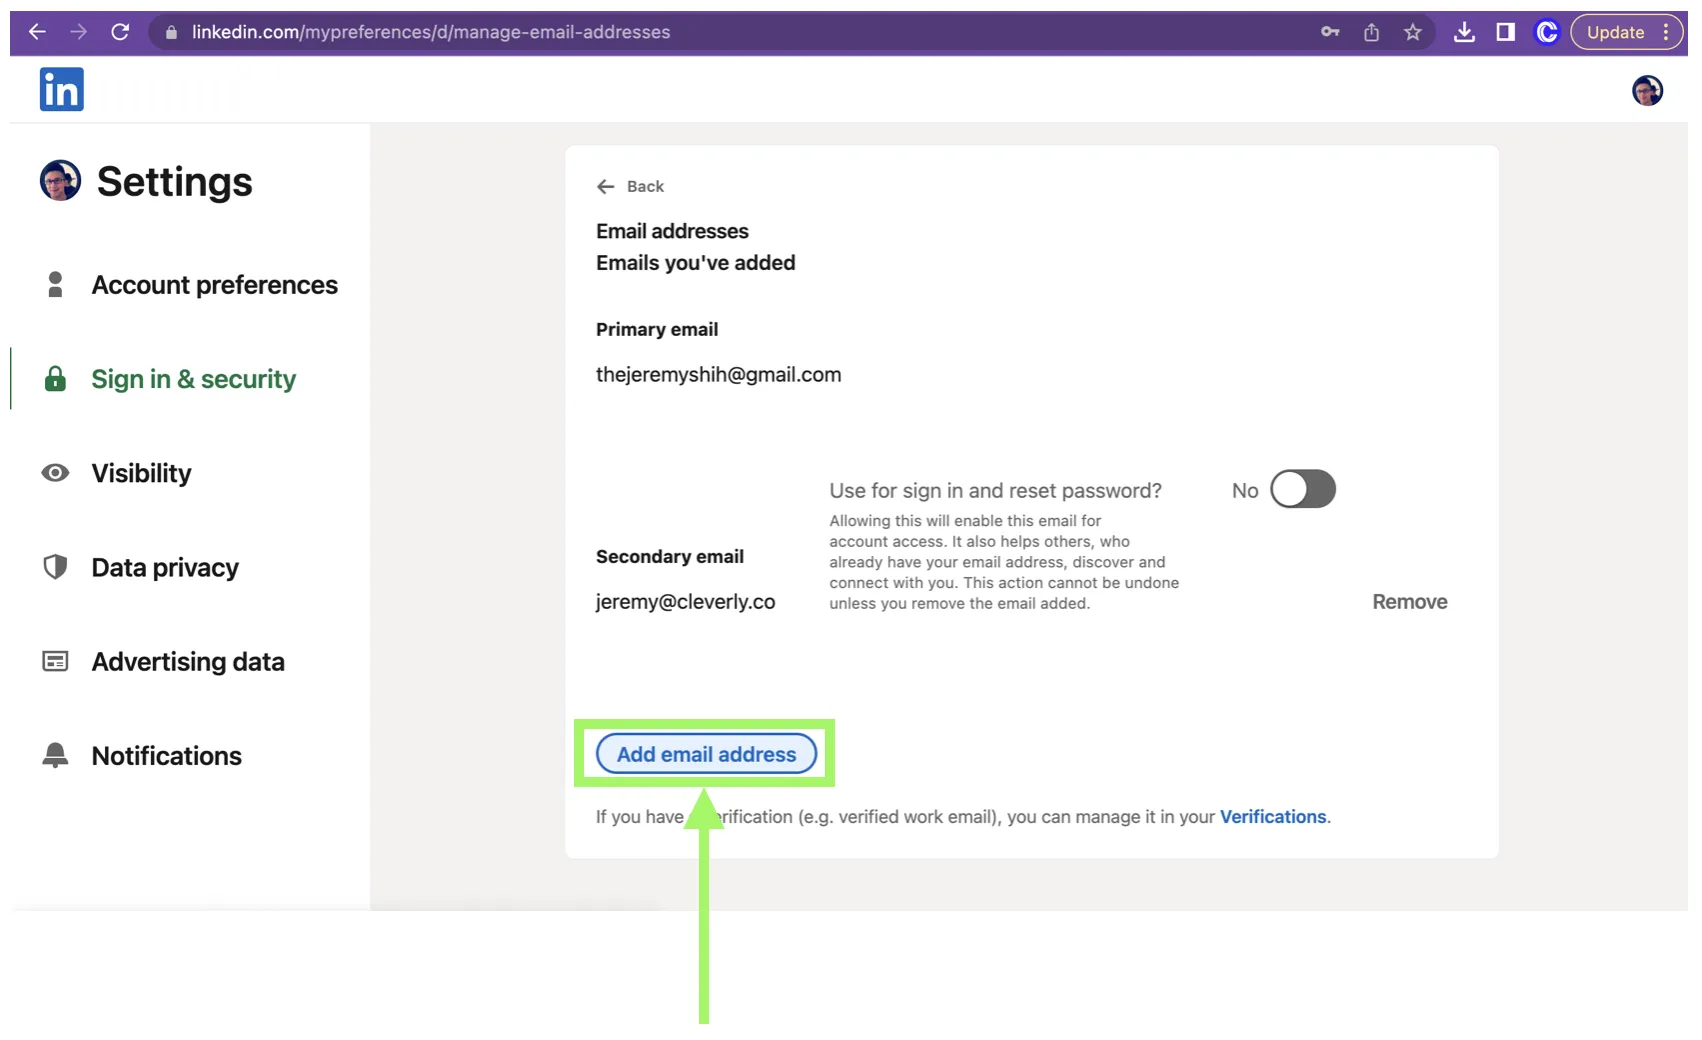
Now that you’ve located the email addresses section, it’s time to add a new email address! This step is essential if you want to ensure that your LinkedIn communications reach you effectively. Let’s dive into the process.
In the “Email addresses” section, you’ll see an option to “Add email address.” Click on that, and a pop-up window will appear prompting you to enter your new email address. Go ahead and type it in!
After entering the new email, LinkedIn will typically send a verification email to that address. This is just a quick security measure to confirm that you own the email you’re adding.
Once you receive the verification email, click the link inside to confirm your new email address. Voila! You’re all set!
Here’s a quick guide to make this step even easier:
- Access the “Email addresses” section.
- Click on “Add email address.”
- Enter your new email address.
- Check your inbox for the verification email.
- Click the verification link to confirm.
And just like that, you’ve successfully added a new email address to your LinkedIn account! Feel free to make this your primary email if you wish, ensuring you stay connected with your professional network.
Also Read This: Effective Strategies to Earn Money Online with Dailymotion
7. Step 5: Verify Your New Email Address
Now that you've added your new email address, it's time to verify it. LinkedIn takes security seriously, so this step is crucial to ensure that you own the email address you've just provided.
Here's how you can verify your new email:
- Check your email inbox for a verification email from LinkedIn. This email usually has a subject line like "Confirm your email address." If you don’t see it in your inbox, make sure to check your spam or junk folder.
- Open the email and look for the ‘Verify Email’ button or link. Clicking this will confirm that you have access to this email account.
- Once you click the link, you’ll be redirected to LinkedIn, where a message will confirm that your email has been verified. It’s as simple as that!
Tip: If you don’t receive the verification email, you can request a new one through LinkedIn. Just head back to the email settings and click on “Resend verification email.”
Also Read This: What Channel is Bally Sports on YouTube TV
8. Step 6: Set Your New Email as Primary
After verifying your new email address, the next step is to make it your primary email on LinkedIn. This means that all LinkedIn notifications and communications will be sent to this email moving forward.
To set your new email as primary, follow these steps:
- Go back to the “Email addresses” section in your LinkedIn settings.
- You should see both your old and new email addresses listed. Locate the new email address you just verified.
- Next to your new email, there will be an option to “Make Primary.” Click on that, and LinkedIn will automatically update your primary email.
And voilà! You’re now set up with your new primary email. Remember, it’s a good idea to check if all your LinkedIn notifications are being sent to this email moving forward.
Note: If you ever need to change your email again, you can follow the same steps to ensure you're always using the email you prefer!
Also Read This: How to Add a New Project to Behance
Step 7: Remove Old Email Address (Optional)
Once you’ve successfully added your new email address to your LinkedIn account, you might be considering whether to remove your old email address. This step is optional, but it can help you keep your account organized and ensure that no unwanted notifications are sent to the old address. Here’s how you can do it:
- Log into your LinkedIn account using your new email address and password.
- Click on your profile picture at the top right corner and select Settings & Privacy from the dropdown menu.
- In the left sidebar, click on Account preferences.
- Scroll down to the Email addresses section.
- Here, you’ll see a list of all email addresses associated with your account.
- Find your old email address and click on the Remove option next to it.
Once you remove the old email, LinkedIn will ask you to confirm this action. Just click Confirm to finalize the process. Keep in mind that you need at least one email linked to your account, so ensure that your new email is already added before you try to remove the old one.
By taking this step, you not only streamline your account but also minimize the risk of missing important notifications. Plus, it’s always good to keep your digital footprint updated!
Conclusion
Changing your email address on LinkedIn is a straightforward process that can enhance your online networking experience. Whether you’ve switched jobs, rebranded yourself, or simply want to use a more current email, keeping your LinkedIn account up-to-date is crucial.
To recap, here are the key steps we covered:
- Log in to your LinkedIn account.
- Add your new email address.
- Verify the new email address through the confirmation link sent to it.
- Set it as your primary email, if desired.
- Optionally, remove your old email address for better organization.
By following this guide, you'll ensure that your LinkedIn profile remains a vital tool in building professional relationships. Remember, maintaining accurate contact information helps you stay connected with your network and receive important updates. If you ever decide to change your email again, just revisit these steps, and you’ll be set in no time!