Changing your email ID on LinkedIn might seem like a small task, but it’s an important step to ensure you maintain control over your professional network. Whether you're looking to update your contact information, enhance your security, or simply prefer a new email, the process is straightforward. In this guide, we'll walk you through everything you need to know about changing your email ID on LinkedIn and why it matters.
Why Change Your Email ID on LinkedIn?
There are several compelling reasons to consider changing your email ID on LinkedIn. Let’s break a few of them down:
- Improved Security: If you suspect that your current email has been compromised or if you’re using an outdated email provider, switching to a more secure email can protect your account from unauthorized access.
- Professionalism: You might want to switch to a more professional email address, especially if you initially signed up with a personal or informal email. A professional email can enhance your credibility.
- Organizational Changes: If you’ve changed jobs or companies, you might want to update your email to reflect your current role. This helps you stay connected with colleagues and networks.
- Consolidation: You may have multiple email accounts, and it might make sense to consolidate them into one primary email for easier management of notifications and messages.
- Outdated Information: If your email ID is no longer in use or has changed due to personal reasons, it’s essential to keep your LinkedIn profile up-to-date to avoid missing important notifications.
In summary, updating your email ID on LinkedIn can enhance your security, reflect your professionalism, and help you stay organized. Each reason emphasizes the importance of maintaining accurate contact information in your professional network.
Also Read This: How to Block YouTube on a School Chromebook: A Guide for Administrators
Step 1: Log into Your LinkedIn Account
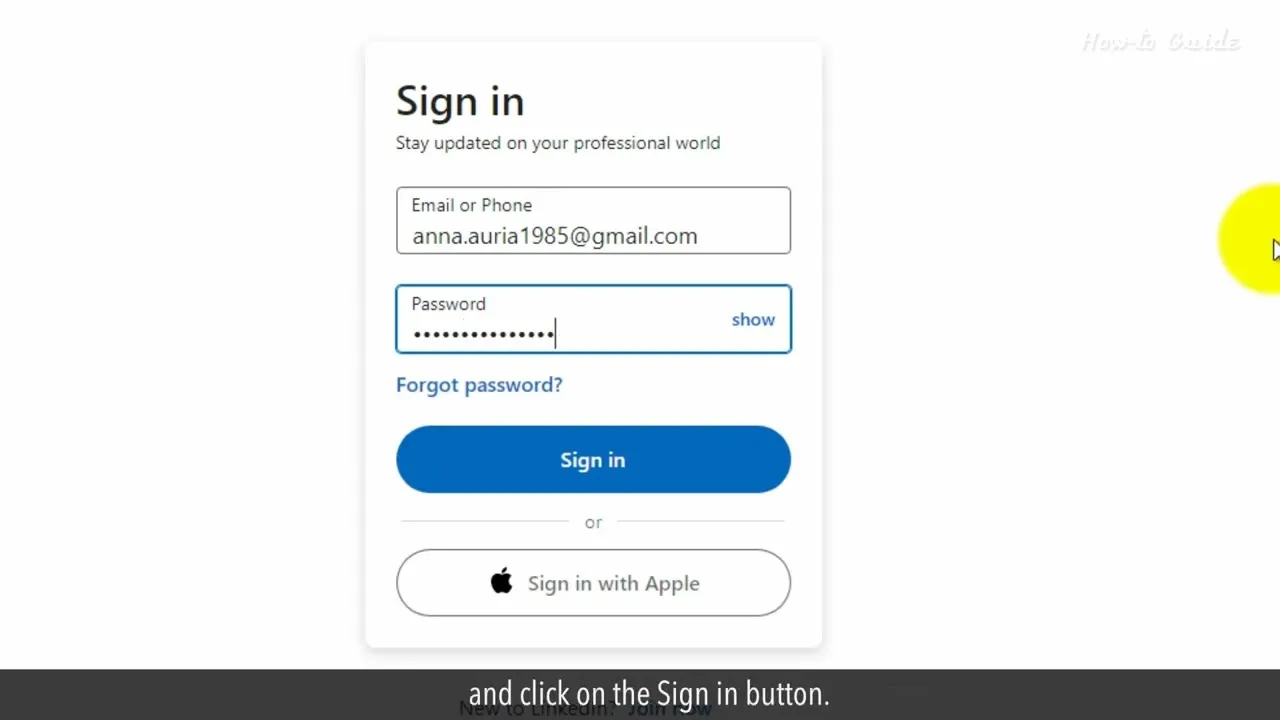
Alright, let’s kick things off! The first thing you need to do is log into your LinkedIn account. If you’re like most of us, you probably have your username and password saved somewhere, which makes this part super easy. Just follow these steps:
- Open your preferred web browser or the LinkedIn mobile app.
- Type in the URL www.linkedin.com or tap open the LinkedIn app.
- In the login fields, enter your email address and password.
- Hit that Sign In button!
Once you’re in, you’ll be greeted by your LinkedIn homepage. It’s like stepping into your professional living room, where all your connections and opportunities are waiting. If you’ve forgotten your password or are having trouble logging in, don’t sweat it! Just click on the Forgot Password? link, and LinkedIn will guide you through resetting it.
Now that you’re logged in, you’re ready to take the next step in changing your email ID. Let’s keep this momentum going!
Also Read This: A Guide to ShootProof Client Downloads
Step 2: Access Account Settings
Great! You’re logged in, and now it’s time to access your account settings. This is where all the magic happens, and you can manage your profile, privacy, and of course, your email address. Here’s how you can do that:
- Look towards the top right corner of your LinkedIn homepage. You’ll see your profile picture or the icon that represents your account.
- Click on it to reveal a drop-down menu.
- Select Settings & Privacy from that menu. This will take you to the settings page where you can manage various aspects of your account.
On the Settings & Privacy page, you’ll find different sections like Account, Privacy, and Ads. For changing your email ID, you’ll want to focus on the Account tab. It’s like your personal control center!
Once you’re there, you can easily navigate to the section that allows you to manage your email addresses. Easy peasy, right? Now, let’s move on to the actual email change!
Also Read This: How to Upload and Sell Photos on Shutterstock Successfully
Step 3: Navigate to Email Addresses
Alright, now that you've clicked on "Settings & Privacy," it's time to find where all the email magic happens! Look for the section that says "Sign in & security." This is where LinkedIn stores all the details related to your account's security, including your email addresses.
Once you're in the "Sign in & security" section, you'll want to scroll down until you see the *Email addresses option. This is your gateway to managing all the email addresses linked to your LinkedIn profile. Go ahead and click on it. You should see a list of your current email addresses. If you have multiple addresses linked, you’ll notice which one is set as your primary email address, and which ones are just hanging out in the background.
It’s essential to keep your email updated since LinkedIn uses it for notifications, security alerts, and account recovery. So, if you notice an old email address that you no longer use, this is the perfect time to get rid of it or change it! Just remember, you can always add another email address later if you need to.
In this section, you’ll also find options to set your preferred email for receiving notifications from LinkedIn. Whether you want updates on job opportunities, connection requests, or messages, controlling your email preferences is super important!
Also Read This: How to Watch the Dodgers on YouTube TV
Step 4: Add a New Email Address
Now that you’re all set with navigating to the email addresses, let’s dive into adding a new email address! This part is straightforward and won’t take much time at all.
Look for the Add email address* button—it's usually pretty prominent in the Email addresses section. When you click on that, you'll be prompted to enter the new email address you wish to add. Type it in carefully; you wouldn’t want a typo causing communication issues later on!
After entering your new email address, LinkedIn will ask you to verify it. This step is crucial because it ensures that you have access to the new email address and prevents anyone else from adding it to your account. You’ll receive a verification email with a link. Go ahead and check your inbox (and maybe your spam folder, just in case!) for that email.
Once you click on the verification link, LinkedIn will confirm that the new email address is now part of your account. If you'd like to make it your primary email, you can easily do that as well. Just remember, keeping your contact information up-to-date helps you stay connected with your network!
Also Read This: How to Watch Private Videos on Dailymotion
Step 5: Verify Your New Email Address
Once you've entered your new email address on LinkedIn, the next crucial step is to verify it. This is a simple yet essential process that ensures your account's security and confirms that the email belongs to you. Here’s how to go about it:
- Check Your Inbox: After you submit your new email address, LinkedIn will send a verification email to that address. So, grab your smartphone or open your email client and check your inbox for an email from LinkedIn.
- Open the Email: Look for a message that says something like “Confirm Your Email Address” or “Verify Your Email.” It usually contains a direct link to confirm your new email.
- Click the Verification Link: Go ahead and click that link! This will redirect you back to LinkedIn and confirm that you have access to the email address you just added.
- Confirmation Message: Once clicked, you should see a confirmation message on LinkedIn indicating that your new email has been verified successfully. This means you’re all set!
If you don’t see the email in your inbox, make sure to check your spam or junk folder. Sometimes, verification emails can land there. If it’s still missing after a few minutes, you might want to try resending the verification email from your LinkedIn settings.
Also Read This: Link Activision to YouTube for Enhanced Gaming Integration
Step 6: Remove the Old Email Address (Optional)
After successfully verifying your new email address, you might be wondering whether to keep your old email on your LinkedIn profile. While it’s not mandatory to remove it, doing so can help tidy up your account and enhance its security. Here’s how you can remove your old email address:
- Go to Settings & Privacy: Navigate back to your LinkedIn settings by clicking on your profile picture and selecting “Settings & Privacy” from the dropdown menu.
- Access the Email Addresses Section: In the “Account” tab, find the “Email addresses” section. Here, you’ll see a list of all the email addresses linked to your account.
- Select the Old Email: Locate the email address you wish to remove. Next to it, you might see an option like “Remove” or a trash bin icon.
- Confirm Removal: Click on “Remove,” and you’ll likely be prompted to confirm your decision. Just follow the prompts, and voilà, your old email address will be removed!
Keep in mind that if your old email address is currently set as the primary one, you'll need to switch your primary email to the new one before you can remove the old one. It's a straightforward process, and once done, you’ll have a cleaner and more secure LinkedIn profile!
How to Change Your Email ID on LinkedIn
Changing your email ID on LinkedIn is a straightforward process that helps ensure your account remains secure and accessible. Whether you want to update your email for privacy reasons or simply wish to use a different one, following these steps will guide you through the process. Below is a comprehensive guide on how to change your email ID on LinkedIn.
Steps to Change Your Email ID on LinkedIn
- Log In to Your Account: Start by visiting the LinkedIn website or opening the LinkedIn app. Enter your current email address and password to log in.
- Access Settings: Click on your profile picture or the 'Me' icon at the top right corner, and select 'Settings & Privacy' from the dropdown menu.
- Go to 'Account Preferences': In the left sidebar, click on 'Account preferences' to find the email settings.
- Add New Email: Under the 'Email addresses' section, click on 'Add email address.' Enter your new email ID and click 'Send verification.'
- Verify New Email: Check your new email inbox for a verification email from LinkedIn. Click on the verification link provided.
- Set as Primary (Optional): If you want to make the new email your primary email, return to the 'Email addresses' section, click 'Make primary' next to your new email address.
- Remove Old Email (Optional): If you no longer wish to keep your old email address, click 'Remove' next to it.
Important Tips
- Always use an email that you have access to.
- Ensure your new email is secure and not easily guessable.
- Check your spam folder if the verification email does not arrive.
By following these simple steps, you can easily change your email ID on LinkedIn, ensuring your account remains secure and updated.
Conclusion
Updating your email ID on LinkedIn is essential for maintaining account security and ensuring you receive important notifications; just follow the outlined steps for a seamless transition.