In today's digital age, having a robust LinkedIn profile is essential for professional growth. Adding your experience is a key component that showcases your career journey, skills, and accomplishments. Whether you're a seasoned professional or just starting out, highlighting your experience effectively can open doors to networking opportunities, job offers, and collaborations. Let's explore why adding experience to your LinkedIn profile is not just beneficial but crucial for your career advancement.
Why Adding Experience is Important
Adding experience to your LinkedIn profile is more than just a formality; it’s a powerful way to communicate your professional story. Here are some reasons why it’s important:
- Visibility to Recruiters: Recruiters often search LinkedIn for potential candidates. By detailing your work experience, skills, and achievements, you increase your chances of being noticed. According to a LinkedIn study, profiles with complete experience sections receive 36 times more messages from recruiters.
- Showcasing Your Skills: Each role you've held offers a chance to demonstrate specific skills. Listing your experience allows you to highlight both hard and soft skills relevant to your industry, such as leadership, project management, or technical expertise.
- Building Your Professional Brand: Your experience section helps to define your personal brand. It reflects your career path, interests, and areas of expertise. A well-crafted experience section can position you as a thought leader in your field.
- Networking Opportunities: When you add experience, you can connect with former colleagues, supervisors, and industry peers. This not only expands your network but also can lead to collaborative opportunities or referrals.
- Tracking Your Career Progression: Keeping your experience updated allows you to visually track your career journey. This can be motivating and help you set future career goals.
In summary, taking the time to add and update your experience on LinkedIn can significantly impact your professional life. It’s not just about filling out a profile; it’s about setting yourself up for success!
Also Read This: Exploring the Tragic Event of Alex from Dougherty Dozen's Death on YouTube
Step 1: Log into Your LinkedIn Account
Before you can showcase your experience on LinkedIn, the first step is to log into your account. If you've already created a LinkedIn profile, it’s as simple as entering your credentials. Here’s how to do it:
- Open your web browser and go to the LinkedIn homepage.
- Enter your email address and password in the appropriate fields.
- Click the "Sign In" button.
Once you're in, take a moment to familiarize yourself with the dashboard. You’ll see your feed filled with updates from your connections, groups, and companies you follow. This is where the magic begins!
If you’re having trouble logging in, check if you’ve forgotten your password. Just click on the “Forgot password?” link and follow the instructions to reset it.
Now that you're logged in, you're ready to start enhancing your profile. Remember, your LinkedIn account is a reflection of your professional persona, so let’s make it shine!
Also Read This: How Dailymotion Functions: An In-Depth Look at the Platform
Step 2: Navigate to Your Profile
Now that you’re logged into LinkedIn, the next step is to navigate to your profile. Your profile is essentially your online resume, and it’s important to ensure it accurately reflects your professional experience and accomplishments. Here’s how to get there:
- Look for your profile picture or the “Me” icon at the top right corner of the homepage.
- Click on it, and you'll see a dropdown menu.
- Select “View Profile” from the options.
Your profile page will display your current experience, education, and skills. Here, you can easily edit existing entries or add new experiences.
To make your profile stand out, consider the following:
- Profile Picture: Ensure you have a professional-looking photo.
- Headline: Craft a headline that summarizes your expertise.
- Background Image: Add a background image that resonates with your professional field.
Remember, navigating your profile is the first step in making meaningful updates that showcase your experience. Let’s get ready to add those valuable experiences next!
Also Read This: How to Add Dailymotion to Kodi for Seamless Video Streaming
Step 3: Click on the Add Profile Section Button
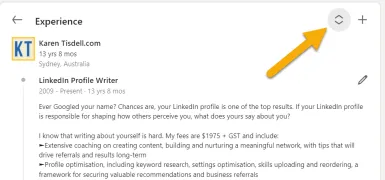
Alright, you’re getting closer to showcasing your professional journey on LinkedIn! The next step is to locate the Add Profile Section button. This button is usually nestled right at the top of your profile page, just below your profile picture. It’s hard to miss, but if you do, here’s a quick guide:
- Look for your profile header, which includes your name and headline.
- Just below that, you’ll see the Add Profile Section button, often highlighted in a vibrant blue color.
Once you’ve spotted it, go ahead and click on it. This is like unlocking a treasure chest filled with opportunities to enhance your profile! You’ll notice a dropdown menu unfold with various sections you can add. It’s a simple, user-friendly interface designed to guide you through the process.
So, why is this step so crucial? Well, the Add Profile Section button serves as your gateway to presenting your skills, experiences, and accomplishments in a structured manner. Think of it as the starting point for turning your profile into a compelling narrative of your career. Now, let’s move on to the next step!
Also Read This: Understanding Why Telegram Is Stuck on Connecting
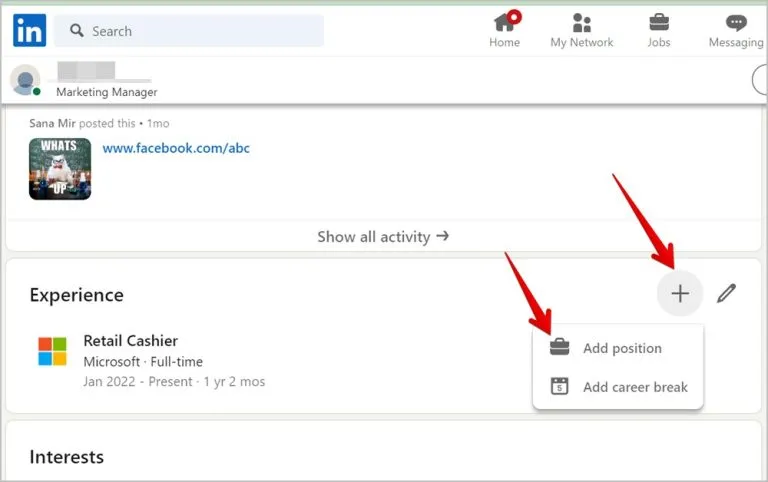
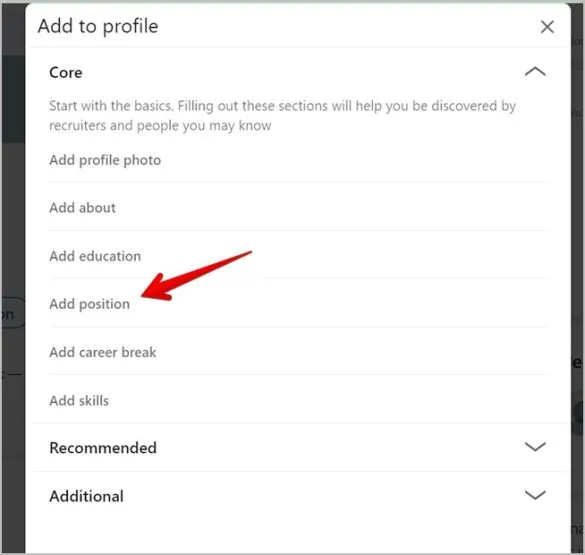
Step 4: Select Experience from the Dropdown Menu
Now that you’ve clicked on the Add Profile Section button, it’s time to dive into the specifics of your career. From the dropdown menu, you'll want to select Experience. This is where you can share your work history, and it’s essential for potential employers to get a glimpse of what you’ve accomplished.
When you click on Experience, a new section will appear where you can start filling in the details. Here’s a quick checklist of what you’ll typically need to provide:
- Job Title: Your official title at the company.
- Company Name: The name of the organization you worked for.
- Location: Where the company is based (city and state/country).
- Dates Employed: The start and end dates of your employment.
- Description: A brief overview of your responsibilities and achievements.
Once you’ve entered this information, don’t forget to hit the Save button at the bottom. This step is vital because it not only adds depth to your profile but also enhances your visibility to recruiters who are on the hunt for talent like yours. So, take your time here and make sure to showcase the unique contributions you made at each position!
Also Read This: How to Extract Transcripts and Scripts from YouTube Videos
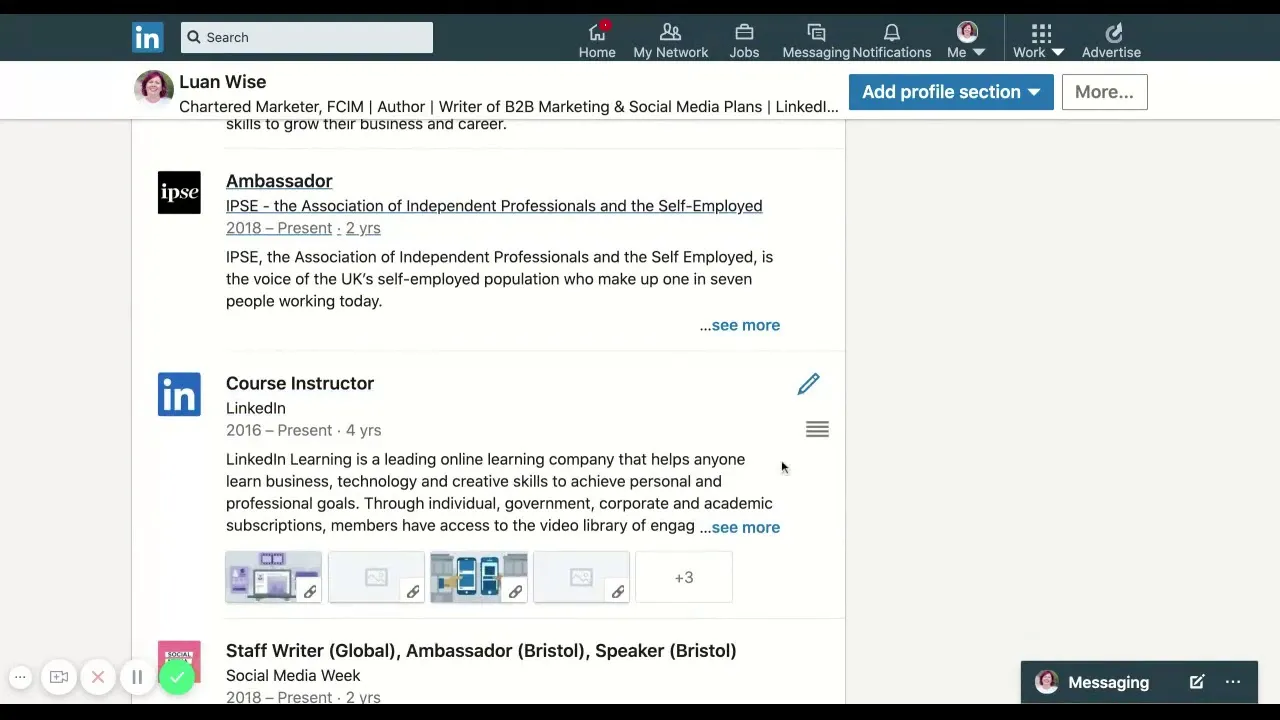
Step 5: Fill in Your Job Details
Now that you’ve chosen the position you're adding, it’s time to dive into the nitty-gritty of your job details. This section is your chance to showcase your role and responsibilities, so make it count!
Here’s what you need to include:
- Job Title: Clearly state your title. If you held a unique position, consider using a more general title for clarity.
- Company Name: Add the name of the organization you worked for. If it’s a well-known company, this can add credibility!
- Location: Specify the city and country where the job was based. This gives context to your experience.
- Dates of Employment: Use the month and year format to make it easy to read. If you’re still working there, check the box that says “I currently work here.”
- Description: Here’s where you can shine! Describe your responsibilities and accomplishments in a few bullet points. Use action verbs and quantify your achievements if possible. For example:
| Responsibility | Achievement |
|---|---|
| Managed a team of 5 | Increased sales by 30% in one year |
| Developed marketing strategies | Boosted engagement by 50% through social media campaigns |
Remember, this is your chance to tell your story, so be genuine and enthusiastic!
Also Read This: How to Change Your Username in Behance
Step 6: Add Additional Information
This step is where you can get creative! Adding additional information can help you stand out. Think about what makes you unique and how that plays into your professional persona.
Consider including:
- Skills: List skills that are relevant to your role. For example, if you’re in marketing, you could mention SEO, content marketing, and analytics.
- Certifications: If you’ve obtained any certifications or accolades that are relevant to your job, don’t hesitate to flaunt them!
- Projects: Highlight specific projects you worked on that had a significant impact. Talk about challenges faced and how you overcame them.
- Volunteer Work: If applicable, include volunteer experiences that relate to your professional skills or demonstrate your commitment to your field.
- Recommendations: Encourage colleagues to endorse your skills or write you a recommendation. Nothing speaks louder than a personal endorsement!
Incorporating these elements not only enriches your profile but can also create connections with like-minded professionals!
Also Read This: Using Behance effectively
9. Step 7: Save Your Changes
Alright, you’re almost there! After you’ve crafted that perfect experience section, it’s time to save your hard work. This step is crucial because if you forget to save, all those insightful details can vanish into the digital abyss! So, let’s make sure we get it right.
Once you’ve filled in all the relevant fields, look for the *“Save” button, typically located at the bottom of the pop-up form. Here’s a quick checklist to ensure everything is in place before hitting that button:
- Position Title: Have you specified your job title clearly?
- Company Name: Is the company name accurate and correctly spelled?
- Dates of Employment: Did you enter the start and end dates properly?
- Description: Is your role description engaging and free of typos?
After double-checking all these details, it’s time for the moment of truth. Click “Save”*, and voilà! Your changes are now live on your LinkedIn profile. If you want to see how it looks, simply navigate back to your profile page and refresh it. You should see your current experience reflecting your latest updates. Remember, keeping your LinkedIn profile updated is key to attracting the right opportunities!
10. Conclusion
And there you have it! Adding experience on LinkedIn doesn’t have to be daunting. With these simple steps, you can showcase your professional journey effectively. A well-crafted experience section not only highlights your skills but also tells your unique career story, which can resonate with potential employers and connections alike.
As you wrap up this process, keep these final thoughts in mind:
- Authenticity: Be true to your experiences; honesty shines through.
- Updates: Regularly update your profile to reflect any new skills or roles.
- Networking: Don’t forget to engage with your connections; it’s all about building relationships!
In the fast-paced world of professional networking, a standout LinkedIn profile can open doors you never knew existed. So, take the time to refine yours and let your career speak volumes!