Canva has gained popularity as a tool for creating visuals. However many users face the problem of image stretching. This occurs when images don't fit the space causing a distorted or stretched look. As a designer I've dealt with this challenge as well. The first time I came across it I felt quite frustrated. I wanted my design to be flawless but stretching seemed to spoil my efforts. Knowing what image stretching is can assist us in addressing this issue directly.
Why Image Stretching Happens in Canva
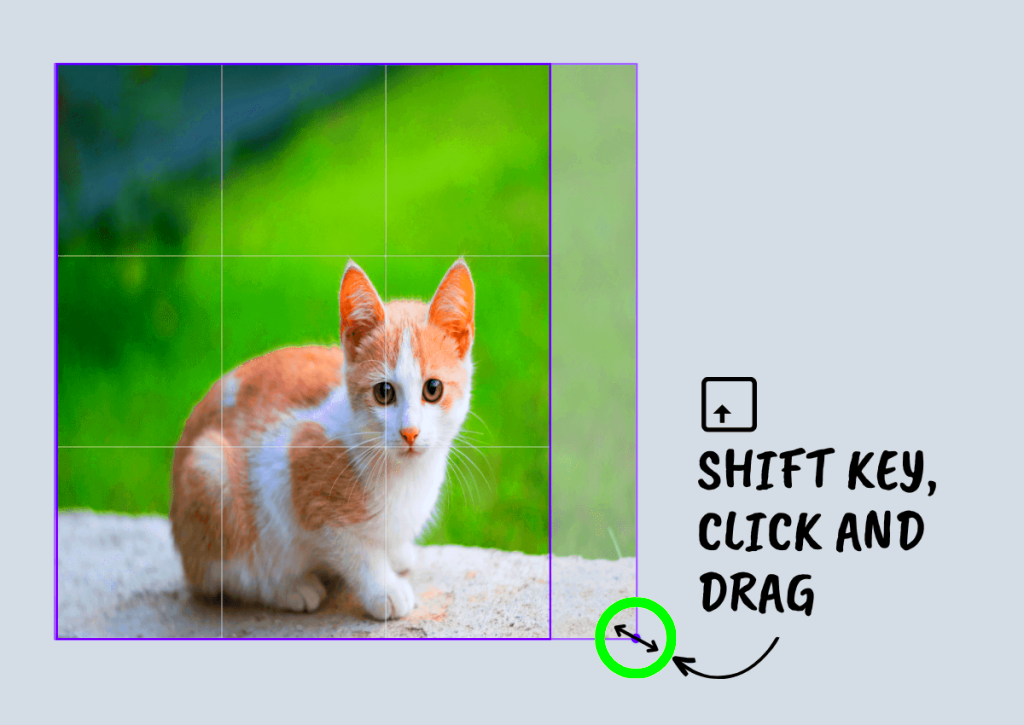
Image stretching happens for various reasons and it's crucial to identify them to prevent the problem from recurring. Here are a few typical culprits.
- Aspect Ratio Mismatch: Every image has a specific aspect ratio. When you stretch an image to fit a different ratio, it can lose its natural proportions.
- Canvas Size Changes: If you resize your canvas, the images may not adapt correctly, leading to stretching.
- Improper Image Import: Uploading images that are either too small or too large can cause Canva to stretch them to fit the design.
As I delved deeper into design I came to understand the importance of grasping the mechanics of image stretching. This knowledge allowed me to recognize the significance of maintaining an images true appearance while tailoring it to suit my requirements.
Also Read This: Dailymotion for Kids Offers Fun Alphabet Songs and Learning Content
Ways to Stretch Images Without Cropping
Fortunately, there are quite a few ways to enlarge images without having to cut them down. Here are some techniques that I’ve found useful.
- Using the Resize Tool: Instead of dragging corners to stretch an image, use the resize tool to adjust dimensions while maintaining proportions.
- Adjusting the Image Position: Sometimes, moving the image within the frame can help fit it better without losing parts of it.
- Experimenting with Backgrounds: If your image is too small, consider adding a background that complements it, creating a seamless look without stretching.
Once I started using these methods my creations began to appear more refined. Its remarkable how a bit of work can turn a design into something truly exceptional!
Also Read This: How to Restore YouTube on Your Phone After Uninstallation
Adjusting Image Settings for Better Results
When using Canva changing the settings of an image can really impact the outcome. I recall my experience trying to design a flyer for a friends birthday bash. I had this stunning photo of us from a trip but when I uploaded it it appeared out of place. The colors seemed off and the resolution appeared subpar. That was the moment I understood that adjusting the image settings could rescue my design.
Here are a few important adjustments to think about when it comes to improving your pictures.
- Brightness: Adjusting brightness can help bring out details that may be hidden in shadows. A little increase can add life to dull images.
- Contrast: This setting defines the difference between the dark and light areas of your image. Finding the right balance can make your visuals pop.
- Saturation: Sometimes, an image needs just a touch more color. Increasing saturation can make your images vibrant, but be cautious—too much can look unnatural.
Through trying out these configurations I discovered that even tweaks can bring about notable enhancements. Believe me investing the effort to explore these options is worthwhile. They have the power to transform a picture into something striking and unforgettable!
Also Read This: Is It Legal to Download Dailymotion Videos for Personal Use
Using the Canva Image Downloader Effectively
I have come to value the Canva Image Downloader as a useful tool. When I first started using Canva I would frequently save my creations as images without fully understanding the significance of selecting the format. This ignorance resulted in a loss of quality. There was an instance when I sent a design to a printer only to discover it was pixelated. That was an unforgettable lesson for me.
Here are some tips to make the most out of the Canva Image Downloader.
- Select the Right Format: Choose between PNG, JPG, or PDF based on your needs. PNG is great for images with transparent backgrounds, while JPG is suitable for photographs.
- Optimize Your Settings: Before downloading, check the quality settings. Higher quality settings will result in better print outputs.
- Check Your Dimensions: Ensure the dimensions match the intended use. For web use, smaller dimensions work fine, but print requires larger sizes.
By following these suggestions, I've managed to save a lot of time and steer clear of annoyance. Believe me when I say that a carefully chosen image can greatly improve your work!
Also Read This: How to Go on Private Mode on LinkedIn to Protect Your Privacy
Common Issues with Image Stretching
Even with our attempts stretching images in Canva can still happen. Its akin to an unexpected plot twist that catches you off guard. I’ve had my fair share of these surprises particularly while designing a social media post. The image appeared gorgeous on my display but once I uploaded it, it came out distorted. Here are some issues, that I’ve come across.
- Wrong Dimensions: Uploading images that are too small can cause Canva to stretch them beyond their limits, leading to pixelation.
- Locking Aspect Ratio: Forgetting to lock the aspect ratio can result in stretched images that lose their original appeal.
- Using the Wrong Template: Selecting a template that doesn't suit your image's proportions can lead to stretching, so always double-check your choices.
Through these moments I've learned the importance of being present and paying attention to details. While Canva is a great resource it does take some time and effort to truly get the hang of it. By recognizing these challenges you can craft designs that are not visually appealing but also stay true to their intended essence.
Also Read This: Canva Circular Image Making
Best Practices for Image Stretching
During my time using Canva I discovered that following a few guidelines can prevent a lot of frustration when it comes to stretching images. I recall working on a presentation for my university project. I was thrilled about my visuals but in my rush I accidentally stretched an important image and it turned out looking terrible. That incident taught me important lessons. Here are some tips to remember:
- Always Lock the Aspect Ratio: This simple step ensures that when you resize an image, it maintains its original proportions. It's a lifesaver!
- Preview Before Finalizing: Always take a moment to preview your design before downloading or sharing. This helps catch any stretching issues early.
- Use High-Resolution Images: Starting with a high-resolution image gives you more flexibility in resizing without compromising quality.
- Consider the Image’s Purpose: Think about where and how the image will be used. If it’s for a small social media post, a different approach might be needed than for a large banner.
From what I have seen these approaches have allowed me to uphold the authenticity of my creations while steering clear of the downsides of distorting images. Adopting these routines can result in more refined and sophisticated results.
Also Read This: How to Change Your Email for YouTube
Frequently Asked Questions About Canva Image Stretching
While exploring Canva more I discovered that a lot of users have inquiries regarding image stretching. Its reassuring to realize that others encounter similar hurdles. Here are some commonly asked questions along with my thoughts.
- What causes my images to stretch in Canva? Stretching occurs primarily due to aspect ratio mismatches when resizing images or using templates that don’t align with your images' dimensions.
- How can I avoid stretching my images? Locking the aspect ratio and using high-quality images can significantly reduce the chances of stretching.
- Can I fix a stretched image after uploading? Yes! You can adjust the image settings and try repositioning the image within its frame.
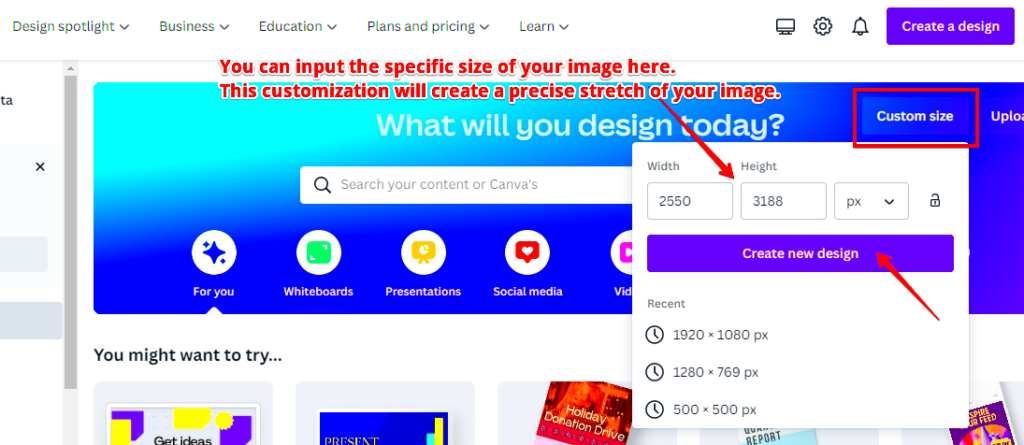
- Is there a specific size for images I should use? It depends on your design's purpose. For social media, aim for standard sizes (like 1080x1080 pixels for Instagram). For print, use larger dimensions.
Grasping these inquiries can shed light on the challenges of navigating Canva. Its comforting to realize that by addressing each query we inch closer to honing our creative abilities.
Conclusion on Canva Image Stretching Techniques
To wrap it up while diving into Canva and image stretching might seem overwhelming initially it gets smoother with some practice and perseverance. Through my journey I've realized that grasping the concepts of image stretching and adhering to guidelines can lead us to craft designs that are visually impressive and polished. The trick lies in embracing the journey of learning and being open to trying out various methods.
As you set out on your design adventure dont forget to consider these points
- Adjust your image settings thoughtfully.
- Utilize the Canva Image Downloader efficiently.
- Be aware of common pitfalls and how to avoid them.
Armed with these tips you'll approach image stretching in Canva with confidence ensuring your designs truly capture your vision. Let your imagination run wild and keep in mind that every obstacle presents a chance, for personal development!