When I began using Canva I was impressed by the ease of crafting stunning designs. However I did face some challenges with image sizes. At first I didn’t grasp the importance of having the dimensions for various projects. Adjusting image size in Canva is vital as it ensures that your visuals retain their integrity and quality. Whether you’re designing social media posts, brochures or slideshows knowing about image size can greatly enhance your creations.
Canva provides the ability to adjust image sizes giving you the freedom to customize your visuals for different platforms and formats. For instance a Facebook post demands an aspect ratio compared to an Instagram story. By mastering the art of resizing images you can ensure that your graphics align flawlessly with the requirements of each platform capturing the attention of viewers and captivating your audience.
Why You Might Need to Change Image Size in Canva
Throughout the years, I've come to realize that the size of an image can significantly impact a design. Here are a few reasons why you might consider adjusting the image size in Canva
- Platform Requirements: Different social media platforms have specific image size requirements. For example, a YouTube thumbnail needs to be 1280 x 720 pixels.
- Print vs. Digital: Images meant for print need a higher resolution than those for online use. Adjusting sizes helps maintain clarity.
- Visual Consistency: Keeping a uniform size across your designs helps in creating a cohesive look for your brand.
- Personal Preference: Sometimes, you just want to highlight a specific part of an image, and changing the size allows you to focus on that.
By considering these aspects you can improve your design journey and produce visually captivating material.
Also Read This: Understanding Getty Images Earnings Model for Contributors
How to Change Image Size for Your Design

Resizing an image in Canva is easy once you understand the process. I still recall the satisfaction I felt when I accomplished it for the time. Here's a guide on how to get it done.
- Open Your Design: Start by opening the design you want to edit in Canva.
- Select the Image: Click on the image you wish to resize. You’ll see handles around it.
- Drag to Resize: Use the corner handles to adjust the image size proportionally. This helps maintain the aspect ratio.
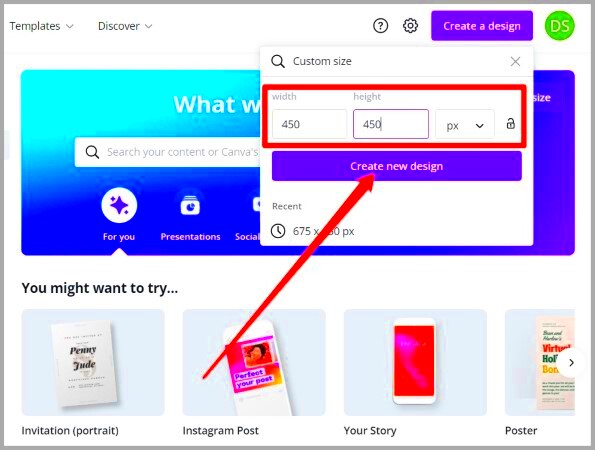
- Use the Resize Tool: If you need specific dimensions, click on the ‘Resize’ option in the top toolbar, where you can enter your desired width and height.
- Apply Changes: Once satisfied with the size, click ‘Apply’ to make the changes.
Keep in mind that if you resize an image excessively it may become distorted. Its always a good idea to preview your design to make sure it appears flawless before finalizing it. Trying out different sizes is an excellent way to discover what suits your projects best.
Also Read This: Understanding Behance Portfolio Limits
Tips for Maintaining Image Quality
As someone who enjoys crafting designs, I soon understood the importance of preserving image quality during resizing. There was an instance when I adjusted an image for a presentation and it turned out pixelated and less than polished. To steer clear of incidents like that, here are a few tips that have proven effective for me.
- Start with High-Resolution Images: Always choose high-resolution images as your starting point. This provides more flexibility when resizing without losing quality.
- Use Canva’s Built-in Tools: Canva has tools that help maintain quality. Utilize the ‘Lock Aspect Ratio’ option to ensure your image doesn’t get distorted while resizing.
- Preview Before Finalizing: Always preview your design in full screen before finalizing. This helps catch any quality issues you might have missed.
- Consider File Formats: Different file formats can affect image quality. For instance, PNGs are better for images with text, while JPEGs work well for photographs.
By incorporating these suggestions you can elevate your designs and add a polished flair to your work. Keep in mind that every little aspect matters in crafting eye catching visuals!
Also Read This: Understanding Alamy Supertags for Enhanced Discoverability
Common Issues When Changing Image Sizes
After using Canva for a while I've encountered quite a few hurdles when it comes to resizing images. Its all part of the journey! Here are a few challenges you may come across.
- Loss of Quality: Resizing an image can lead to pixelation, especially if you enlarge a low-resolution image. Always check the original resolution before resizing.
- Aspect Ratio Problems: Changing the size without maintaining the aspect ratio can distort your image. This is where using the ‘Lock Aspect Ratio’ feature comes in handy.
- Inconsistent Dimensions: If you’re working on multiple images for a single project, inconsistency in size can disrupt the flow. Keeping a consistent template helps avoid this.
- Clipping or Cropping: Sometimes, resizing can lead to essential parts of your image being cut off. Always ensure that the important elements are still visible after resizing.
Being mindful of these challenges can help you sidestep setbacks and effortlessly craft beautiful designs. Keep in mind that honing your skills takes time and repetition!
Also Read This: The Story of James James on YouTube
Frequently Asked Questions about Image Size Change
Whenever I kick off a project in Canva, I usually find myself bombarded with a bunch of queries. I’ve compiled a list of the questions that pop up most frequently when it comes to resizing images along with my own thoughts on the matter.
- What is the best size for social media images? It varies by platform. For instance, Instagram posts are best at 1080 x 1080 pixels, while Facebook posts should be 1200 x 630 pixels.
- Can I change the size of an image after it’s been uploaded? Yes, you can resize any uploaded image at any time. Just select the image and follow the resizing steps.
- How can I avoid pixelation when enlarging images? Always start with high-resolution images. If the original is low-res, there’s little you can do to prevent pixelation upon enlarging.
- Is there a way to maintain quality when reducing size? Yes, reducing the size usually maintains quality better than enlarging. Just ensure you’re not reducing it too much, or it may become hard to see.
These frequently asked questions can help clarify any misunderstandings and improve your experience with Canva. Feel free to connect with the community for additional advice!
Conclusion on Changing Image Size in Canva
Looking back on my experience with Canva I can confidently say that getting the hang of adjusting image sizes has really changed how I design things. At first it was a bit daunting having to think about so many different dimensions and formats. However through practice and perseverance I figured out how to handle these hurdles smoothly. Resizing images isn't just a skill; it's crucial, for crafting designs that leave a lasting impression on your audience.
When it comes to resizing images for social media, print or any personal project it's crucial to pay attention to the quality and dimensions. I've experienced instances where a small tweak transformed a decent design into an exceptional one, grabbing the viewers attention just as I envisioned. The suggestions and insights shared in this article can act as your roadmap to steer clear of mistakes and take your design skills up a notch. Keep in mind that every image has a narrative to convey and getting the size spot on ensures that narrative is conveyed, effectively.
Next time you start working on a project remember to think about how image size can make a difference. With Canva available to you there are no limits to what you can create and your designs will really stand out!