Behance is a popular platform for creative professionals to showcase their work. It allows artists, designers, photographers, and other creatives to present their projects to a global audience. Using Behance can significantly enhance your visibility and connect you with other professionals in your field.
Here are some benefits of using Behance:
- Portfolio Building: Behance provides an easy way to create and manage your online portfolio.
- Networking Opportunities: You can connect with other creatives, potential clients, and employers.
- Feedback and Support: Share your work and receive constructive feedback from the community.
- Job Opportunities: Many companies scout for talent directly on Behance.
- Exposure: Your projects can reach a broader audience, increasing your chances of being noticed.
Preparing Your Project Before Uploading
Before you upload your project to Behance, it's essential to prepare effectively. This preparation can make your project stand out and attract more viewers.
Consider the following steps:
- Choose Your Best Work: Select projects that best showcase your skills and creativity.
- Gather All Materials: Collect images, videos, and other media you want to include.
- Organize Your Content: Ensure everything is in a logical order for easy viewing.
- Write a Clear Description: Prepare a description that explains your project, your process, and any challenges you faced.
- Get Feedback: Consider sharing your project with friends or colleagues for their input before publishing.
Also Read This: What is Behance and How Does It Work
Creating a New Project Step by Step
Creating a project on Behance is straightforward. Follow these steps to ensure a smooth process:
- Log In: Sign in to your Behance account. If you don’t have one, create an account.
- Click on the Create Button: Locate the “Create” button on the top right corner of the homepage.
- Select Project: Choose “Project” from the dropdown menu.
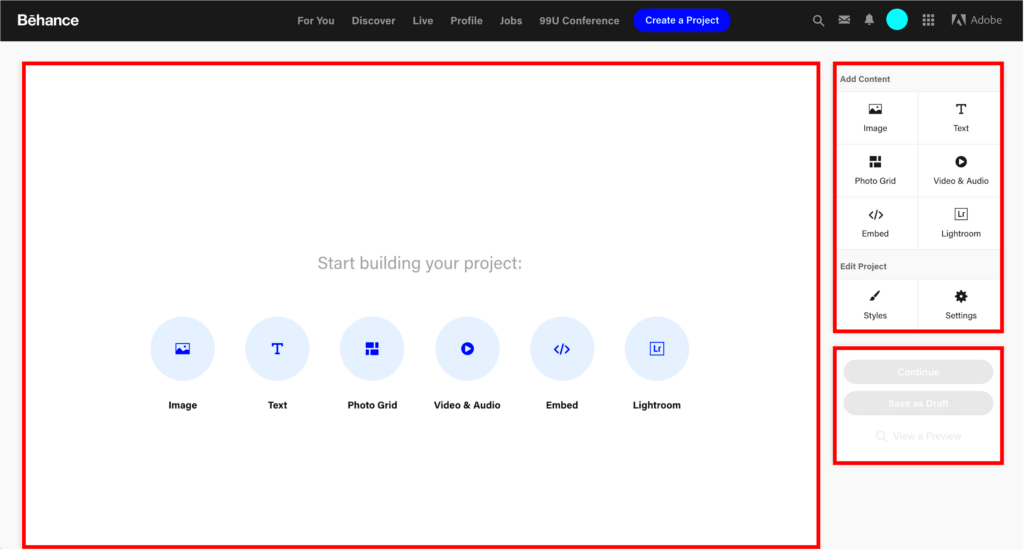
- Upload Your Media: Drag and drop images, videos, and other files into the upload area. You can also upload files from your computer.
- Edit Your Project: Arrange your media, add text, and customize the layout to your liking.
- Review Your Project: Preview your project to ensure everything looks good.
- Publish: Once you are satisfied, hit the “Publish” button to share your project with the Behance community.
By following these steps, you'll create a polished and professional-looking project that captures the attention of your audience.
Also Read This: Design Your Own Cookbook with Canva Cookbook Template
Adding Images and Media to Your Project
Adding images and media to your Behance project is one of the most crucial steps in showcasing your work. Visual content grabs attention and allows viewers to engage with your project on a deeper level. High-quality images and relevant media can significantly enhance the overall appeal of your project.
Here’s how to effectively add images and media:
- Use High-Quality Images: Ensure that your images are clear, high-resolution, and well-lit. Poor-quality images can turn viewers away.
- Variety is Key: Include a mix of images, such as close-ups, full views, and process shots to give viewers a comprehensive understanding of your project.
- Incorporate Videos: If applicable, add video content to showcase your work in action. This is especially useful for animations or product demonstrations.
- Organize Your Media: Arrange your images and media in a logical order. Start with the most striking visuals to grab attention right away.
- Consider Image Size: Make sure the images fit well within the project layout. Avoid overly large files that might slow down loading times.
By thoughtfully adding images and media, you create an engaging experience that encourages viewers to explore your work further.
Also Read This: Can You Message Someone on LinkedIn Without Premium
Writing a Compelling Project Description
Your project description is your chance to tell the story behind your work. A well-crafted description not only explains your project but also connects with viewers on an emotional level. It provides context and enhances the overall understanding of what you’re presenting.
Here are some tips for writing a compelling project description:
- Start with a Hook: Grab your reader's attention right away. Begin with an interesting fact, question, or statement related to your project.
- Explain the Concept: Describe what your project is about. Include your inspiration, goals, and the creative process.
- Highlight Key Features: Point out the unique aspects of your project. What sets it apart from others?
- Share Challenges: Discuss any obstacles you faced during the creation process and how you overcame them. This adds depth to your story.
- Invite Interaction: Encourage viewers to leave comments or ask questions. This can help foster engagement and build a community around your work.
By writing a clear and engaging project description, you can effectively communicate your vision and passion to your audience.
Also Read This: Maximizing Your Earnings with Adobe Stock and Understanding Influencing Factors
Setting Project Visibility and Tags
Setting the right visibility options and tags for your Behance project is essential for reaching your target audience. Proper visibility settings ensure that the right people can see your work, while tags help categorize your project for better discoverability.
Here’s how to set visibility and tags effectively:
- Choose Visibility: You can set your project to be public or private. A public project is visible to everyone, while a private project is only visible to you and those you invite.
- Select Tags Wisely: Use relevant tags that reflect the nature of your project. Think about keywords that your audience might search for. Aim for 5-10 tags.
- Consider Category: Select the appropriate category for your project. This helps Behance categorize your work, making it easier for others to find it.
- Keep Tags Consistent: If you have multiple projects, try to use similar tags across them. This helps in building a recognizable brand.
- Update Tags as Needed: If your project gains more traction or shifts focus, don't hesitate to update your tags to reflect that.
By setting your project visibility and using effective tags, you can enhance the chances of your work being discovered by a wider audience.
Also Read This: Master the Art of Applying Kajal to Your Eyes with Dailymotion Video Tutorials
Sharing Your Project with the Community
Sharing your project on Behance is an exciting moment. It’s the time to showcase your hard work and creativity to a global audience. Engaging with the community can also lead to valuable feedback and connections that might help you in your creative journey.
Here are some effective ways to share your project:
- Use Social Media: Promote your Behance project on platforms like Instagram, Twitter, and Facebook. Use engaging visuals and snippets to draw attention.
- Join Behance Groups: Participate in relevant groups on Behance. Sharing your project in these spaces can help you reach individuals interested in your specific field.
- Connect with Other Creatives: Collaborate or network with other users. Engaging with their projects can encourage them to check out yours in return.
- Utilize Email Newsletters: If you have a mailing list, share your project with your subscribers. This is a great way to keep your audience updated.
- Encourage Feedback: Ask viewers for their thoughts and opinions. This not only boosts engagement but can also provide insights for future projects.
By actively sharing your project, you increase its visibility and create opportunities for interaction within the creative community.
Also Read This: How to Search Getty Images for Royalty-Free Images
FAQ
Have questions about using Behance or creating projects? Here are some frequently asked questions that might help clarify things:
- What types of projects can I upload? You can upload various creative works, including graphic design, photography, illustration, and more.
- Is there a limit to the number of projects I can create? No, there’s no limit. You can showcase as many projects as you like on your Behance profile.
- Can I edit my project after publishing? Yes, you can edit your project anytime. Just click on the project and select the edit option.
- How can I get more views on my project? Share your project on social media, engage with other users, and use relevant tags to enhance discoverability.
- Are there any fees associated with Behance? No, creating an account and uploading projects is free. However, there are premium features available through Adobe Creative Cloud.
Conclusion
Creating and sharing a project on Behance is a rewarding experience that allows you to connect with fellow creatives and showcase your talents. By following the steps outlined in this guide, you can enhance your project’s visibility and impact. Remember to engage with the community, seek feedback, and keep your portfolio updated.
Whether you are a seasoned professional or just starting, Behance offers a platform to share your creativity and gain inspiration from others. So go ahead, dive in, and let your work shine!