When it comes to video editing, transitions play a pivotal role in creating a seamless flow between scenes. Adobe Stock Transitions are a fantastic resource that can elevate your video projects, making them visually appealing and engaging. These transitions are designed to be easily integrated into Adobe Premiere Pro, one of the most popular video editing software programs. By leveraging the power of Adobe Stock, you gain access to a vast library of high-quality transition effects that can transform your editing process.
Whether you're crafting a personal video, a marketing piece, or a short film, Adobe Stock Transitions offer a variety of styles and effects to suit your creative vision. From smooth fades to dynamic wipes, these transitions can help you tell your story more effectively. So, if you're ready to take your editing skills to the next level, let's dive into the benefits of using these transitions!
Benefits of Using Transitions in Video Editing
In the realm of video editing, transitions are more than just decorative elements; they serve crucial functions that enhance the overall viewing experience. Here are some key benefits of incorporating transitions into your projects:
- Smooth Flow: Transitions help maintain the flow of your video. By connecting different scenes or clips seamlessly, they guide the viewer's eye and mind, making it easier for them to follow the narrative.
- Visual Interest: A well-placed transition can add flair and excitement to your video. Instead of abrupt cuts, transitions introduce movement and style, keeping your audience engaged.
- Emotional Impact: Certain transitions can evoke specific feelings. For example, a slow dissolve may create a sense of nostalgia, while a fast swipe could convey urgency. Choosing the right transition can enhance the emotional tone of your video.
- Professional Quality: Using Adobe Stock Transitions gives your videos a polished, professional look. High-quality transitions elevate your project and demonstrate your attention to detail.
- Time-Saving: With Adobe Stock, you can quickly find and apply transitions without spending hours creating them from scratch. This efficiency allows you to focus more on the creative aspects of your project.
In summary, transitions are a powerful tool in video editing. By utilizing Adobe Stock Transitions in Premiere Pro, you not only improve the aesthetic quality of your videos but also strengthen your storytelling. So, why not explore the diverse options available and see how they can transform your next video project?
Also Read This: How to Properly Credit Storyblocks When Using Their Content in Your Work
Getting Started with Adobe Premiere Pro
If you're eager to dive into video editing, Adobe Premiere Pro is a fantastic place to start. Whether you're a beginner or a seasoned pro, this powerful software offers a range of tools to help you create stunning videos. Here’s how to get started:
- Download and Install: First things first, you need to have Adobe Premiere Pro installed on your computer. You can download it directly from the Adobe website. Make sure your system meets the minimum requirements for smoother operations.
- Create a New Project: Once installed, launch the program and select "New Project." Give your project a name and choose a location to save it. This is also where you can set your video and audio settings.
- Import Media: To start editing, you’ll need to import your media files. Simply drag and drop your video, audio, and image files into the project panel. You can also click on "File" > "Import" to select files from your computer.
- Familiarize Yourself with the Interface: Spend some time getting to know the Premiere Pro interface. It consists of multiple panels, including the timeline, program monitor, and effects panel. Understanding where everything is will make your editing process smoother.
- Basic Editing: Start by dragging your clips onto the timeline. You can trim, split, and arrange your clips as needed. Don’t forget to save your project frequently!
With these initial steps, you’re well on your way to creating amazing videos in Adobe Premiere Pro. Let’s get ready to enhance your projects with some stunning transitions!
Also Read This: AliExpress Alliance: Connect AliExpress to Shopify
Accessing Adobe Stock Transitions
Now that you’ve got the basics of Premiere Pro down, it’s time to access Adobe Stock Transitions. These transitions can really elevate your video projects, making them look more professional and polished. Here’s how to find and use them:
- Open the Essential Graphics Panel: In Premiere Pro, go to "Window" > "Essential Graphics." This panel is your gateway to accessing various graphic assets, including transitions.
- Access Adobe Stock: Within the Essential Graphics panel, you’ll see a search bar. Type "transitions" or "Adobe Stock transitions" to browse the available options. You can filter results based on your needs, like video type or style.
- Preview and License Transitions: Click on any transition that catches your eye to see a preview. If you like what you see, select the transition and click on the "License" button. This will allow you to use the transition in your project.
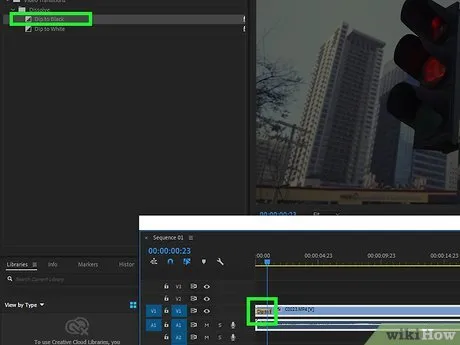
- Drag and Drop: Once you've licensed a transition, simply drag it from the Essential Graphics panel onto your timeline. Place it between clips where you want to create a seamless transition.
- Customize as Needed: You can adjust the duration and properties of the transition by clicking on it in the timeline. This allows you to fine-tune how it appears and feels in your video.
With Adobe Stock Transitions at your fingertips, your videos will have that extra flair that keeps your audience engaged. Happy editing!
Also Read This: Are You Ready to Rumble Sound Clip and Its Rise as a Pop Culture Phenomenon
Tips for Achieving Smooth Edits
When it comes to video editing, achieving smooth transitions can make all the difference in how your final product looks. Here are some handy tips to elevate your editing game:
- Plan Your Shots: Before you even open Premiere Pro, think about how you want your video to flow. A well-planned shot sequence will help you determine where transitions will be most effective.
- Use the Right Transition: Not all transitions are created equal. Choose transitions that fit the mood and style of your video. For example, a fade might be perfect for a soft, emotional moment, while a quick cut may be better for an action scene.
- Match the Rhythm: Pay attention to the pacing of your video. Transitions should sync with the beat of background music or the natural flow of dialogue. This creates a cohesive viewing experience.
- Keep It Simple: Sometimes, less is more. Overusing transitions can distract viewers and detract from your content. Stick to a few well-placed transitions for maximum effect.
- Use Keyframes: Keyframes allow you to customize the timing and properties of your transitions. Experiment with easing in and out to achieve a more dynamic feel.
By keeping these tips in mind, you can create seamless edits that engage your audience and keep them coming back for more.
Also Read This: Exploring the Latest Trends on 123RF
Finalizing Your Video with Transitions
Once you've crafted your raw footage into a cohesive story, it’s time to polish it up with transitions. This step is crucial for ensuring a professional finish to your video. Here’s how to effectively finalize your project:
- Review Your Edits: Before adding transitions, watch your video from start to finish. Identify spots that feel abrupt or jarring, as these are perfect candidates for transitions.
- Incorporate Adobe Stock Transitions: Utilize Adobe Stock transitions to add a professional touch. Drag and drop them into your timeline, ensuring they align with your cuts.
- Adjust Duration: The duration of transitions can greatly affect the pacing of your video. Typically, about 1-2 seconds is ideal, but feel free to adjust based on the context of your scene.
- Preview and Tweak: After applying transitions, preview your video. Look for any transitions that feel out of place and adjust as necessary. Sometimes a bit of tweaking can make all the difference.
- Export with Care: Finally, when you're satisfied with your transitions and overall edit, export your video. Choose the right format and settings that suit your distribution needs.
With these steps, you’ll ensure that your video not only looks polished but also flows seamlessly from one scene to the next. Happy editing!
Also Read This: Step-by-Step Guide to Crafting a Paper Balloon
Applying Adobe Stock Transitions in Premiere Pro for Seamless Video Edits
Video editing is an art that requires precision and creativity. One of the best ways to enhance your video projects is by using transitions. Adobe Stock offers a variety of professional transitions that can elevate your editing game in Adobe Premiere Pro. In this guide, we will explore how to apply these transitions to achieve seamless video edits.
Before diving into the application process, let’s take a look at the benefits of using Adobe Stock transitions:
- High-Quality Graphics: Adobe Stock transitions are curated by professionals, ensuring top-notch quality.
- Diverse Options: With a wide range of transitions, you can find something that fits any theme or style.
- Customization: Many transitions can be customized to suit your specific needs and aesthetics.
- Time-Saving: Pre-made transitions save you from the hassle of creating effects from scratch.
Here’s a step-by-step guide to applying Adobe Stock transitions in Premiere Pro:
- Open your project in Adobe Premiere Pro.
- Navigate to the Essential Graphics panel.
- Search for transitions in the Adobe Stock library.
- Preview the transitions by hovering over them.
- Drag and drop the desired transition onto the timeline between two clips.
- Adjust the duration and settings as necessary in the Effect Controls panel.
With these simple steps, you can significantly enhance your video projects using Adobe Stock transitions in Premiere Pro. These transitions not only streamline your editing process but also ensure a polished and professional final product.
Also Read This: How to Download a Behance Font
Conclusion
Incorporating Adobe Stock transitions into your Premiere Pro projects can dramatically improve the flow and visual appeal of your videos, making them more engaging for viewers.