Introduction
Welcome to the world of Picfair albums, where your images come to life in curated collections! In this blog post, we'll guide you through the process of adding images to your Picfair albums, enhancing your overall experience on the platform. Whether you're a photography enthusiast, a professional photographer, or someone who simply loves to share moments visually, understanding how to effectively use Picfair albums is key to showcasing your work. Let's dive in and discover what you need to know about creating and organizing your visual stories on Picfair.
Also Read This: Accessing YouTube TV on Your Amazon Fire TV Stick
Creating a Picfair Account
Embarking on your Picfair journey begins with the simple yet crucial step of creating a Picfair account. Follow this comprehensive guide to set up your account seamlessly and unlock the full potential of Picfair's features.
Step 1: Visit the Picfair Website
Start by navigating to the official Picfair website at https://www.picfair.com/. Here, you'll find the platform's welcoming homepage, enticing you to showcase your visual stories.
Step 2: Sign Up
Locate the "Sign Up" option, usually positioned prominently on the homepage. Click on it to initiate the account creation process. You will be prompted to provide basic information, including your email address and a secure password.
Step 3: Verify Your Email
After entering your details, Picfair will send a verification email to the address you provided. Access your email inbox, locate the email from Picfair, and click on the verification link to confirm your account.
Step 4: Complete Your Profile
Upon verification, log in to your newly created Picfair account. Take the time to complete your profile by adding a profile picture, a bio, and any additional information you'd like to share with the Picfair community. A complete profile enhances your visibility and connection with other users.
Step 5: Explore Picfair Features
Once your account is set up, take a tour of Picfair's features. Familiarize yourself with the user-friendly interface, where you can discover, purchase, and, of course, create stunning albums to showcase your images.
Benefits of Creating a Picfair Account:
- Access to a global community of photographers and enthusiasts.
- Ability to upload and sell your images on the Picfair marketplace.
- Full control over the organization and presentation of your visual content through albums.
- Participation in Picfair challenges and competitions to showcase your skills.
Table: Picfair Account Types
| Account Type | Features |
|---|---|
| Free Account | Basic features, including album creation and limited storage. |
| Premium Account | Enhanced storage, advanced customization options, and participation in marketplace sales. |
By creating a Picfair account, you open the door to a vibrant visual community, where your images can reach a global audience. Stay tuned as we guide you through the next steps of understanding and maximizing Picfair albums.
Also Read This: Understanding Us.123RF.com and Its Regional Access Features
Understanding Picfair Albums
Delve into the heart of Picfair's organizational prowess by understanding the intricacies of Picfair albums. These virtual collections not only elevate the presentation of your images but also offer a dynamic way to tell your visual stories. Let's explore the key aspects of Picfair albums to make the most of this feature.
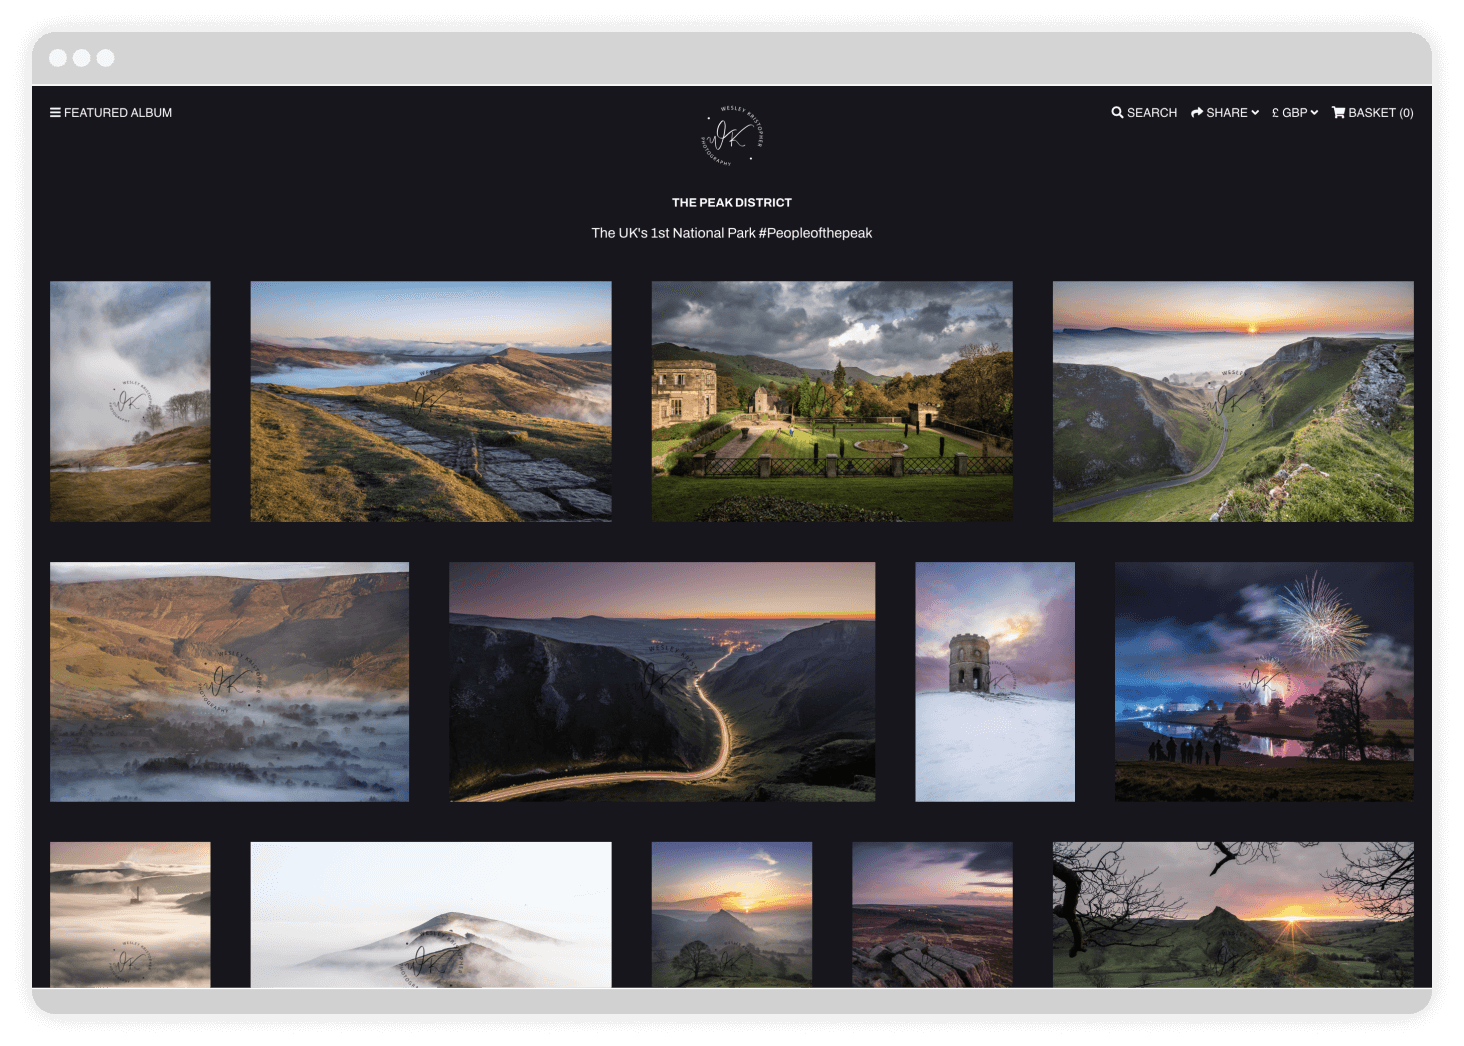
What Are Picfair Albums?
Picfair albums are personalized collections where you can curate and organize your images. Whether you want to showcase a series of photos from a specific event, create a portfolio, or group images by theme, Picfair albums provide a versatile platform for expressing your visual narrative.
Creating Your First Album
To create an album, log in to your Picfair account and navigate to the "Albums" section. Click on the "Create New Album" option, where you can input a title, description, and choose the privacy settings for your album. This initial setup is crucial for presenting your images in a meaningful context.
Organizing Images in Albums
Once your album is created, you can start populating it with images. Picfair allows you to select and add multiple images at once, streamlining the process of organizing your visual content. Drag-and-drop functionality makes rearranging images within the album a breeze, allowing you to perfect the storytelling flow.
Album Privacy Settings
Picfair recognizes the importance of privacy. You have the option to set your album as public, private, or visible to a select group of people. This flexibility ensures that you have control over who can view and engage with your curated collections.
Collaborative Albums
For those looking to collaborate, Picfair offers the ability to create collaborative albums. This feature enables multiple contributors to add their images to a shared album, fostering a sense of community and collective storytelling.
Benefits of Using Picfair Albums:
- Enhanced Presentation: Showcase your images in a visually appealing and organized manner.
- Storytelling Opportunities: Craft narratives by grouping images based on themes, events, or projects.
- Increased Visibility: Albums make it easier for users to discover and engage with your content.
Table: Picfair Album Privacy Settings
| Privacy Setting | Description |
|---|---|
| Public | Visible to anyone on Picfair; can be discovered through searches and on your profile. |
| Private | Accessible only to you; not visible to others on Picfair. |
| Custom | Shareable link required for access; you control who can view the album. |
Understanding Picfair albums empowers you to curate, share, and connect through your visual storytelling. Stay tuned as we guide you through the next steps of uploading and adding images to your Picfair albums.
Also Read This: Customize Menus with Canva Template Menu
Uploading Images to Picfair
Now that you've created your Picfair account and gained insights into the world of Picfair albums, it's time to bring your images to life on the platform. Uploading images to Picfair is a straightforward process, ensuring that your visual stories reach a global audience. Let's explore the step-by-step guide to uploading your images with ease.
Step 1: Log In to Your Picfair Account
Start by logging in to your Picfair account using your credentials. If you're not already a Picfair member, refer to our previous guide on creating a Picfair account to get started.
Step 2: Navigate to the 'Upload' Section
Once logged in, locate the 'Upload' section on the Picfair platform. This is typically found in the main menu or dashboard. Click on 'Upload' to initiate the image uploading process.
Step 3: Select Images to Upload
Choose the images you want to upload from your device. Picfair supports a variety of image formats, ensuring flexibility in the types of visual content you can share. Select multiple images at once for a more efficient upload process.
Step 4: Add Details and Tags
After selecting your images, Picfair will prompt you to add details such as titles, descriptions, and relevant tags. This step is crucial for enhancing the discoverability of your images within the Picfair community and beyond.
Step 5: Set Pricing and Licensing (For Selling Images)
If you intend to sell your images on the Picfair marketplace, you'll have the option to set pricing and licensing details. This includes determining the cost of your images and specifying the rights granted to buyers.
Image Upload Tips:
- High-Quality Images: Ensure your images meet Picfair's guidelines for resolution and quality.
- Relevant Metadata: Provide accurate and descriptive metadata to enhance search visibility.
- Consistent Branding: Maintain a consistent style or theme across your uploaded images.
Table: Supported Image Formats
| Image Format | Description |
|---|---|
| JPEG | Commonly used format supporting lossy compression; suitable for photographs. |
| PNG | Lossless compression format; ideal for images with transparency or crisp details. |
| GIF | Supports animations and limited color palette; suitable for simple graphics. |
With your images successfully uploaded, you've taken a significant step in sharing your visual stories with the Picfair community. In the next segment, we'll guide you through the process of adding these images to your thoughtfully crafted Picfair albums.
Also Read This: How to Use Canva Resume Templates to Land Your Dream Job
Adding Images to Albums
Now that you've successfully uploaded your images to Picfair, it's time to take the presentation of your visual stories to the next level by adding them to your meticulously crafted albums. This process allows you to organize your content, create compelling narratives, and showcase your photography or artwork in a curated manner.
Step 1: Access Your Picfair Albums
Begin by logging in to your Picfair account and navigating to the 'Albums' section. Here, you'll find a list of your existing albums or the option to create a new one if you haven't done so already.
Step 2: Select an Album
Choose the specific album to which you want to add images. If you're creating a new album, follow the steps outlined in our previous guide on 'Understanding Picfair Albums' to set up your album with a title, description, and privacy settings.
Step 3: Add Images
Once inside the selected album, you'll find an option to add images. Click on this option, and a window will appear, displaying your recently uploaded images. Select the images you want to add to the album and confirm your selection.
Step 4: Arrange and Customize
Take advantage of Picfair's user-friendly interface to arrange the order of your images within the album. Drag and drop images to create a visually appealing sequence that tells a cohesive story. Additionally, customize each image by adding titles, captions, and relevant metadata.
Step 5: Save Changes
After arranging and customizing your album, don't forget to save your changes. This ensures that your carefully crafted presentation is preserved for viewers to appreciate.
Tips for Effective Album Curation:
- Storytelling Flow: Arrange images to create a narrative flow that engages viewers.
- Consistent Themes: Maintain consistency in themes, colors, or styles for a cohesive album aesthetic.
- Engaging Descriptions: Write compelling descriptions for each image to provide context and enhance viewer engagement.
Table: Supported Image Formats
| Image Format | Description |
|---|---|
| JPEG | Commonly used format supporting lossy compression; suitable for photographs. |
| PNG | Lossless compression format; ideal for images with transparency or crisp details. |
| GIF | Supports animations and limited color palette; suitable for simple graphics. |
By adding your images to Picfair albums, you transform individual visual moments into cohesive narratives, making your portfolio more engaging and accessible to your audience. Stay tuned as we guide you through further customization options and advanced features on Picfair.
Also Read This: Troubleshooting Why You Canât Comment on YouTube Videos
Customizing Album Settings
Now that you've organized your images into Picfair albums, it's time to elevate the presentation further by customizing album settings. Tailoring these settings allows you to add a personal touch, control the visibility of your albums, and optimize their impact on viewers. Let's explore the key customization options available for Picfair albums.
1. Album Title and Description
Each album deserves a compelling title and a descriptive summary. Click on the 'Edit' option within the selected album to modify the title and description. Use bold text or italics to emphasize key points and make your album more visually appealing.
2. Privacy Settings
Choose the level of visibility for your album by adjusting privacy settings. Picfair offers three options: Public, Private, and Custom. A public album is visible to anyone on Picfair, while a private album is accessible only to you. The custom setting allows you to share the album through a link, providing a balance of privacy and accessibility.
3. Cover Image Selection
Make a strong first impression by selecting a captivating cover image for your album. Navigate to the 'Edit' section and choose the 'Change Cover' option. Pick an image that represents the essence of your album and entices viewers to explore further.
4. Rearrange and Crop Images
Ensure a visually appealing flow by rearranging images within the album. Drag and drop images to adjust their order, creating a narrative sequence. Additionally, use the crop feature to highlight specific details or maintain a consistent aspect ratio for a polished presentation.
5. Tagging and Metadata
Optimize the discoverability of your album by adding relevant tags and metadata. Tags help users find your album through searches, so include keywords related to the content or theme. Write concise but engaging metadata to provide additional context and enhance the overall viewing experience.
Benefits of Customizing Album Settings:
- Personalized Aesthetics: Tailor the look and feel of your albums to match your style or branding.
- Controlled Visibility: Adjust privacy settings to share your albums selectively or make them accessible to a wider audience.
- Enhanced Discoverability: Strategic use of tags and metadata increases the likelihood of your album being discovered by other Picfair users.
Table: Privacy Settings
| Privacy Setting | Description |
|---|---|
| Public | Visible to anyone on Picfair; can be discovered through searches and on your profile. |
| Private | Accessible only to you; not visible to others on Picfair. |
| Custom | Shareable link required for access; you control who can view the album. |
Customizing your Picfair album settings goes beyond organization—it transforms your albums into curated experiences that resonate with your audience. Stay tuned as we explore additional features and advanced tips for optimizing your visual content on Picfair.
Also Read This: How to Download a Free Template on Behance
Optimizing Images for Picfair
As you continue your journey on Picfair, optimizing your images is crucial for ensuring they look their best and meet the platform's standards. From resolution considerations to strategic tagging, let's explore the key steps in optimizing your images for Picfair.
1. Image Resolution and Quality
Start by ensuring that your images meet Picfair's guidelines for resolution and quality. High-resolution images not only look more professional but also enhance the overall viewing experience. Aim for a minimum resolution of 3000 pixels on the longest side for optimal results.
2. File Format and Compression
Picfair supports various image formats, including JPEG, PNG, and GIF. While JPEG is commonly used for photographs, PNG is ideal for images with transparency or crisp details. Be mindful of file compression to maintain image quality; avoid excessive compression that may result in loss of detail.
3. Consistent Branding and Style
Create a cohesive visual identity by maintaining consistent branding and style across your images. Whether it's a specific color palette, composition style, or thematic elements, consistency enhances the overall aesthetic of your portfolio and contributes to a memorable viewer experience.
4. Strategic Tagging and Metadata
Optimize the discoverability of your images by using strategic tagging and metadata. Choose relevant and descriptive tags that accurately represent the content of each image. Craft engaging metadata that provides additional context and draws viewers into the story behind your visuals.
5. Crop and Composition
Consider the composition of each image within the context of Picfair's platform. Use the crop feature to highlight key details or maintain a consistent aspect ratio for a polished presentation. Pay attention to the overall composition to ensure a visually appealing arrangement within your albums.
Benefits of Optimizing Images:
- Professional Presentation: High-resolution images contribute to a polished and professional appearance.
- Improved Discoverability: Strategic tagging and metadata enhance the chances of your images being discovered by other Picfair users.
- Enhanced Viewer Engagement: Consistent branding and style contribute to a cohesive and engaging viewer experience.
Table: Supported Image Formats
| Image Format | Description |
|---|---|
| JPEG | Commonly used format supporting lossy compression; suitable for photographs. |
| PNG | Lossless compression format; ideal for images with transparency or crisp details. |
| GIF | Supports animations and limited color palette; suitable for simple graphics. |
By optimizing your images for Picfair, you not only adhere to platform guidelines but also elevate the overall quality and impact of your visual storytelling. Stay tuned for more insights as we guide you through advanced features and strategies to maximize your presence on Picfair.
Also Read This: Guide to Using Free Getty Images and Finding Licensed Content
FAQ
Explore common questions and answers about using Picfair albums and optimizing your visual content on the platform.
Q: How do I create a Picfair account?
A: To create a Picfair account, visit the official Picfair website at https://www.picfair.com/. Click on the "Sign Up" option, provide your email address and a secure password, and follow the verification steps sent to your email.
Q: Can I upload images in different file formats?
A: Yes, Picfair supports various image formats, including JPEG, PNG, and GIF. Choose the format that best suits your type of visual content.
Q: How can I make my Picfair albums private?
A: You can make your Picfair albums private by adjusting the privacy settings. Select the desired album, go to the 'Edit' option, and choose the 'Private' setting. This ensures that the album is accessible only to you.
Q: What is the recommended resolution for images on Picfair?
A: For optimal results, aim for a minimum resolution of 3000 pixels on the longest side. High-resolution images enhance the overall viewing experience and professionalism of your portfolio.
Q: How can I enhance the discoverability of my images?
A: To improve the discoverability of your images, use strategic tagging and metadata. Choose relevant tags, provide engaging metadata, and maintain consistency in branding and style across your visual content.
Q: Can I collaborate on Picfair albums?
A: Yes, Picfair allows collaboration on albums. You can create collaborative albums, enabling multiple contributors to add their images to a shared collection, fostering a sense of community and collective storytelling.
Q: What are the benefits of optimizing images for Picfair?
A: Optimizing images ensures a professional presentation, improves discoverability through strategic tagging, and enhances viewer engagement by maintaining consistent branding and style across your portfolio.
Explore these FAQs to navigate your Picfair journey seamlessly. If you have additional questions, feel free to check Picfair's official support resources or community forums for further assistance.
Conclusion
As we conclude this exploration into the world of Picfair albums and optimizing your visual content, you've gained valuable insights into creating, customizing, and presenting your images on this dynamic platform. Let's recap the key takeaways and encourage you to continue your journey on Picfair.
Embracing Picfair Albums:
Creating Picfair albums provides a powerful tool for organizing and showcasing your visual stories. From capturing memorable events to curating thematic collections, albums offer a versatile canvas for your creativity.
Personalization and Privacy:
Customizing album settings allows you to add a personal touch to your presentation. Whether it's crafting engaging titles, adjusting privacy settings, or selecting captivating cover images, personalization enhances the viewer experience.
Optimizing for Impact:
Optimizing your images for Picfair ensures that they meet the platform's standards and elevate the overall quality of your visual storytelling. From resolution considerations to strategic tagging, these optimizations contribute to a polished and professional presentation.
Engaging the Picfair Community:
Collaborative albums open the door to community engagement, allowing multiple contributors to share their perspectives and create collective narratives. The platform's vibrant community provides opportunities for connection, discovery, and inspiration.
Continuous Exploration:
As you continue your Picfair journey, remember to explore advanced features, participate in challenges, and connect with the global community of photographers and visual storytellers. Stay curious, share your unique perspective, and continue to refine your presence on Picfair.
With the knowledge gained from this guide, you're well-equipped to navigate Picfair's features, create captivating albums, and optimize your visual content for maximum impact. Now, go ahead and showcase your stories to the world on Picfair with confidence and creativity.