If you're ready to elevate your dressmaking skills, sewing a collar is an exciting way to add flair and personality to your garment. Collars can instantly transform the look of a dress, turning a simple design into a stylish statement piece. In this guide, we'll walk you through the basics of sewing a collar, tailoring your choice to suit the style and feel of your dress. Whether you're a seasoned sewer or a curious beginner, you'll find the process incredibly rewarding. Let's dive into the world of collars and see how you can make your dresses truly shine!
Types of Collars to Consider
When it comes to collars, the variety can be overwhelming, but each type serves a unique purpose and offers different aesthetics. Here’s a handy list of popular collar types you might consider for your dress:
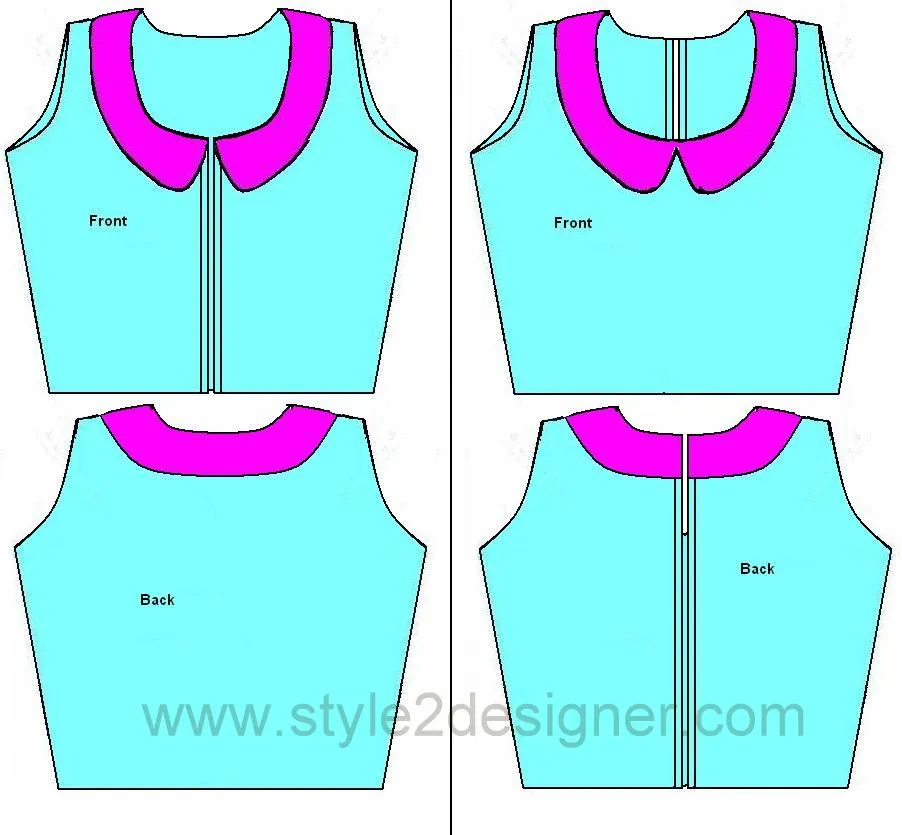
- Peter Pan Collar: This soft, rounded collar features a flat design and is usually made from fabric that can drape gently. It’s perfect for a sweet and feminine touch.
- Mandarin Collar: A stand-up style that adds a modern flair, the mandarin collar gives an edgier look while keeping the neckline clear and elegant.
- Notched Collar: Commonly found on blouses and jackets, the notched collar has a V-shape cut-out at the center, giving it a tailored appearance.
- Rolled Collar: Similar to the Peter Pan, this collar is typically taller and can be rolled over for a more sophisticated look.
- Shirt Collar: This classic collar is structured and features points that form a slight triangle. It works beautifully for casual and formal dresses alike.
Each of these collars can dramatically change the vibe of your dress. To choose the best fit, consider the style you desire and the fabric you will be using. Different fabrics will hold different collar shapes, so factor that in as you make your selection!
Also Read This: Where to Watch the Royal Rumble Tonight
Cutting the Fabric for the Collar
Cutting the fabric for your collar is one of the most crucial steps in sewing. Getting the right shape and size will ensure that your collar fits perfectly and looks professional. Let’s dive into how to do it effectively.
First, let's talk about the materials you'll need:
- Fabric of your choice (usually the same as the dress or a contrasting fabric for a unique look)
- Fabric scissors or a rotary cutter
- A cutting mat (if using a rotary cutter)
- Pattern for collar (you can create your own or purchase one)
- Measuring tape
- Chalk or fabric marker
Here’s a step-by-step process for cutting your collar:
- Prepare the Pattern: If you have a commercial pattern, lay it on a flat surface. If you're making your own, ensure it’s symmetrical and the correct size. Remember, the collar should fit the neckline of your dress.
- Fold the Fabric: Fold your fabric in half, right sides together. This way, you'll get two identical collar pieces in one cut.
- Pin the Pattern: Lay the collar pattern on the folded fabric and use pins to secure it in place. Make sure to align the edges properly, following the grainline.
- Mark the Outline: Using chalk or a fabric marker, trace around the pattern. This line is your cutting guide.
- Cut the Fabric: Carefully cut along the marked lines with your scissors or rotary cutter. Take your time to ensure a clean, even cut.
- Remove the Pins: Once cut, remove the pins and set your collar pieces aside. You now have your collar ready for sewing!
Cutting the fabric accurately is the foundation of a well-fitted collar. Take your time and ensure that everything is done carefully!
Also Read This: How to Add an Account to ShootProof
Sewing the Collar: Step by Step
Now that you have your collar pieces cut out, it’s time to turn those fabric pieces into a beautiful collar. Follow these steps to sew it on with ease!
Here’s a comprehensive guide on how to sew a collar:
- Gather Your Supplies: Ensure you have the following on hand:
- Sewing machine with matching thread
- Pins or fabric clips
- Iron and ironing board
- Seam gauge or ruler for accurate seam allowances
- Pin the Collar Pieces: Place the collar pieces right sides together and align the edges. Use pins or clips to secure them in place.
- Start Sewing: Using a sewing machine, sew along the pinned edges at a consistent seam allowance (typically 1/4 to 1/2 inch). Make sure to backstitch at the beginning and end to secure your seams.
- Trim the Seam Allowance: After sewing, trim the seam allowance to about 1/4 inch to reduce bulk. Be careful not to cut into your stitching!
- Turn the Collar Right Side Out: Gently turn the collar so that the right side is facing out. Use a chopstick or a turning tool to push out the corners for a neat finish.
- Press the Collar: Using an iron, press the collar flat, making sure the seams are crisp. This step is essential for a professional look.
- Attach the Collar to the Dress: With the dress inside out, pin the collar to the neckline. Ensure the raw edges align. Sew it in place, using the same seam allowance as before.
- Finish the Edges: If desired, finish the neckline edge with a serger or a zigzag stitch to prevent fraying.
And voilà! You've successfully sewn your collar onto the dress! Remember, practice makes perfect, so don’t hesitate to try again if things don’t go perfectly the first time. Happy sewing!
Also Read This: Insights into Popular and Profitable Content: Adobe Stock’s Best Selling Images
7. Finishing Touches and Hemming
Now that you've constructed and attached your collar, it’s time for those all-important finishing touches. These steps will ensure your dress not only looks polished but also feels comfortable to wear.
First, let's talk about pressing: This step is crucial for achieving a professional finish. Begin by using a steam iron on a low setting. Gently press the collar and seam allowances to ensure everything lies flat. This will really make your collar pop!
Next up, it's time to hem your dress. Depending on the style of your dress, you might opt for a simple straight hem, a rolled hem, or maybe even a bias tape finish. Here’s how to do a straight hem:
- Measure the desired length from the floor or your preferred length to the fabric's edge.
- Mark the hemline with fabric chalk or a fabric marker.
- Turn the fabric up by about 1/4 inch and press with your iron.
- Fold it up again by another 1/4 inch and press again, ensuring a clean edge.
- Pin or baste the hem in place, and then sew along the top edge of the hem, ensuring to keep it straight.
After hemming, give it a final press, and don’t forget to check for any loose threads or imperfections. A little snip here and there can make all the difference!
Also Read This: Understanding YouTube Shadowbans and How to Avoid Them
8. Tips for Perfecting Your Collar
Now that you’re well on your way to making a collar for your dress, let’s talk about perfecting it! A well-made collar can elevate your garment from ordinary to extraordinary. Here are some valuable tips:
- Choose the right interfacing: The type and weight of interfacing can change the stiffness and shape of your collar. A medium-weight fusible interfacing usually works wonders!
- Measure twice, cut once: Always take the time to measure your collar pattern pieces accurately. This helps prevent any awkward fitting issues.
- Consider your fabric: Different fabrics behave differently when sewn. For instance, flowing fabrics like silk may require extra care to prevent slipping, while stiffer fabrics hold structure better.
- Practice makes perfect: If you're new to sewing collars, practice on scrap fabric before you work on your actual project. This way, you can troubleshoot any potential issues.
- Take your time: Don’t rush through the process. Precision is key when crafting a collar, so give yourself enough time to be thorough.
By following these tips, you’ll not only enhance the appearance of your collar but also improve your overall sewing skills. Happy sewing!
Also Read This: Troubleshooting LinkedIn Certificate Upload Issues
Common Mistakes to Avoid
When sewing a collar on a dress, even the most experienced sewists can run into a few hiccups. Here are some common mistakes to watch out for so you can achieve that polished look you’re aiming for:
- Using the Wrong Fabric: Some collar types work better with certain fabrics. Make sure to choose a fabric that’s suitable for both your dress and the collar design.
- Poor Measurement: Always double-check your measurements before cutting fabric. An inch off can lead to a collar that’s too tight or too loose.
- Forgetting Interfacing: Interfacing adds structure to your collar. Skipping this step can result in a floppy, unstructured look.
- Incorrect Attaching Technique: There are various methods to attach a collar—be it a band or a flat collar. Make sure you understand the technique required for your specific design.
- Neglecting Seam Allowances: Consistent seam allowances are crucial for a clean finish. Check your sewing machine settings and don’t forget to maintain even allowances throughout.
By being aware of these pitfalls, you can streamline your process and ensure your collar turns out beautifully. Remember, every mistake is just an opportunity to learn and improve your skills!
Conclusion and Next Steps
- Practice: If you're new to sewing collars, practice on scrap fabric before you tackle your dress.
- Experiment: Try different types of collars—like Peter Pan or Mandarin collars—to see what you like best.
- Join a Sewing Community: Connect with fellow sewists online or in local groups to share tips and get feedback on your projects.
- Watch Tutorials: Sometimes, seeing the process can be more helpful than reading about it. Look for video tutorials that complement this guide.
- Share Your Work: Don’t forget to showcase your finished dress on social media or sewing blogs. It’s a great way to inspire others!
With practice, patience, and a little creativity, you’ll be sewing collars like a pro in no time. Happy sewing!