Are you looking to share your creative photography with the world and earn some extra cash while you’re at it? If so, you’ve come to the right place! This guide will walk you through the ins and outs of uploading your photos to Adobe Stock. Whether you’re a seasoned photographer or a hobbyist, understanding how to navigate this platform can open up new opportunities for you. So, let’s dive in!
Understanding Adobe Stock
Adobe Stock is a popular online marketplace where photographers, designers, and creatives can license high-quality images, videos, templates, and more. But what makes Adobe Stock stand out? Let’s break it down!
- Wide Reach: Adobe Stock integrates seamlessly with Adobe Creative Cloud applications. This means millions of users who work with software like Photoshop, Illustrator, and InDesign can easily access your photos. Talk about exposure!
- Flexible Licensing: Adobe Stock offers various licensing options, making it easier for buyers to find the right fit for their needs. Your photos can be used in everything from personal projects to commercial advertising.
- Competitive Earnings: As a contributor, you can earn up to 33% commission on sales, depending on your image type and exclusivity. This competitive rate is a great incentive for photographers aiming to monetize their work.
- User-Friendly Interface: The platform is designed with the user in mind, making it simple for both contributors and buyers to navigate. You’ll appreciate the straightforward upload process and intuitive dashboard.
- Global Marketplace: Adobe Stock has a vast international audience, providing your work with potential exposure to clients across the globe. This diversity can lead to more sales and opportunities.
In short, Adobe Stock is a powerful tool for photographers and creatives. With its expansive reach and user-friendly design, it’s an excellent platform for sharing your talent and earning from your passion. Ready to get started? Let’s move on to the next steps in uploading your photos!
Also Read This: Shutterstock vs Adobe Stock: A Comprehensive Comparison
3. Preparing Your Photos for Upload
Before you hit that upload button, it’s crucial to prepare your photos properly. This ensures that your images meet Adobe Stock’s guidelines, which helps you get accepted faster and sell better. Here’s a step-by-step guide to prepare your photos:
- Check Image Quality: Make sure your images are sharp, well-composed, and have a high resolution. Adobe Stock requires a minimum resolution of 4 MP (megapixels), but higher is always better.
- File Format: Adobe Stock accepts JPEGs, so convert your images to this format if they aren’t already. Make sure to save them with the highest quality settings.
- Post-Processing: Use photo editing software to enhance your images. Adjust brightness, contrast, and color balance. However, avoid over-editing, as it may lead to rejection.
- Remove Noise: If your images have any grain or noise, especially in low-light conditions, consider using noise reduction tools to clean them up.
- Check for Model and Property Releases: If your photos feature identifiable people or private property, you need to obtain and submit releases. This is essential to avoid legal issues.
- Organize Your Files: Create a folder for your uploads. Name your files descriptively, as a good file name can help with discoverability.
By following these steps, you’ll not only enhance the quality of your submissions but also increase your chances of being accepted into Adobe Stock’s library. Remember, quality over quantity!
Also Read This: How to Search for People on LinkedIn: Tips for Finding People Using LinkedIn’s Search Features
4. Creating an Adobe Stock Contributor Account
Ready to share your stunning images with the world? The first step is to create an Adobe Stock Contributor account. Don’t worry; it’s a straightforward process! Here’s how to do it:
- Visit Adobe Stock: Go to the Adobe Stock website and click on the “Contributor” link, usually found at the top of the page.
- Sign In or Create an Adobe ID: If you already have an Adobe ID, simply sign in. If not, you’ll need to create one. This ID is your gateway to all Adobe services.
- Fill Out Your Profile: Once signed in, fill out your profile. Include your name, a brief bio, and any relevant skills or experiences that highlight your photography journey.
- Tax Information: Adobe Stock will require you to provide tax information, especially if you’re planning to earn money from your uploads. This is a standard procedure.
- Bank Information: Set up how you want to get paid. You can choose from different payment methods, such as PayPal or bank transfer.
- Agree to Terms: Make sure to read through Adobe Stock’s contributor agreement and guidelines. It’s essential to understand the rights and responsibilities before you proceed.
Once you’ve completed these steps, you’re all set to upload your photos! It’s an exciting moment to become part of a creative community where your work can reach a global audience. Happy uploading!
Also Read This: How to Cancel Your Depositphotos Subscription with Ease
5. Uploading Your Photos
So, you've captured some stunning photos and you're ready to share them with the world through Adobe Stock? Great choice! Uploading your images is a straightforward process, and I'm here to guide you through it step by step.
First, ensure that your photos meet Adobe Stock’s requirements. Generally, your images should be:
- High-quality JPEG format
- At least 4 MP in size
- Free of watermarks and borders
- Original works that you own the rights to
Once you've checked your images, it’s time to upload. Here’s how:
- Log into your Adobe Stock Contributor account.
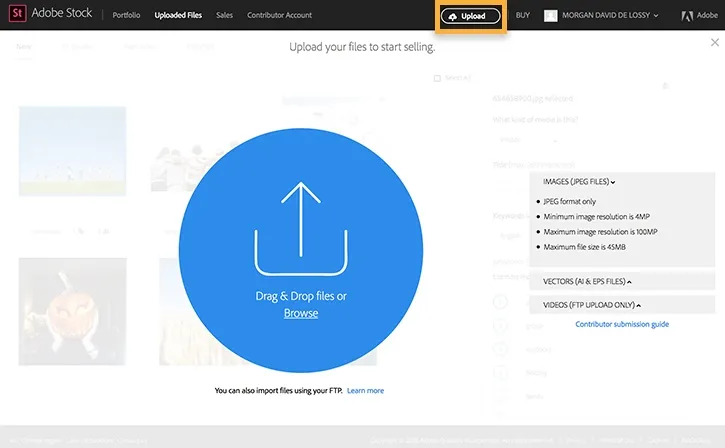
- Click on the "Upload" button.
- Drag and drop your photos into the upload area or click to browse your files.
- Monitor the upload progress; Adobe Stock will notify you when your images are successfully uploaded.
After uploading, you can review the images to ensure everything looks good. If you find any issues, you can easily delete the image and re-upload a corrected version. Remember, the better the quality, the higher the chance of your photos selling!
And there you have it! Once your photos are uploaded, the next step is to make them discoverable by adding metadata and keywords. Let’s dive into that!
Also Read This: Saving photos from Behance tutorial
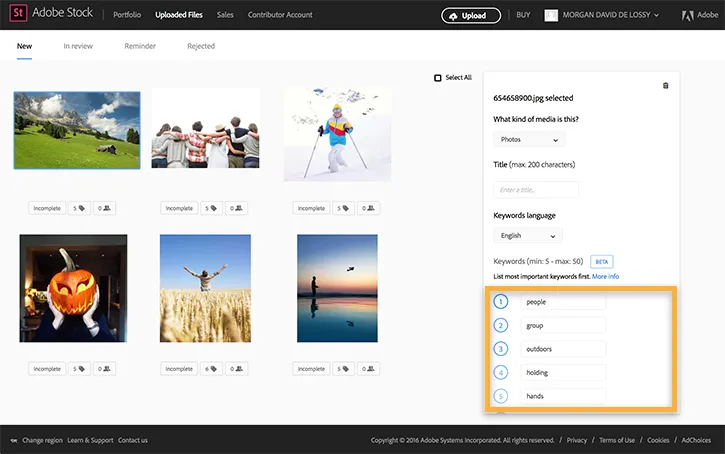
6. Adding Metadata and Keywords
Now that your photos are uploaded, it’s time to make them shine in search results! Adding metadata and keywords is crucial for making your images easily discoverable by potential buyers.
*What is Metadata? Metadata is like the behind-the-scenes information that describes your photo. It includes details like:
- Title: A brief description of what the photo is about.
- Description: A more detailed overview, including context or story.
- Categories: The broader themes or types that your photo fits into.
Keywords* are specific words or phrases that potential buyers might use when searching for images. Think about what someone would type into a search bar to find your photo. Here’s how to effectively add keywords:
- Start with general terms that describe the main subject of the image.
- Add specific details, like colors, emotions, or actions depicted.
- Include synonyms or variations of your main keywords.
- Use a mix of broad and niche keywords to reach a wider audience.
Be mindful of the keyword limit; too many irrelevant keywords can hurt your visibility. Adobe Stock allows you to add up to 50 keywords, so choose wisely!
In short, well-thought-out metadata and keywords can significantly increase your chances of making sales on Adobe Stock. Take your time with this step; it’s worth the effort!
Also Read This: How to Boost Your LinkedIn Post for Free Tips to Increase Visibility Without Paying
Submitting Your Photos for Review
So, you’ve meticulously prepared your photos and are ready to share your artistic vision with the world! The next step in your journey with Adobe Stock is submitting your photos for review. This process is crucial because it determines whether your images meet the platform's quality standards and guidelines.
Here’s a simple breakdown of how to submit your photos:
- Log into Your Adobe Stock Contributor Account: Start by accessing your account. If you haven’t created one yet, you’ll need to do that first.
- Navigate to the Upload Section: Once you’re logged in, find the “Upload” option in the menu. This is where the magic happens!
- Select Your Photos: Choose the images you want to upload. You can typically select multiple images at once, which saves time.
- Add Metadata: Fill in the relevant information for each photo. This may include titles, keywords, and descriptions. Good metadata helps your images get discovered!
- Review Your Submission: Before hitting that submit button, double-check everything. Make sure your images are high-quality and your metadata is accurate.
- Submit for Review: Once you’re satisfied, click the submit button. Your photos will be sent to Adobe Stock’s review team for evaluation.
And just like that, you’re one step closer to sharing your work with potential buyers! Remember, patience is key during this phase.
Also Read This: Will The Rock Compete in the Royal Rumble 2024
After Submission: What to Expect
Now that you’ve submitted your photos, you might be wondering what happens next. The waiting game can be a bit nerve-wracking, but understanding the process can help ease your mind.
Here’s what you can expect after you submit your photos:
- Review Time: The review process usually takes anywhere from a few hours to several days. Adobe Stock’s team will assess your photos based on quality, relevance, and adherence to their guidelines.
- Email Notifications: You’ll receive an email notification once your photos have been reviewed. This will inform you whether they were accepted or rejected.
- Feedback (if applicable): If your photos were rejected, Adobe Stock will typically provide feedback on why. This can be incredibly valuable for improving your future submissions.
- Accepted Photos: Congratulations! If your photos are accepted, they’ll be published on Adobe Stock, and you’ll start earning royalties when they’re downloaded.
In summary, the period after submitting your photos is filled with anticipation. Stay positive, and remember that every submission is a learning opportunity!
Also Read This: The Top Video Downloaders for Android Devices
9. Tips for Success on Adobe Stock
Uploading your photos to Adobe Stock can be a rewarding experience, both creatively and financially. However, standing out in a crowded marketplace requires more than just snapping pictures. Here are some essential tips to help you succeed:
- Understand the Market: Take some time to browse Adobe Stock. Look at popular images, trends, and styles that are currently in demand. This will give you a sense of what buyers are looking for.
- Quality Over Quantity: While it might be tempting to upload as many photos as possible, focus on quality. Ensure your images are sharp, well-composed, and properly lit. Adobe Stock has specific technical requirements, so make sure your images meet them.
- Keyword Wisely: Keywords are crucial for visibility. Use relevant and specific keywords to describe your images. Think about what buyers might search for and include those terms.
- Stay Consistent: Develop a consistent style or theme for your portfolio. This helps to create a recognizable brand and can attract more buyers who appreciate your aesthetic.
- Engage with the Community: Participate in forums and discussions related to stock photography. Learning from others and sharing your experiences can provide valuable insights and tips.
- Monitor Trends: Keep an eye on seasonal trends and current events. Images that reflect what's happening in the world can gain traction and sell well.
- Utilize Social Media: Promote your Adobe Stock portfolio on social media platforms. Building an audience can increase your visibility and lead to more sales.
10. Conclusion
Embarking on your journey with Adobe Stock can be both exciting and challenging. With the right approach and strategies, you can effectively monetize your photography while sharing your creativity with the world. Remember, success won’t happen overnight; it takes time, patience, and persistence.
By following the tips outlined above, you're setting yourself up for a greater chance of success in this competitive marketplace. Focus on enhancing your skills, understanding market demands, and delivering high-quality content. Don’t forget to engage with the community and stay updated on trends—these are crucial aspects of thriving on Adobe Stock.
Lastly, enjoy the process! Photography is not just about making money; it's also about expressing yourself and capturing moments. So get out there, take those stunning photos, and share them with Adobe Stock. Happy shooting!