Are you a photographer or videographer looking to monetize your creative work? Selling on Adobe Stock might just be the perfect fit for you! In this guide, we'll walk you through everything you need to know about uploading and selling your photos and videos on this popular platform. From understanding the basics to getting your content published, let's embark on this exciting journey together!
Understanding Adobe Stock
Adobe Stock is a platform that connects creatives with high-quality stock images, videos, and templates. It's part of the Adobe Creative Cloud ecosystem, making it easily accessible for those who already use Adobe products like Photoshop and Illustrator. Here’s what you need to know:
- Wide Audience Reach: Adobe Stock boasts millions of users, including designers, marketers, and businesses seeking content for their projects. This makes it an excellent opportunity for you to showcase your work.
- High-Quality Standards: Adobe has strict quality requirements. Your submissions must meet specific guidelines regarding resolution, composition, and subject matter to ensure they’re suitable for commercial use.
- Easy Integration: If you’re already using Adobe software, you can seamlessly integrate your stock portfolio. You can upload directly from applications like Lightroom, making the process smooth and efficient.
- Royalties and Earnings: You earn a percentage of the sales made from your contributions. Adobe Stock typically offers 33% of the sale price for photos and 35% for videos, providing a lucrative opportunity for talented creators.
By understanding how Adobe Stock operates, you can better position your work to attract potential buyers and maximize your earnings. Ready to dive deeper into how to get started? Let’s go!
Also Read This: How to Cancel Your YouTube Premium Subscription
Preparing Your Content for Submission
Getting your photos and videos ready for submission to Adobe Stock can be both exciting and daunting. You want to put your best foot forward, right? Here’s how you can ensure your content shines:
- Quality Matters: Make sure your images and videos are high-resolution. For photos, aim for at least 4MP (megapixels). For videos, 1080p is the minimum standard.
- Editing: Use editing software to enhance your content. Simple adjustments like brightness, contrast, and cropping can make a big difference. But remember, don’t overdo it — authenticity is key!
- Keywords and Metadata: Think about what someone would search for when looking for your content. Use relevant keywords and detailed descriptions to help potential buyers find your work.
- Model Releases: If your photos include identifiable people, obtain a signed model release. This legal document protects you and gives buyers confidence in using your images.
- Property Releases: Similarly, if your content features recognizable locations or property, a property release is necessary to avoid legal issues.
- Review Guidelines: Familiarize yourself with Adobe Stock's content guidelines. Ensure that your submissions meet their quality standards to avoid rejection.
By meticulously preparing your content, you increase the chances of it being approved and ultimately sold. It’s all about putting your best work forward!
Also Read This: Importing Adobe Stock Photos into Photoshop for Seamless Editing
Steps to Create an Adobe Stock Account
Ready to dive into the world of stock photography and videography? Creating an Adobe Stock account is your first step! Here’s how to do it smoothly:
- Visit the Adobe Stock Website: Go to stock.adobe.com. This is where all the magic happens!
- Click on 'Sign In': You’ll find this option in the upper right corner. Here, you can either sign in or start a new account.
- Select 'Join Now': If you’re a new user, click on the ‘Join Now’ button to begin the registration process.
- Fill Out Your Information: Provide the necessary details like your name, email address, and a strong password. You can also choose to sign in with an Adobe ID if you have one.
- Agree to Terms: Read through Adobe’s terms of service and privacy policy. Once you’re comfortable, check the box to agree.
- Verify Your Account: You may need to confirm your email address. Check your inbox for a verification email from Adobe and follow the instructions provided.
And voila! You’re now set up with an Adobe Stock account. From here, you can start uploading your content and begin your journey as a contributor!
Also Read This: Enhancing Image Discoverability on Alamy
5. Uploading Your Photos and Videos
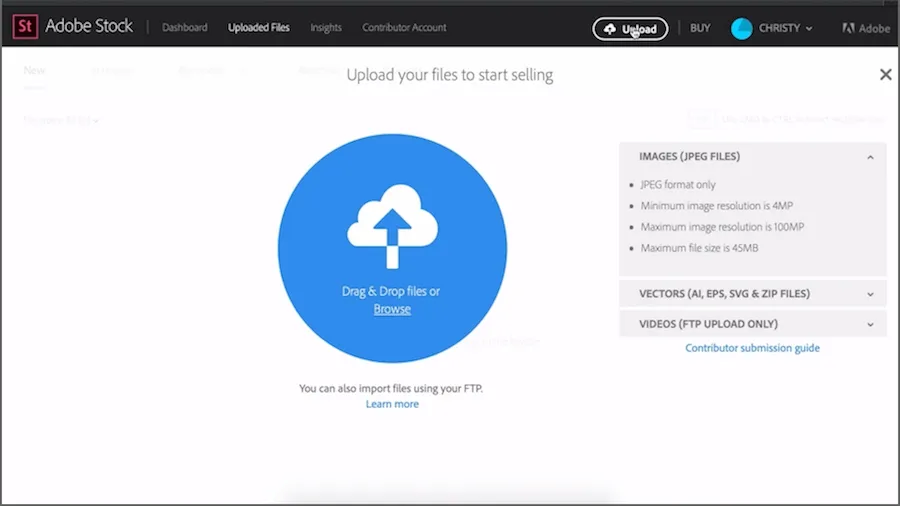
Once you’ve sorted out your account and are ready to share your creative work, uploading your photos and videos to Adobe Stock is a breeze! Follow these straightforward steps to get your content online and ready for potential buyers.
- Access the Contributor Portal: Log in to your Adobe Stock Contributor account. You’ll find an intuitive dashboard that guides you through the uploading process.
- Select Upload: Click on the “Upload” button. You can drag and drop your files directly into the portal or browse your computer to select them.
- File Formats: Make sure your files are in the right formats! Adobe Stock accepts JPEG for images, and for videos, you can upload formats like MP4 or MOV. This ensures compatibility and ease of use.
- Batch Upload: If you have multiple files, take advantage of the batch upload feature. This saves time and allows you to upload several images or videos at once.
- Quality Check: Adobe Stock has strict quality standards. Ensure your images are sharp, well-composed, and free of watermarks or logos before uploading.
With your files successfully uploaded, you’re one step closer to making them available for sale. Don’t rush this process; take your time to ensure everything looks perfect!
Also Read This: How to Apply Pancake Makeup on Your Face
6. Adding Metadata and Keywords
Now that your photos and videos are uploaded, it’s time to make them discoverable! Adding metadata and keywords is crucial in helping potential buyers find your work. Think of this as giving your content a roadmap to reach the right audience.
- Title: Start with a catchy title. It should be descriptive and give an idea of what the content is about. For example, instead of "Beach," you could use "Sunny Beach Sunset with Palm Trees."
- Description: Provide a detailed description. This is your chance to explain what’s in the image or video. Include the setting, subject, and any emotional context. For instance, "A serene view of a sunset over a tranquil beach, perfect for vacation promotions."
- Keywords: Choose relevant keywords that buyers might use to search for your content. Aim for 10-15 keywords. Think broadly and specifically! For example, "beach, sunset, vacation, relaxation, tropical, travel."
- Categorization: Select appropriate categories. Adobe Stock often prompts you to choose categories that best fit your work, making it easier for customers to find what they’re looking for.
Good metadata and keywords are essential for visibility. They help your work get seen, so take your time and think strategically about what terms will connect your content with the right audience!
Also Read This: How to Apply Eyeliner for Big Eyes Techniques to Enhance Your Look
7. Review Process and Approval
So, you've uploaded your stunning photos and videos to Adobe Stock, and now you're probably wondering what happens next. The review process is a crucial step where your submissions are evaluated for quality and adherence to Adobe's guidelines.
When you submit your work, it goes into a queue where Adobe's team of reviewers assesses it based on several criteria:
- Technical Quality: Your images and videos must be sharp, well-composed, and properly exposed. Any blurriness or poor lighting can lead to rejection.
- Relevance: Submissions should meet the current market demands. Trends change, so keep an eye on what's popular!
- Compliance: Ensure you have the necessary model and property releases for any recognizable people or private properties in your work.
Once reviewed, Adobe will notify you of the outcome. If approved, your work will be published in the Adobe Stock marketplace. If rejected, don't be discouraged! The feedback provided can guide you in refining your submissions for future attempts.
Remember, quality over quantity is key. Focusing on creating a smaller number of high-quality images will serve you better than flooding the market with mediocre content.
Also Read This: How to Bypass Fortiguard Downloader Web Filters
8. Marketing Your Adobe Stock Portfolio
Now that your photos and videos are live on Adobe Stock, it’s time to put on your marketing hat! Promoting your portfolio is essential to attract buyers and boost your sales.
Here are some effective strategies to get your work noticed:
- Social Media Presence: Share your work on platforms like Instagram, Pinterest, and Facebook. Use relevant hashtags to increase visibility.
- Create a Personal Website: Showcase your best work and link back to your Adobe Stock portfolio. This not only builds your brand but also provides a platform for potential clients to find you.
- Engage in Online Communities: Join photography forums or groups where you can share your work, get feedback, and connect with other creatives.
- Networking: Attend industry events, workshops, or local meetups to establish relationships with potential buyers or fellow artists.
Don’t forget to regularly update your portfolio with fresh content. This keeps your offerings relevant and encourages repeat visits from customers. Every bit of effort you put into marketing can significantly enhance your visibility and sales on Adobe Stock!
How to Sell on Adobe Stock and Get Your Photos and Videos Published
Adobe Stock is a powerful platform for photographers and videographers looking to monetize their creative work. Selling your photos and videos on Adobe Stock can be a rewarding way to earn passive income while showcasing your talent to a global audience. Here’s a comprehensive guide on how to get started.
1. Create an Adobe Account
To begin selling on Adobe Stock, you need to have an Adobe ID. If you don't have one, sign up for a free account on the Adobe website.
2. Understand the Submission Guidelines
Before submitting your work, familiarize yourself with Adobe Stock's guidelines. Key points include:
- Image Quality: High-resolution images are essential.
- Content Restrictions: Avoid submitting content that is illegal, offensive, or violates copyright.
- Model Releases: Secure releases for recognizable individuals in your images.
3. Prepare Your Photos and Videos
Ensure your images and videos are properly edited and formatted. Consider these tips:
| Type | Specifications |
|---|---|
| Photos | Minimum of 4MP resolution |
| Videos | Minimum of 1080p resolution |
4. Upload Your Content
Use the Adobe Stock Contributor portal to upload your photos and videos. Tag your submissions with relevant keywords to enhance discoverability.
5. Monitor Your Sales
Once your content is live, you can track sales and performance through the contributor dashboard. This information can help you refine your future submissions.
Conclusion
By following these steps, you can effectively sell your photos and videos on Adobe Stock, reaching a wide audience while earning income from your creative work. Consistently producing high-quality content and understanding market trends can significantly enhance your success on the platform.