Installing drivers on Windows 7 from a CD might seem like a daunting task, especially if you're not particularly tech-savvy. But fear not! This guide will walk you through the entire process in a simple and straightforward manner. Whether you're setting up a new printer, a graphics card, or any other hardware, having the right drivers is crucial for optimal performance. Let’s dive into how to prepare for a smooth installation!
Preparing for Driver Installation
Before you jump into installing drivers from your CD, there are a few preparation steps you should take to ensure everything goes off without a hitch. Here’s a handy checklist to guide you:
- Check the Compatibility: Ensure that the drivers on the CD are compatible with your version of Windows 7. This is often printed on the CD or the packaging.
- Backup Important Data: It’s always wise to back up any important files before making system changes. Use an external hard drive or cloud storage for this task.
- Gather Necessary Tools: Have your CD drive and any necessary cables ready. If you're using a laptop, make sure it’s charged or plugged in.
- Uninstall Old Drivers: If there are existing drivers for the hardware, it’s a good idea to uninstall them first. This can prevent conflicts during the installation process.
Also, consider the following:
| Step | Details |
|---|---|
| Ensure Connectivity | Make sure your device is properly connected to the computer before installation. |
| Prepare for Reboots | Some driver installations may require you to restart your computer. Save your work! |
By following these preparation steps, you're setting yourself up for a successful driver installation from your CD. Ready to move on? Let’s get started!
Also Read This: How to Download YouTube Videos to a USB Stick for Offline Viewing Anywhere
Inserting the CD
Alright, let’s get started! The first step in installing drivers on your Windows 7 system is to insert the CD that came with your hardware. It’s pretty straightforward, but let’s break it down to make sure you don’t miss anything.
1. *Locate the CD: Find the CD that contains the drivers for your device. This is usually included in the packaging of your hardware, whether it’s a printer, graphics card, or any other peripheral.
2. Open the CD Drive: Gently press the button on your CD/DVD drive. This is often located on the front of your computer. If you’re using a laptop, it might be a bit different, but look for a similar button.
3. Insert the CD: Once the tray is open, carefully place the CD in the center of the tray with the label facing up. Make sure it sits flat and securely in place.
4. Close the Tray: Gently push the tray back into the drive until it clicks into place. If you're using a laptop, just press down until the tray retracts.
5. Wait for Recognition: Your computer should automatically recognize the CD. You might hear a slight whirring sound as it reads the disc. If everything is in order, you’re ready to move on to the next step!
Also Read This: How to Connect Dailymotion with Smart TV for Smooth Playback
Accessing the CD Contents
Now that your CD is in place, it’s time to access its contents. This is where the fun part begins, as you’ll be able to navigate through the files and start installing your drivers.
1. Open Windows Explorer: Click on the folder icon on your taskbar or press Windows + E on your keyboard to open Windows Explorer.
2. Locate the CD Drive: On the left sidebar, you should see an option labeled “Computer” or “This PC.” Click on it, and you will see all your drives, including your CD drive, which is often labeled as “DVD RW Drive” or similar.
3. Double Click to Open: Simply double-click on the CD drive icon. This will open up a new window that displays all the files and folders present on the CD.
4. Identify the Driver Files: Look for files typically labeled as “setup.exe” or might be in a folder named “Drivers.” It's usually straightforward, but if you’re unsure, you can look for a README file that might guide you.
5. Ready to Install:* Once you’ve located the driver files, you’re all set to go ahead and start the installation process. Just double-click the setup file, and you’ll be on your way!
Also Read This: How to Replace Downloaded Images on ShootProof
5. Running the Driver Installation
Once you've inserted the CD containing your drivers into the CD/DVD drive, it’s time to start the installation process. This can feel a bit daunting, but don’t worry; I’ll guide you through it step-by-step!
First, navigate to the CD drive on your computer. You can do this by opening My Computer or This PC from your desktop or Start menu. You should see an icon representing your CD drive, usually labeled with the CD's name or just “CD Drive.” Double-click on it to open.
Inside, you’ll find several files and possibly folders. Look for a file named setup.exe or a similar executable file. This is typically the driver installation file. If you see a README file, it can be helpful to check it out first for any specific instructions.
Once you’ve located the setup file, double-click it. A window will pop up, often asking if you want to allow this program to make changes to your computer—click Yes to proceed.
Follow the on-screen prompts. This usually involves agreeing to the license terms and selecting the installation location. You might see options for a typical, custom, or advanced installation. If you're unsure, go with the typical option, which is usually adequate for most users.
After a few moments, the installation should complete, and you might be prompted to restart your computer. Don’t skip this step; restarting is essential for the drivers to function correctly!
Also Read This: Understanding Telegram's Message Deletion Policies
6. Verifying Driver Installation
Now that you've run the installation, it's crucial to ensure that your drivers are working correctly. This verification step helps you identify any issues that might have occurred during installation.
To check if the drivers have been installed successfully, follow these simple steps:
- Click on the Start menu and type Device Manager in the search box.
- Select Device Manager from the list that appears.
In Device Manager, you’ll see a list of all your hardware devices. Look for the category related to the driver you installed. For example, if you installed a graphics driver, check under Display adapters. If you installed a printer driver, look under Printers.
If your driver is installed correctly, you should see it listed without any warning symbols (like a yellow triangle). If you see a warning icon, that indicates there might be an issue with the installation.
Additionally, you can test the functionality of your hardware. For instance, if it’s a printer driver, try printing a test page. For a graphics card, test some graphics-intensive applications to ensure everything runs smoothly.
In summary, verifying your driver installation is a straightforward process, but it's essential for optimal performance. Checking Device Manager is your best bet to confirm everything is working as it should!
Also Read This: How to View Deleted LinkedIn Posts
Troubleshooting Common Issues
Installing drivers from a CD on Windows 7 is generally a smooth process, but sometimes things can go awry. If you encounter issues, don’t panic! Here are some common problems and their solutions:
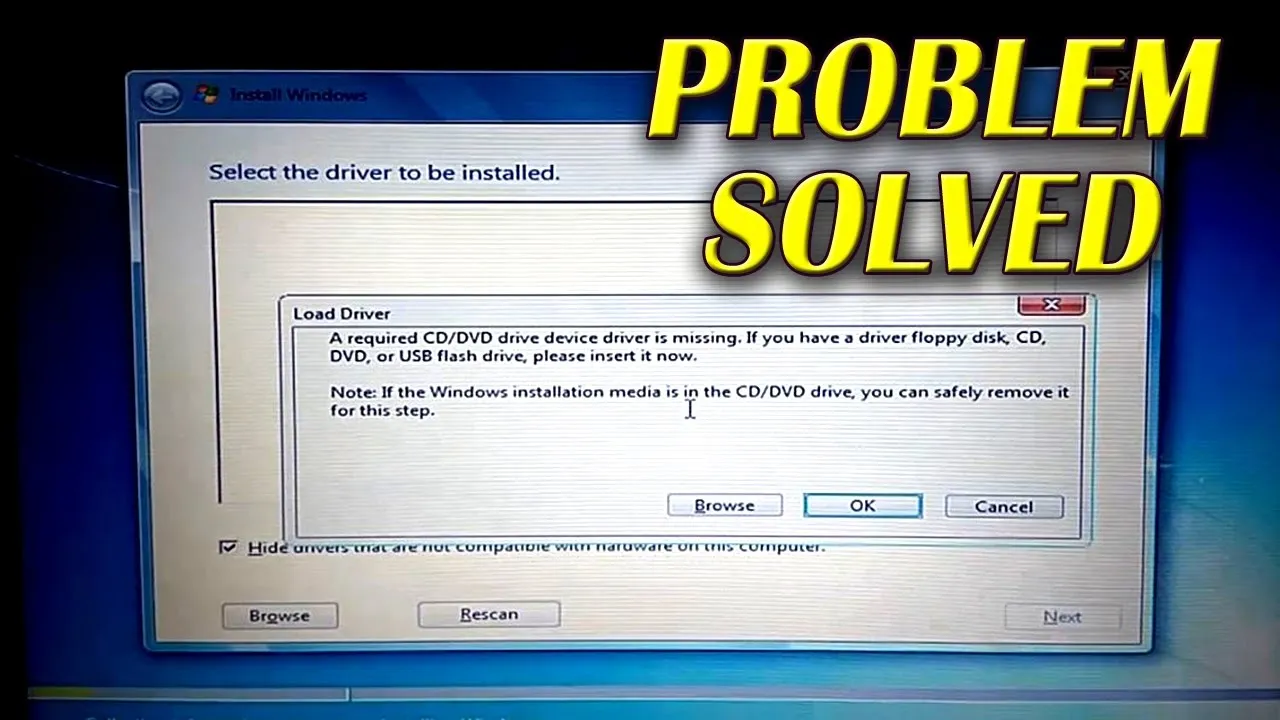
- Driver Not Recognized: If your CD contains drivers that aren't recognized, it might be due to compatibility issues. Ensure the driver is specifically designed for Windows 7. You can check the manufacturer's website for updated drivers.
- Installation Errors: If you receive error messages during installation, try running the setup as an administrator. Right-click on the setup file and select "Run as administrator." This often resolves permission-related issues.
- CD Drive Issues: Sometimes, the CD drive itself can be the problem. Make sure it's functioning properly. You can test it by trying to read a different CD. If it fails, consider using an external USB CD drive.
- Missing Dependencies: Some drivers require additional software or updates. Check the manufacturer's instructions for any prerequisite installations, such as .NET Framework or specific system updates.
- Conflicts with Existing Drivers: If you have old or conflicting drivers, they might interfere with the new installation. Use the Device Manager to uninstall the old drivers before attempting to reinstall from the CD.
If you’re still facing issues, consider reaching out to forums or the manufacturer’s customer support for personalized assistance. Remember, troubleshooting is part of the process!
Conclusion
Installing drivers from a CD on Windows 7 can seem daunting at first, but with the right approach, it’s a straightforward task. Let’s recap the essential steps:
- Ensure your system is compatible with the drivers contained on the CD.
- Follow the installation instructions carefully, and don’t forget to run as administrator when necessary.
- Troubleshoot common issues like driver recognition and installation errors by checking compatibility and your CD drive's functionality.
In conclusion, taking the time to install drivers correctly not only enhances your system performance but also ensures that all your hardware functions optimally. If you face any hiccups along the way, remember to seek help or consult resources online. Happy computing, and may your drivers always be up-to-date!