Changing your email address on LinkedIn can feel a bit daunting, but it’s easier than you might think! Whether you’re updating your contact information for professional growth or simply moving to a new email provider, having the right email linked to your LinkedIn account is crucial. In this guide, we’ll walk you through the steps and discuss why you might want to make this change.
Why Change Your Email Address?
There are several reasons why you might consider changing your email address on LinkedIn. Let’s dive into some of the most common scenarios:
- Switching Providers: You may have decided to switch from a personal email (like Yahoo or Gmail) to a professional one that represents your brand or business.
- Security Concerns: If you suspect your current email has been compromised or is at risk, updating it is a smart move to protect your account.
- Job Changes: When you transition to a new job, it’s common to use your company email temporarily, but later, you might want to switch back to your personal email for continuity.
- Cluttered Inbox: If your inbox is overflowing and it's challenging to manage, consolidating your LinkedIn communications to a different email can help streamline your online presence.
- Changing Domains: If you’ve created a new domain for your business or personal branding, you’ll want to update your LinkedIn email to reflect that change.
In each of these cases, changing your email address on LinkedIn ensures that you stay connected with your network and receive important notifications without any hassle.
Also Read This: How Much Money Can You Make on Shutterstock Landscape
Step 1: Log into Your LinkedIn Account
Before you can change your email address on LinkedIn, the first thing you need to do is log into your account. This step is pretty straightforward, but let’s break it down:
- Open LinkedIn: Navigate to the LinkedIn website or open the LinkedIn mobile app on your device.
- Enter Your Credentials: In the login fields, type in your registered email address and password. Make sure you’re using the correct email associated with your LinkedIn account. If you’ve forgotten your password, there’s an option to reset it.
- Click on 'Sign In': Hit the 'Sign In' button, and voilà! You’re in. If everything goes smoothly, you’ll land on your LinkedIn homepage.
If you encounter any issues during login, double-check your internet connection or look for any error messages that might indicate what's wrong. Once you're logged in, you’re ready to move to the next step—accessing your account settings!
Also Read This: How to Earn Money on Rumble
Step 2: Access Account Settings
Now that you’re logged into your LinkedIn account, it’s time to find your account settings. This is where you can manage your profile and make changes to your email address. Here’s how to do it:
- Profile Icon: Look for your profile icon or photo at the top right corner of the LinkedIn homepage. Click on it.
- Settings & Privacy: From the dropdown menu, select 'Settings & Privacy.' This will take you to a new page where you can adjust various aspects of your account.
- Navigation: On the left side of the settings page, you’ll see different options. Click on 'Account' to delve into your account-specific settings.
In this section, you can update your email address, change your password, and manage other important settings. It’s essential to keep your account information up to date, so don’t skip this step!
Also Read This: Maximizing Your Experience With OK.ruâs Trending Content Features
Step 3: Navigate to Email Addresses
Alright, you’re doing great! Now that you’re in the Settings & Privacy section, it's time to head over to the email addresses. This is where you can manage all the email accounts linked to your LinkedIn profile.
To get there, look for the *“Sign in & security” tab on the left sidebar. Once you click on that, you’ll see an option labeled “Email addresses.” Go ahead and click on it. This section allows you to view your current email addresses, set a primary email, and add new ones.
Here’s what you should look for:
- Current Email Addresses: You’ll see a list of the email addresses associated with your account.
- Primary Email: This is the email LinkedIn uses to send you notifications and updates. You can change this later, so keep that in mind.
- Verification Status: If any email addresses need verification, you’ll see a status indicator here.
Once you’re on the email addresses page, take a moment to review what you already have. If everything looks good, let’s move on to the next step!
Also Read This: Is My Hero Academia Ultra Rumble Crossplay Available Across Platforms
Step 4: Add a New Email Address
Now comes the exciting part—adding your new email address! You’re just a few clicks away from making this change.
While you’re still in the Email addresses section, look for a button that says “Add email address.” Click on it, and a dialog box will pop up, prompting you to enter the new email.
Here’s the process broken down:
- Enter your new email address: Type it in carefully so there are no typos. It’s essential for ensuring you receive notifications!
- Choose your preferences: Decide if you’d like this new email to be your primary email. If you do, make sure to select that option.
- Save Changes: After entering the details, don’t forget to hit the “Save” button to confirm your new email address.
Once you’ve added the email, LinkedIn will send a verification email to that address. Make sure to check your inbox for this email and follow the instructions to verify your new email. And just like that, you’re all set!
Also Read This: How Many Photos Does Shutterstock Have and What It Means for Contributors
Step 5: Verify Your New Email Address
Once you’ve entered your new email address on LinkedIn, the next crucial step is verification. This step ensures that the new email is indeed yours and helps keep your account secure. Here’s how you can go about it:
- After submitting your new email, check your inbox for a verification email from LinkedIn.
- If you don’t see it, make sure to check your spam or junk folder. Sometimes, emails can end up there!
- Once you find the email, open it and look for a button or link that says something like “Verify Email” or “Confirm Your Email Address.”
- Clicking this link will direct you back to LinkedIn, where you’ll see a confirmation that your email address has been verified.
Pro Tip: Make sure to complete this step promptly. If you don’t verify your new email within a certain timeframe, LinkedIn may require you to re-enter it.
Verifying your email not only confirms your identity but also ensures you can receive important notifications and updates regarding your LinkedIn account. Without this step, your new email address won’t be fully functional for your LinkedIn communications.
Also Read This: Performing Domain Checks with Fortiguard Downloader
Step 6: Remove the Old Email Address
After successfully verifying your new email address, it's time to tidy up your account by removing the old email. This helps prevent confusion and keeps your LinkedIn profile up-to-date. Here’s how to go about it:
- Go back to the “Settings & Privacy” section of your LinkedIn account.
- Navigate to the “Email addresses” section, where you should see both your new and old email addresses listed.
- Find the old email address and look for an option that allows you to “Remove” or “Delete” it.
- Confirm your choice when prompted to ensure that you really want to take this step.
Why is this important? Keeping your old email can lead to confusion, especially when receiving notifications. By removing it, you ensure that all communications are streamlined to your new address.
Finally, it’s a good practice to revisit your account settings periodically to ensure everything is current. Keeping your email list clean not only enhances your account security but also simplifies your LinkedIn experience.
How to Change Your Email Address on LinkedIn
Changing your email address on LinkedIn is a crucial step if you're updating your contact information or transitioning to a new email provider. Keeping your email up to date ensures you receive important notifications, connection requests, and job opportunities. Here’s a comprehensive guide on how to change your email address on LinkedIn:
- Log into your LinkedIn account.
- Click on the Me icon at the top of your LinkedIn homepage.
- Select Settings & Privacy from the dropdown menu.
- In the Account tab, look for the Email addresses section.
- Click on Add email address to enter your new email.
- After adding, you’ll receive a verification email. Check your inbox and click on the verification link.
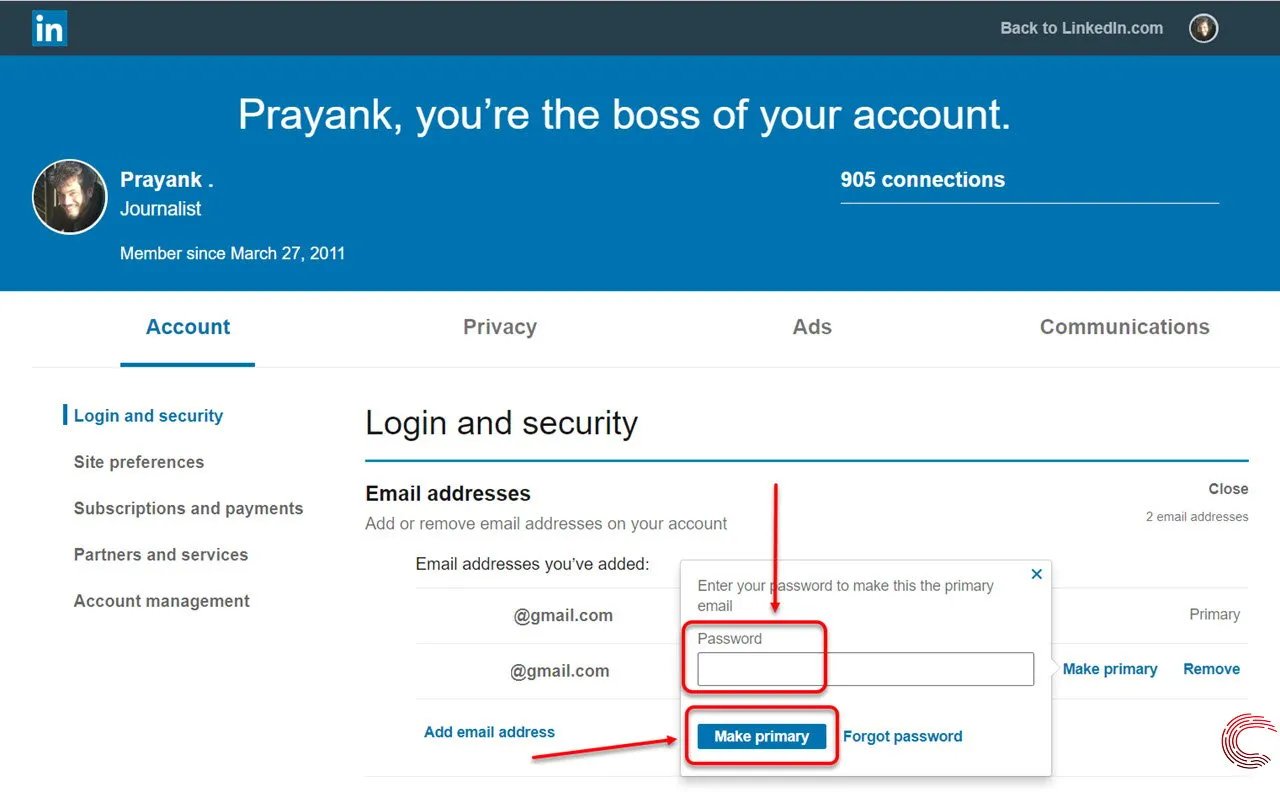
- Once verified, you can set the new email as your primary address.
- If desired, remove the old email address by clicking on the Remove* button next to it.
It’s important to note that:
- Your LinkedIn account needs to be active to change your email.
- You must have access to the new email address to verify it.
- LinkedIn allows you to have multiple email addresses linked to your account.
| Step | Action |
|---|---|
| 1 | Log into LinkedIn |
| 2 | Go to Settings & Privacy |
| 3 | Add and verify new email |
| 4 | Set as primary or remove old email |
In conclusion, updating your email address on LinkedIn is a straightforward process that enhances your connectivity and ensures you stay informed about opportunities and network updates. Follow the steps outlined above to keep your profile current and maintain effective communication.