Feeling overwhelmed by LinkedIn email notifications? You’re not alone! Many users find themselves inundated with messages about job recommendations, connection requests, and updates from their network. Thankfully, managing these notifications is easier than you might think. In this guide, we’ll walk you through the steps to unsubscribe from unwanted LinkedIn email notifications, helping you regain control over your inbox. Let’s dive in!
Understanding LinkedIn Email Preferences
Before you go ahead and unsubscribe, it’s essential to understand LinkedIn’s email preferences and what each type of notification entails. LinkedIn offers a variety of email notifications, tailored to keep you informed about your professional network. Here’s a breakdown:
- Connection Requests: Notifications about new connections and pending requests.
- Job Opportunities: Emails suggesting job listings based on your profile and activity.
- Network Updates: Updates on your connections’ activities, such as job changes and anniversaries.
- Group Activity: Notifications about discussions and updates in groups you belong to.
- Content Suggestions: Emails recommending articles and content relevant to your interests.
Each of these notifications serves a purpose, but they can clutter your inbox if you don’t manage them effectively. To get started, you’ll want to access your LinkedIn settings. Here’s how:
| Step | Action |
|---|---|
| 1 | Log in to your LinkedIn account. |
| 2 | Click on the “Me” icon at the top right corner. |
| 3 | Select “Settings & Privacy.” |
| 4 | Go to the “Communications” tab. |
| 5 | Manage your email preferences. |
With a clearer understanding of LinkedIn’s email preferences, you can make informed decisions about what notifications you want to keep and what to unsubscribe from. Stay tuned for the next steps on how to streamline your LinkedIn email experience!
Also Read This: Elegant Red Carpet Hairstyles for Special Occasions
Step 1: Access Your LinkedIn Account
To start the process of unsubscribing from LinkedIn email notifications, the first thing you need to do is access your LinkedIn account. This step is essential as it serves as the gateway to all your settings and preferences.
Here’s how you can do it:
- Open your preferred web browser and go to the LinkedIn homepage.
- If you’re not already logged in, you’ll see fields asking for your email and password. Enter your credentials and click on the “Sign In” button.
- Once logged in, you’ll be directed to your LinkedIn feed, where you can see updates from your connections and industry news.
Now that you’re in, it’s easy to navigate to the next step. If you’re using the mobile app, simply tap on your profile picture in the top left corner to access your account settings. Remember, having your account handy is crucial for making these changes efficiently!
Also Read This: How to Create a Microsoft Account on Dailymotion
Step 2: Navigate to Settings & Privacy
With your LinkedIn account open, it’s time to dive into the settings where you can manage all your notification preferences. This is where you’ll find the tools to unsubscribe from those pesky email notifications.
Follow these steps:
- Click on your profile icon or the “Me” option in the top right corner of your LinkedIn homepage.
- A dropdown menu will appear. Select “Settings & Privacy” from this menu.
- In the Settings & Privacy menu, you will see several tabs on the left side of the screen. Click on “Communications” to access notification settings.
Here, you’ll find options related to how LinkedIn communicates with you, including all email notifications. It’s important to explore these settings fully, so you can tailor your LinkedIn experience to your preferences!
Also Read This: Design Airbnb Manuals with Canva Airbnb House Manual Template
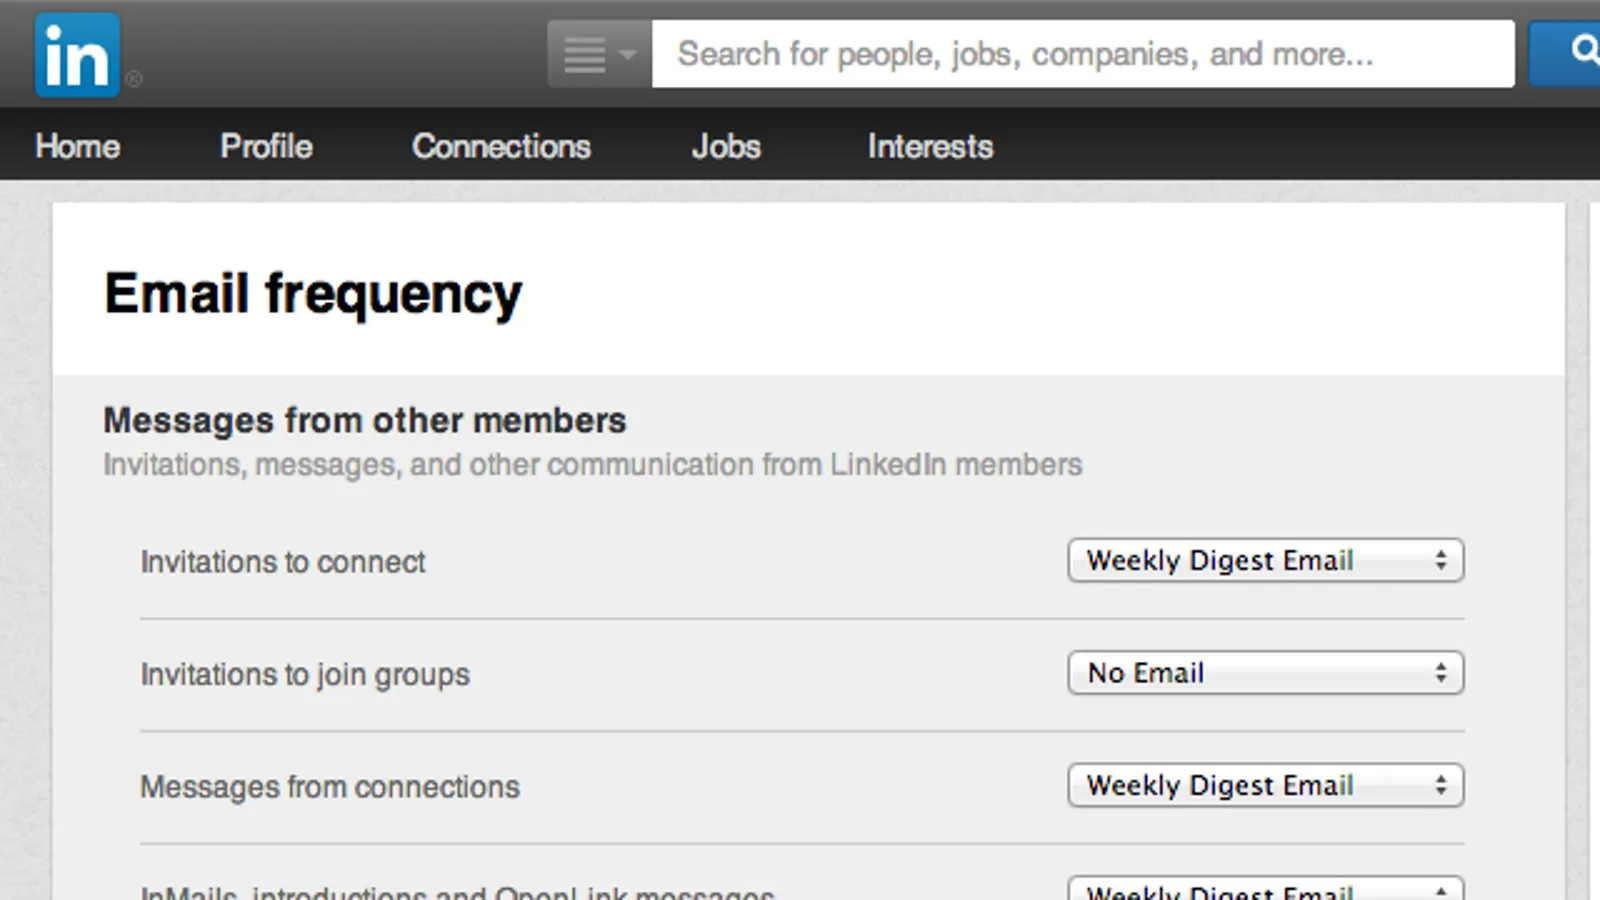
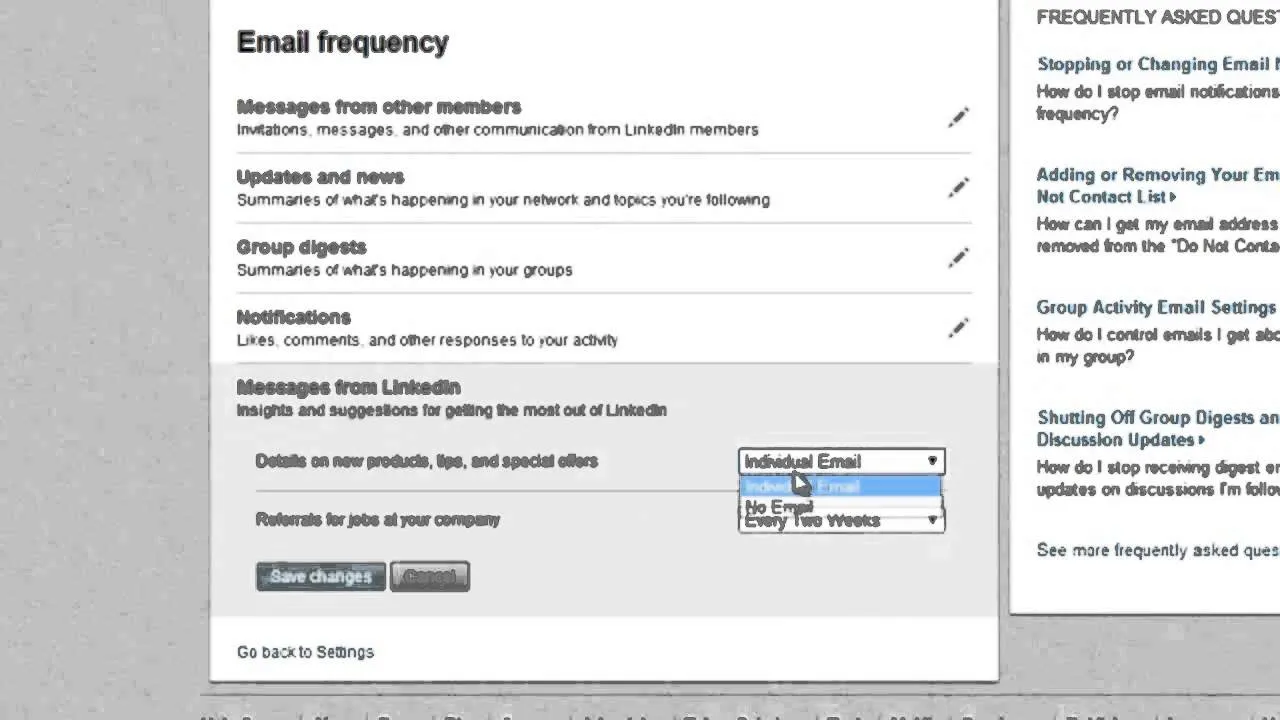
Step 3: Locate Email Preferences
Alright, you've made it this far! Now it’s time to find the section where all the magic happens—your email preferences. Trust me, it’s easier than it sounds. Just follow these simple steps:
- Log in to your LinkedIn account.
- Look for your profile picture in the upper right corner of the screen and click on it.
- From the dropdown menu, select “Settings & Privacy.” This will take you to a world of options!
- In the left sidebar, click on “Communications.” This is where you can manage how LinkedIn communicates with you.
Once you’re in the Communications section, you’ll see a variety of options that will help you customize your LinkedIn experience. You want to focus on the “Email notifications” section. Here, you’ll find various categories of emails that LinkedIn sends out—from job alerts to connection requests. You can really tailor this to suit your needs.
To make the process smoother, here’s a quick summary:
| Action | How To |
|---|---|
| Log In | Enter your credentials on LinkedIn. |
| Access Settings | Click your profile picture > Settings & Privacy. |
| Navigate | Click on “Communications” in the sidebar. |
Also Read This: How Shutterstock Contributor Program Works and How to Get Involved
Step 4: Adjust Your Email Notifications
So you’ve located your email preferences—fantastic! Now it’s time to roll up your sleeves and adjust your email notifications. This is where you can decide exactly what you want to hear from LinkedIn, and what can go straight to the digital recycling bin.
Within the “Email notifications” section, you’ll see a list of categories. Here are a few common types you can manage:
- Connections: Get notified when someone wants to connect with you.
- Job Alerts: Receive emails about job opportunities that match your profile.
- Group Activities: Stay updated on discussions happening in your groups.
- Recommendations: Find out when someone recommends you or your work.
For each category, you can toggle notifications on or off. Just click the button next to each type to customize your preferences. If you find certain notifications helpful, keep them; if not, just turn them off. It’s that simple!
Remember, the goal here is to streamline your LinkedIn experience so you’re only getting the emails that matter to you. Here’s a quick checklist:
- Review each notification category.
- Toggle notifications based on your preference.
- Save your settings if prompted!
And just like that, you've taken control of your inbox! Happy customizing!
Also Read This: Step-by-Step Guide to Safely Open a Party Popper Using Dailymotion Tutorials
Step 5: Save Changes
After you’ve customized your LinkedIn email notification settings to suit your preferences, it’s crucial to ensure that all those changes are saved properly. This step is essential to avoid any confusion or disappointment later on when you continue to receive unwanted emails.
Here’s how to save your changes:
- Locate the Save Button: At the bottom of the settings page, you’ll find a prominent “Save” button. It’s usually highlighted in blue or another contrasting color to make it easily identifiable.
- Click to Confirm: Once you’ve reviewed your selections, go ahead and click the “Save” button. This action will finalize your changes and update your notification settings.
- Check for Confirmation: After saving, keep an eye out for a confirmation message. LinkedIn typically displays a notification that you’ve successfully saved your changes. If you don’t see one, consider refreshing the page to ensure everything is up to date.
- Log Out and Back In: As a precaution, you might want to log out of LinkedIn and log back in. This can help ensure that your new settings are in effect.
And that’s it! You’ve taken the necessary steps to manage your LinkedIn email notifications effectively. Enjoy a more tailored and less cluttered inbox!
Conclusion
Unsubscribing from LinkedIn email notifications doesn’t have to be a daunting task. Following the steps outlined above allows you to take control of your inbox and manage how often you hear from LinkedIn.
Remember, it’s all about tailoring your experience to fit your needs. By reducing the volume of emails, you can focus more on what truly matters—building your professional network and engaging with relevant content.
In summary:
- Navigate to Settings: Understanding where to find the email notifications settings is your first step.
- Review Notification Types: Make sure to explore each type and decide what’s necessary for you.
- Unsubscribe Wisely: You can selectively unsubscribe from specific notifications rather than all.
- Save Your Changes: Don’t forget this crucial final step to ensure your preferences are applied.
With these tips, you can enjoy a more streamlined LinkedIn experience without unnecessary distractions. Happy networking!