Changing your email address on LinkedIn is a straightforward process, and I'm here to walk you through it step-by-step! Just follow these simple instructions, and you'll be all set in no time.
- Log In to Your Account: Start by visiting LinkedIn and logging into your account with your current email and password.
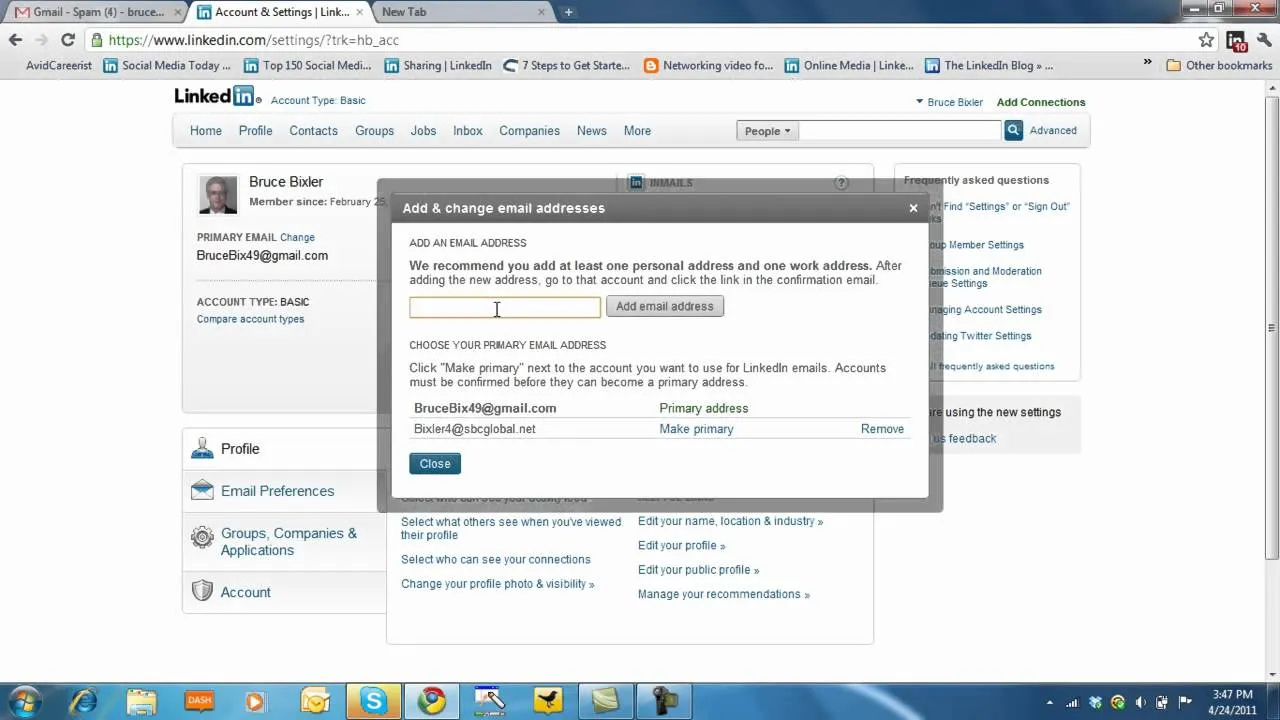
- Access Account Settings: Once logged in, click on your profile picture at the top right corner. From the dropdown menu, select “Settings & Privacy.”
- Go to the Email Addresses Section: In the Settings menu, look for the “Account” tab on the left sidebar. Under this section, find and click on “Email addresses.”
- Add Your New Email: Click on “Add email address.” A pop-up will appear where you can enter your new email. After entering it, hit “Send verification.”
- Set as Primary (Optional): If you want your new email to be the primary one, make sure to check the option that says “Set as primary” before you save. This will ensure that all your notifications and communications come to your new email.
- Remove Old Email (Optional): If you no longer want to keep your old email linked to your account, you can remove it by clicking on “Remove” next to it.
And that’s it! You’ve successfully changed your email address on LinkedIn. Now, let’s move on to ensuring that your new email is verified!
4. Verifying Your New Email Address
Verification is an important step to ensure that your new email address is linked to your LinkedIn account. Here’s how you can verify it quickly and easily:
- Check Your Inbox: After you’ve added your new email, head over to your email inbox. Look for a verification email from LinkedIn. It should arrive almost instantly, but sometimes it might take a few minutes.
- Open the Verification Email: Once you find the email, open it. It will contain a verification link that you need to click on.
- Click the Verification Link: Clicking the link will redirect you back to LinkedIn, confirming that you own this email address.
- Confirmation Message: After clicking the link, you should see a confirmation message on LinkedIn that your new email address has been verified successfully. If you encounter any issues, check your spam folder just in case!
Now that your new email is verified, you’re all set! You can enjoy a seamless experience on LinkedIn without any email hassles.
Also Read This: How to Create a Private YouTube Channel for Content Protection
5. Updating Your Contact Information
Updating your contact information on LinkedIn is a straightforward process but crucial for maintaining your professional network. Keeping your email address current ensures that you receive important notifications about job opportunities, connections, and messages. Here’s how to do it:
- Log in to your LinkedIn account.
- Click on the Me icon at the top of your homepage.
- Select Settings & Privacy from the dropdown menu.
- In the Account tab, find the Contact info section.
- Click on the pencil icon to edit your email address.
- Add your new email and click Save.
After updating, you might want to notify your connections of your new email, especially if you actively use LinkedIn for networking. It’s also wise to check your email preferences and ensure you're receiving the updates you want. You can customize these settings in the same Settings & Privacy section under Communications.
Note: You may need to verify your new email address by clicking a link sent to it, so keep an eye on your inbox!
Also Read This: Are Royal Rumbles Scripted? Debunking the Myths of Professional Wrestling
6. Troubleshooting Common Issues
Sometimes, changing your email on LinkedIn might not go as smoothly as planned. Here are a few common issues and how to troubleshoot them:
- Verification Email Not Received: If you don’t see a verification email, check your spam or junk folder. Also, ensure that the email address entered is correct.
- Unable to Save Changes: If you’re having trouble saving your new email, try clearing your browser cache or switching to a different browser. Sometimes, browser issues can cause glitches.
- Old Email Still Active: If your old email still appears after updating, double-check that you’ve completed the verification step for your new email.
- Account Locked: If your account gets locked after multiple failed attempts to change your email, follow the instructions in the email from LinkedIn to unlock it.
For persistent issues, consider reaching out to LinkedIn support. They can provide personalized assistance to get things sorted. Remember, staying connected on LinkedIn is essential, so don’t hesitate to address these hiccups quickly!
How to Change Your Email on LinkedIn
Changing your email address on LinkedIn is a straightforward process that ensures your account remains secure and up-to-date. Whether you’ve switched providers, changed your domain, or simply want to use a new address, keeping your LinkedIn email current is essential for maintaining connections and receiving important notifications. Follow the steps below to update your email address on LinkedIn:
- Log into Your LinkedIn Account:
Visit the LinkedIn website and enter your credentials to log in.
- Access Your Settings:
Click on your profile picture in the top right corner and select “Settings & Privacy” from the dropdown menu.
- Navigate to the Email Addresses Section:
In the “Account” tab, locate the “Email addresses” section. Here, you will find your current email and options to add or change it.
- Add a New Email Address:
Click on “Add email address.” Enter your new email and click “Send verification.”
- Verify Your New Email:
Check your inbox for a verification email from LinkedIn. Click on the verification link to confirm your new email address.
- Set the New Email as Primary:
Return to the “Email addresses” section, and select the new email as your primary contact.
- Remove the Old Email (if desired):
You can choose to remove the old email address by clicking the “Remove” button next to it.
By following these simple steps, you can easily change your email address on LinkedIn, ensuring that you stay connected with your professional network without missing important updates.
Conclusion: Updating your email on LinkedIn is vital for maintaining effective communication and security, and the process is quick and user-friendly, allowing you to focus on building your professional connections.