Uploading videos on Behance can greatly enhance your creative portfolio. It allows you to showcase your work in a dynamic way and engage your audience more effectively. Whether you're a designer, artist, or filmmaker, adding videos helps tell your story and gives potential clients or collaborators a deeper understanding of your skills and style.
Understanding the Requirements for Video Uploads
Before you dive into uploading your videos on Behance, it’s essential to know the platform's requirements. Here’s what you need to keep in mind:
- Video Format: Behance supports common video formats like MP4 and MOV. Ensure your video is in one of these formats for a smooth upload.
- Maximum File Size: Your video file should not exceed 1GB. If your file is larger, consider compressing it or reducing the resolution.
- Video Length: While there’s no strict limit on video length, keeping your videos under 5 minutes is recommended for viewer engagement.
- Resolution: Aim for a resolution of at least 720p for clear playback. Higher resolutions like 1080p are even better if your file size allows it.
By meeting these requirements, you ensure that your videos upload successfully and look great on your profile.
Also Read This: What Fortiguard Downloader Labs Can Do for You
Steps for Uploading Videos on Behance
Uploading a video on Behance is a straightforward process. Just follow these simple steps:
- Log in to Your Account: Start by logging into your Behance account. If you don’t have an account, you’ll need to create one first.
- Navigate to Your Profile: Click on your profile picture in the top right corner, and select “Profile” from the dropdown menu.
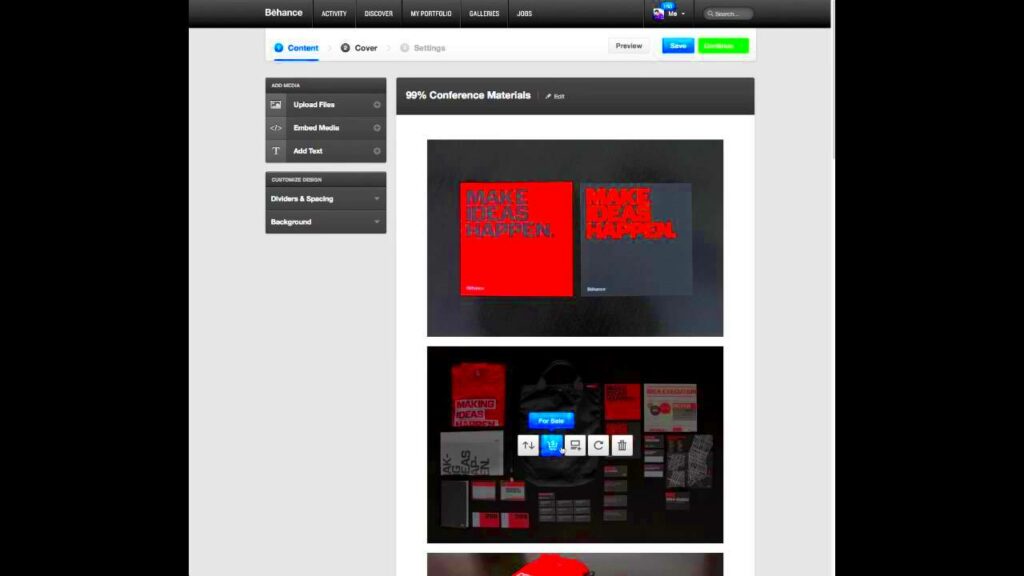
- Click on “Create a Project”: On your profile page, look for the “Create a Project” button. This will take you to the project setup screen.
- Add Your Video: Once in the project editor, you can drag and drop your video file or click on the upload button. After selecting your video, it will begin uploading.
- Fill in Project Details: Add a title, description, and any other relevant information about your video. This helps viewers understand your work better.
- Adjust Privacy Settings: Decide whether you want your project to be public or private. This controls who can view your video.
- Publish Your Project: Once everything looks good, click the “Publish” button to make your video live on your profile.
And that’s it! Your video is now part of your Behance portfolio, ready for others to see and appreciate.
Also Read This: How to Get Featured on Behance Served
Tips for Creating Engaging Videos
Creating engaging videos is key to capturing your audience's attention on Behance. Here are some helpful tips to ensure your videos stand out:
- Start with a Strong Hook: The first few seconds of your video are crucial. Begin with an eye-catching moment or a compelling statement to draw viewers in.
- Keep It Concise: Aim for clarity and brevity. Stick to your main message and avoid unnecessary details that could bore your audience.
- Use High-Quality Visuals: Invest in good lighting and camera equipment. High-quality visuals make your video more appealing and professional.
- Add Captivating Music: Choose background music that fits the mood of your video. A well-selected soundtrack can elevate your content significantly.
- Include Text Overlays: Text overlays can emphasize key points and make your video more accessible. Use them to highlight important information without overwhelming the viewer.
- Engage with Your Audience: Ask questions or encourage comments. Engaging directly with your viewers can make your content feel more personal and inviting.
Remember, the goal is to connect with your audience and keep them interested in what you have to share.
Also Read This: PNGWing Copyright: Ensuring Freedom for Your Projects
Common Issues and Solutions While Uploading
Sometimes, you might run into issues when uploading your videos to Behance. Here are some common problems and how to solve them:
| Issue | Possible Solution |
|---|---|
| File size exceeds 1GB | Compress your video using software like HandBrake or reduce the resolution. |
| Video format not supported | Convert your video to MP4 or MOV format using a video converter tool. |
| Upload takes too long | Check your internet connection or try uploading during off-peak hours. |
| Video doesn't play properly | Ensure your video meets the platform's resolution requirements and try re-uploading. |
If you encounter any of these issues, don’t worry! Most of them have simple fixes, allowing you to get back to showcasing your work.
Also Read This: eStockPhoto: High-Quality Travel and Nature Images
How to Optimize Your Videos for Better Visibility
To make your videos more visible on Behance, you need to optimize them effectively. Here are some strategies to consider:
- Use Relevant Keywords: Incorporate keywords in your video title and description. This helps people find your content through searches.
- Write a Compelling Description: Clearly explain what your video is about and what viewers can expect. A well-written description can encourage more clicks.
- Tag Your Videos: Use appropriate tags that relate to your video's content. This can improve its discoverability on the platform.
- Share on Social Media: Promote your Behance project on social media platforms. This drives traffic to your video and increases its visibility.
- Engage with Comments: Respond to comments on your video. Engaging with your audience encourages interaction and can boost your visibility.
By optimizing your videos, you increase the chances of reaching a wider audience and making a lasting impact on viewers.
Also Read This: Finding Unique Content for Holiday and Cultural Specials on Dailymotion
Exploring Video Privacy Settings on Behance
Understanding privacy settings is essential when uploading videos to Behance. These settings allow you to control who can see your work, giving you flexibility in how you share your creative projects. Here’s a breakdown of what you can do:
- Public Setting: When your video is set to public, anyone can view it, making it an excellent choice for reaching a wider audience and gaining exposure.
- Private Setting: Choosing the private option means only you can see your video. This is ideal for drafts or projects you want to keep confidential until you’re ready to share.
- Invited Viewers: This setting allows you to share your video with specific people. You can invite collaborators or clients to view your work without making it public.
To adjust these settings:
- Go to the project editor after uploading your video.
- Find the privacy settings option.
- Select your preferred visibility option (Public, Private, or Invited Viewers).
Having control over who can see your videos helps you manage your creative image and engage with the right audience.
Also Read This: Tracking Download Status with Fortiguard Downloader
FAQs About Behance Video Uploading
If you have questions about uploading videos to Behance, you're not alone! Here are some frequently asked questions:
| Question | Answer |
|---|---|
| What file formats can I use for my videos? | You can upload videos in MP4 and MOV formats. |
| Is there a limit on video length? | While there’s no strict length limit, videos under 5 minutes are generally more engaging. |
| Can I edit my video after uploading? | Yes, you can edit project details, including the description and tags, but you cannot edit the video itself once uploaded. |
| How can I ensure my video is high quality? | Aim for at least 720p resolution and use good lighting when filming to enhance video quality. |
These FAQs should help clear up any confusion and make your uploading experience smoother.
Conclusion and Final Thoughts
In conclusion, uploading videos on Behance is a great way to showcase your creativity and connect with a broader audience. By understanding the platform's requirements, utilizing privacy settings, and optimizing your content, you can effectively engage viewers and promote your work. Remember to keep your videos engaging, solve common issues proactively, and share your projects widely to maximize visibility.
As you continue to upload and create on Behance, don’t forget to interact with your audience. Their feedback can provide valuable insights and help you improve your future projects. Happy creating!