Canva has really become a go to tool for people like me in the world of graphic design. Whether you're a seasoned pro or just someone wanting to make eye catching visuals mastering the art of cutting images is essential. I still remember my first try at designing a poster for an event. I had this stunning picture but I needed to extract a section to make it pop. That's when I stumbled upon the wonders of image cutting in Canva. It took my project to a level and boosted my confidence to venture into more creative designs.
Steps to Cut Images in Canva
Trimming pictures in Canva is a breeze, even if you're new to it. Here's a simple guide on how to get it done.
- Open Canva and Choose Your Template: Start by selecting a blank canvas or a template that suits your project.
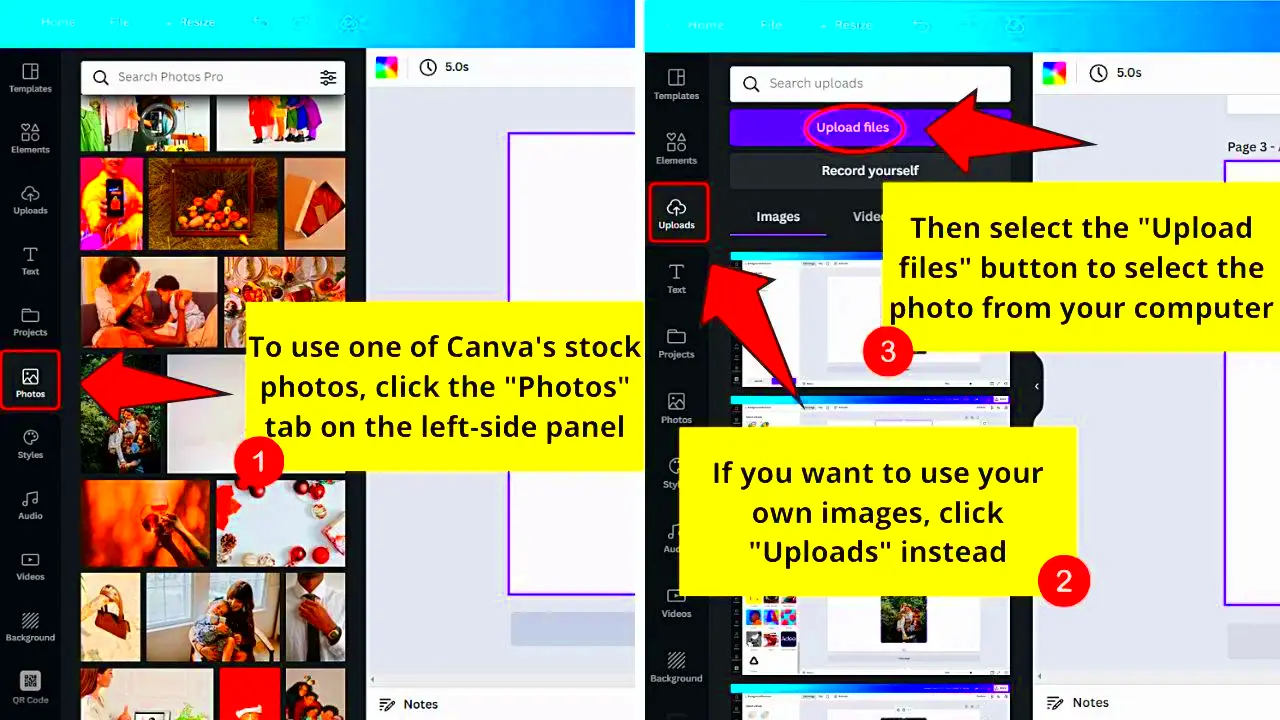
- Upload Your Image: Click on the "Uploads" tab and upload the image you want to cut.
- Select the Image: Drag the image onto your canvas and click on it to activate the editing options.
- Use the Crop Tool: Click on the crop icon in the toolbar. You can drag the corners to adjust what you want to keep.
- Fine-Tune Your Selection: Use the guidelines to ensure you’re cutting evenly. You can also rotate or flip the image if needed.
- Click Done: Once you’re satisfied, click the "Done" button to apply your changes.
By following these steps you will be able to crop images efficiently and before long it will become second nature to you.
Also Read This: Understanding Adobe Stock Standard License Pricing and Usage Rights
Tools Available for Image Cutting
Canva provides a range of tools that streamline the process of cropping images. Here are a few notable features you can take advantage of.
- Crop Tool: This is your primary tool for cutting images. It allows for simple adjustments and gives you control over what part of the image you want to keep.
- Masking Options: Canva provides various shapes that you can use to mask your images creatively. This adds a fun twist to how you present your images.
- Filters and Effects: After cutting your image, apply filters or effects to enhance it further. This can help you blend the cut image seamlessly with the background.
- Resize Feature: You can resize your image after cutting it, making it easier to fit into your design perfectly.
These resources can assist you in turning your ideas into reality much like they did for me during my initial design explorations. Embrace these options and allow your creativity to take flight!
Also Read This: How Getty Images Claims Copyright on Old Photos
Tips for Effective Image Cutting
When I began my journey with Canva I faced challenges in cropping images as I had imagined. However with time and some trial and error I stumbled upon tips that truly made an impact. Skillful image cropping can elevate a decent design to an exceptional level and these straightforward techniques can assist you in accomplishing just that.
Here are some of my favorite tips:
- Start with High-Quality Images: Always choose images with good resolution. Low-quality images can look pixelated when cut, ruining your design.
- Use the Grid Feature: Activate the grid lines in Canva. They provide a great visual guide to help you align your cuts perfectly.
- Experiment with Shapes: Instead of just using rectangular cuts, try using shapes to add creativity to your design. It’s a fun way to enhance visual appeal!
- Keep It Simple: Sometimes less is more. Avoid overcomplicating your designs. A clean, simple cut can have a striking effect.
- Review Your Cuts: After cutting, always take a step back and review your work. This will help you catch any imperfections.
These suggestions have helped me along my creative path and I wish the same for you. Keep in mind that honing your skills takes time and each design presents an opportunity to gain fresh insights!
Also Read This: Mastering Dribbble: Your Path to Design Success
Common Mistakes to Avoid When Cutting Images
While exploring the realm of image cropping I stumbled upon my share of missteps. Every error served as a valuable lesson that honed my design abilities. Here are a few pitfalls to steer clear of when trimming images in Canva.
- Not Planning Your Cuts: Jumping into cutting without a clear vision can lead to awkward results. Take a moment to think about what you want to achieve.
- Ignoring Aspect Ratios: Forgetting to maintain the aspect ratio can distort your image. Always check how your cut will affect the overall look.
- Overusing Filters: While filters can enhance your design, using too many can overwhelm the image. A little goes a long way!
- Forgetting to Save Your Work: It sounds simple, but I’ve lost designs because I forgot to hit save. Make it a habit to save frequently!
- Not Utilizing Canva’s Help Features: Canva has numerous tutorials and resources. Don’t hesitate to seek guidance if you’re stuck.
Steering clear of these blunders will not only help you be more efficient but also improve the quality of your designs. Keep in mind that even top notch designers started off as novices!
Also Read This: How to Remove Watermarks After Purchasing from Shutterstock
How to Save and Download Your Cut Images
After putting in effort to refine your image edits the last thing you want is to throw away all that effort. Saving and downloading your visuals in Canva is pretty straightforward but there are some tricks to make sure you get it right.
Here’s a step by step guide on how to save and download the images you’ve cropped.
- Finish Your Design: Ensure you are happy with your cut and the overall design before moving on to save it.
- Click on the Download Button: In the top right corner, you’ll see the download icon. Click on it to open the download options.
- Select File Type: Choose the file format that best suits your needs. Options include PNG, JPG, and PDF. I prefer PNG for its quality, especially for web use.
- Adjust Settings: If necessary, adjust the settings based on your requirements. For example, you might want a transparent background for certain designs.
- Download Your Image: Click on the “Download” button. Your image will be processed and saved to your device.
Its really that simple! I make it a point to review my saved pictures to make sure everything appears just right. Enjoy your design process!
Also Read This: How to Create a GIF for Behance
Benefits of Using Canva for Image Cutting
Canva has really transformed my design journey. When I first delved into graphic design I found myself daunted by intricate software that appeared to demand a level of technical expertise. However when I discovered Canva it unlocked a realm of creativity that was not only easy to navigate but also incredibly fun. The advantages of utilizing Canva for cropping images are plentiful and frequently underestimated.
Here are a few reasons why Canva is an excellent tool for cutting images.
- User-Friendly Interface: Canva’s layout is intuitive, making it easy even for beginners. I remember how quickly I adapted to it, which kept my motivation high.
- Variety of Tools: Canva offers a range of cutting and editing tools that help you achieve professional-looking results without needing advanced skills. Whether you want to crop, mask, or adjust, everything is at your fingertips.
- Collaboration Features: If you’re working with a team, Canva allows for easy sharing and collaboration. I’ve often worked on projects with friends, and being able to edit together in real-time is invaluable.
- Access to Stock Images: Canva provides a wealth of stock images, making it simple to find the perfect backdrop or subject for your project. This feature saved me hours of searching for images online.
- Cost-Effective: Many features are available for free, and the premium version is reasonably priced. It’s a great investment for anyone serious about design.
Canva makes it easy to crop images and encourages users to unleash their creativity without worrying about making errors. It’s a space that fosters learning in a way.
Also Read This: Creative Crafting with Tissue Paper Flowers
FAQ About Canva Image Cutting
As I explored Canva further I was bombarded with queries regarding image cropping. Many beginners have similar worries which is why I’ve put together a list of questions to shed some light on the topic.
- Can I cut images without losing quality?
Yes, as long as you start with a high-resolution image, cutting it won’t compromise its quality. Just remember to save it in the right format. - Is it possible to undo a cut?
Absolutely! Canva has an undo button that allows you to revert any changes instantly. It’s like a safety net for your creativity. - Can I cut images in different shapes?
Yes, you can mask images using various shapes available in Canva, adding an artistic touch to your designs. - Are there tutorials available?
Definitely! Canva has an extensive help section with tutorials that guide you through image cutting and many other features. - What if I need more advanced features?
Canva Pro offers advanced tools and features for serious designers, but the free version is quite robust for beginners.
These frequently asked questions address worries and offer comfort to individuals embarking on their image cutting journey. Keep in mind that each query brings you closer to honing your skills!
Conclusion on Canva Image Cutting
Looking back on my time using Canva I can say that learning how to cut images has been a rewarding experience. This tool has changed not only my design process but also my perspective on creativity. Trimming images with Canva offers a degree of personalization and originality that I never imagined before.
As I conclude my message I'd like to share a few key takeaways for you to consider.
- Embrace the Learning Curve: It’s natural to make mistakes. Each misstep is an opportunity to learn something new.
- Explore and Experiment: Don’t be afraid to try different styles and techniques. Some of my best designs came from unexpected experiments!
- Connect with the Community: Engage with fellow Canva users. Sharing tips and insights can spark new ideas and enhance your skills.
Canva has opened up the world of design making it easy and fun for many including me. As you start your own adventure in crafting images I wish you happiness and fulfillment in bringing to life stunning visuals that showcase your one of a kind viewpoint. Enjoy the creative process!