Canva is an amazing tool that has revolutionized our approach to graphic design. When I first discovered it, I was impressed by how easy it was to use especially in comparison to traditional software. It caters to both newcomers and experienced designers alike. With its diverse features Canva empowers users to craft visuals for different purposes be it social media, presentations or personal projects.
One of the highlights is how effortlessly you can modify pictures. A few simple clicks allow you to tweak brightness, contrast and saturation. You can also apply filters and effects to make your images stand out even more. I recall designing my poster for a community event and feeling a sense of fulfillment as it started to take shape. This platform really fosters creativity and experimentation.
Why Adding Borders Can Enhance Your Images
Have you ever observed how a border can transform an image from mundane to exceptional? I recall the moment I added a border to one of my pictures; it gave the impression that the photo was finally finished. Borders offer a sense of organization and unity directing the viewers attention towards the main focus. They also have the power to evoke emotions soft pastel borders can create a serene atmosphere while bold dark borders add a dramatic flair.
Incorporating borders into your designs can be beneficial for reasons. Here are some key points to keep in mind when considering their use.
- Visual Interest: Borders can make your images more engaging.
- Focus: They help guide the viewer's attention to the main subject.
- Branding: Consistent border styles can enhance brand recognition.
- Separation: Borders can help differentiate between elements in a crowded design.
In the end, selecting the right frame for your pictures can infuse them with character, making them stand out in memory.
Also Read This: 5 Tips for Creating a Killer Content Marketing Strategy
Exploring Different Border Styles in Canva
Canva provides a variety of border options, each with its own distinct charm. While trying out different borders I was amazed by the range of choices at hand. Whether you prefer sleek lines or intricate patterns there is a perfect style for every event. Here are some border styles you might want to explore.
| Border Style | Description | Best Used For |
|---|---|---|
| Solid Line | A classic, clean look that frames your image neatly. | Formal presentations or professional designs. |
| Dotted Line | Fun and whimsical, adds a light-hearted touch. | Children’s projects or casual invitations. |
| Shadow Borders | Creates depth and dimension, making images pop. | Promotional graphics or social media posts. |
| Patterned Borders | Unique designs that reflect your style. | Creative projects or personal branding. |
When selecting a border design consider the feeling you wish to express and the setting in which the picture will be used. I recommend being open to trying out different options. You never know you might discover a blend that beautifully reflects your idea.
Also Read This: Is It Safe to Show Your Face on YouTube
Step-by-Step Guide to Adding Borders to Your Images
Adding borders to images in Canva is simpler than you may expect. I recall my initial attempt at it and I was pleasantly surprised by how straightforward the process was. It felt like uncovering a new realm of creativity. Here’s an easy step by step guide to assist you in getting going.
- Open Your Canva Project: Log in to your Canva account and select the design you want to work on. It could be anything from a social media post to a flyer.
- Select Your Image: Click on the image you want to add a border to. You can upload your own or choose from Canva’s extensive library.
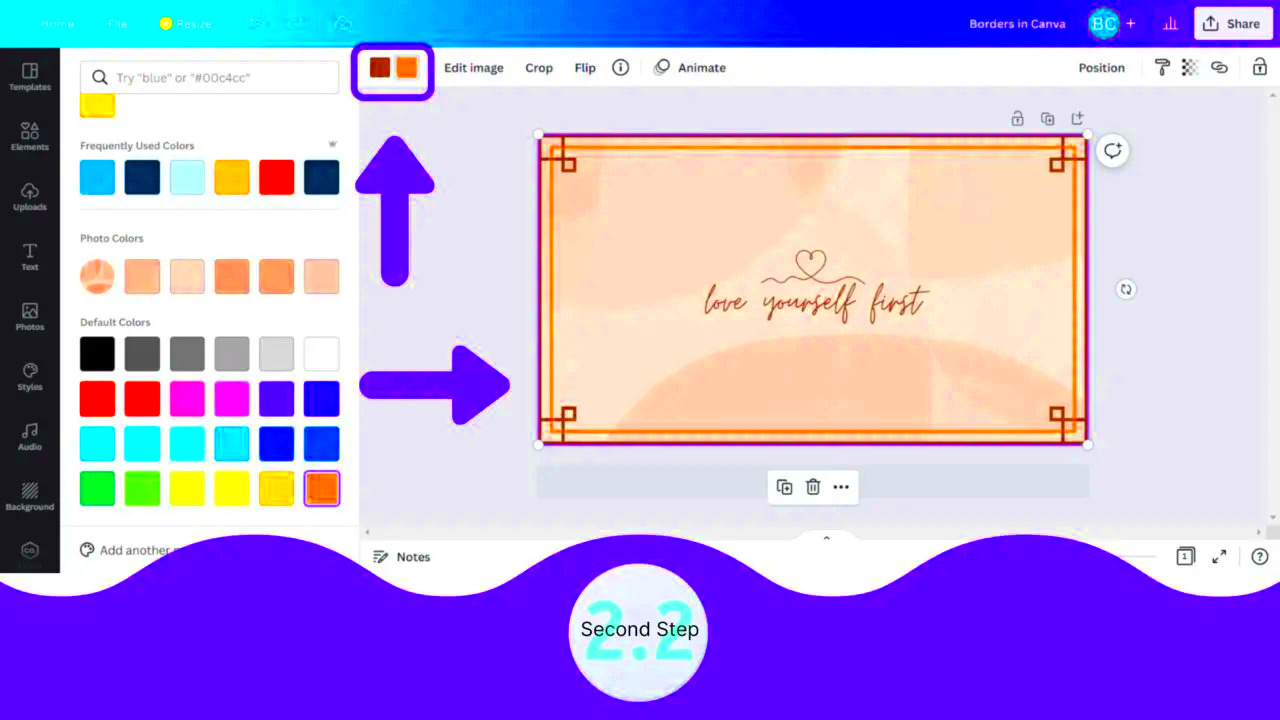
- Access the Elements Tab: On the left sidebar, click on the "Elements" tab. Here, you’ll find a plethora of options, including shapes, lines, and frames.
- Add a Shape: Drag a square or rectangle shape onto your canvas. Resize it to fit around your image, ensuring it’s slightly larger for that border effect.
- Adjust the Color: Click on the shape, then use the color tool in the toolbar above to select your desired border color. You can choose a solid color or even a gradient.
- Send the Shape Back: Right-click on the shape and select “Send to back.” This ensures your image is visible on top of the border.
- Final Touches: Adjust the thickness of the border by resizing the shape or adjusting its settings. Play around until you achieve the look you want!
And that's it! A few simple clicks and you've given your image a trendy border. It's such a rewarding feeling, don't you think?
Also Read This: Best Practices for Citing Embedded Getty Images on Your Website
Tips for Choosing the Right Border for Your Image
Picking the perfect border can really change the way people see your image. I usually take some time to play around with styles and it’s incredible how the right one can enhance the overall look. Here are a few suggestions to keep in mind when choosing a border.
- Match the Mood: Think about the emotion you want to convey. For a calming effect, consider soft pastel colors. For something more dramatic, go for bold and dark shades.
- Consider the Content: The border should complement, not overpower the image. For busy images, a simple, thin border works best, while a more complex design can handle a bolder border.
- Brand Consistency: If you’re designing for a brand, use colors and styles that align with its identity. This creates a cohesive look across all marketing materials.
- Test Different Styles: Don’t hesitate to try various border styles. A solid line might work perfectly for one image, while a dotted line fits another. Trust your instincts!
Keep in mind that the aim is to elevate your perception. By making selections you can craft captivating images that strike a chord with your viewers.
Also Read This: How to Sell AI Images on Shutterstock and What to Know
Common Mistakes to Avoid When Adding Borders
Just like in any artistic pursuit it's tempting to make missteps when it comes to putting borders on your pictures. I’ve discovered this through a process of trying things out and sometimes facing challenges along the way! Here are a few blunders to avoid, in your journey.
- Overly Thick Borders: While a bold border can make a statement, going overboard can detract from your image. Aim for a balance that highlights your content.
- Ignoring Color Harmony: Ensure that your border color harmonizes with the image and background. Clashing colors can be jarring and take away from the overall appeal.
- Forgetting About Spacing: A border needs breathing space. Avoid placing images too close to the edge of the border, as it can make the design feel cramped.
- Neglecting Consistency: If you’re working on a series of images, maintain a consistent border style. This helps create a cohesive look, especially for branding.
By steering clear of these traps you can craft designs that truly connect with your audience. Continue to explore and dont hesitate to grow from your missteps!
Also Read This: Instantly Downloading Free Stock Photos from 123RF: Tips
Using Canva’s Image Downloader for Easy Access
Canva has simplified the process of downloading images and I must say this feature has been a game changer for me especially when juggling multiple projects simultaneously. The option to swiftly retrieve and save images can really enhance your efficiency. Allow me to show you how to make the most of Canvass image downloader so you can maximize its benefits.
Here’s a straightforward process to follow:
- Finish Your Design: Make sure you’re happy with your design before downloading. A well-thought-out image reflects your creativity!
- Click on the Download Button: In the top right corner, you’ll see a download button (an arrow pointing down). Click on it, and a menu will pop up.
- Select File Type: You can choose from various formats, including PNG, JPG, and PDF. I usually opt for PNG for images with transparency, while JPG works great for photographs.
- Adjust Settings: If applicable, you can adjust the quality and size of the image. Higher quality is great for print, while lower quality is sufficient for social media.
- Download: Finally, click on the download button. Your image will be saved to your device, ready for use!
This straightforward method helps you stay organized and easily access your designs. I tend to set up folders on my computer to sort my pictures based on projects or themes which makes it convenient to locate them in the future. It’s all about streamlining things and making sure your creative efforts are only a click, away.
Also Read This: Where to Find Saved Jobs in LinkedIn
Frequently Asked Questions
While exploring Canva I’ve come across a lot of users asking similar questions about the platform particularly regarding image downloads and design management. Here are some frequently asked questions that I’ve encountered along with my thoughts on them.
- Can I download my design for free? Yes, Canva allows free users to download images in lower resolution. Premium features are available with a subscription, offering higher quality options.
- Are there any limits to the number of downloads? There are no specific limits, but be mindful of Canva’s usage policies. It’s always a good idea to check for any updates regarding usage rights.
- What formats can I download my images in? Canva supports several formats, including PNG, JPG, PDF, and even GIF for animated designs. Choose the one that best fits your needs.
- How can I download transparent images? For transparent backgrounds, ensure you select the PNG format and check the “transparent background” option before downloading.
- What if my download fails? If you encounter issues, try refreshing the page or checking your internet connection. Often, a quick restart can solve many problems.
Having these responses readily available can really enhance your time using Canva. If you have any additional inquiries I suggest checking out Canvass support center packed with valuable information.
Wrapping Up with Key Takeaways
As we wrap up our exploration of Canva's image editing and downloading capabilities I trust that you've discovered helpful information to elevate your creative endeavors. Here are a few key points to keep in mind:
- Embrace the Power of Borders: A well-placed border can transform your images, providing structure and enhancing visual appeal.
- Experiment and Explore: Don’t hesitate to try different styles and features within Canva. The platform is designed to encourage creativity!
- Organize Your Downloads: Create a system for your downloaded images to save time and effort in future projects.
- Stay Informed: Regularly check for updates on Canva’s features and policies. The platform is always evolving, offering new tools and options.
- Keep Learning: Whether through tutorials or user forums, continuous learning can help you master Canva and take your designs to the next level.
Canva has revolutionized how we approach design making it more approachable and enjoyable. I urge you to jump right in discover what it has to offer and above all relish in the journey!