Welcome to the colorful world of rubber bracelet making! Whether you're looking to create unique accessories for yourself, gifts for friends, or even products to sell, crafting rubber bracelets is a fun and engaging activity. This guide will walk you through everything you need to know, from the basics to more advanced techniques. Grab your supplies, roll up your sleeves, and let's get started on a creative journey that will unleash your artistic flair!
Materials Needed for Your DIY Project
Before diving into the actual crafting process, it's essential to gather all the necessary materials. Here's a handy list to ensure you have everything you need for your rubber bracelet making adventure:
- Rubber Bands: The star of the show! Choose from various colors and sizes to match your style.
- Bracelet Mold: This can be a silicone mold or a simple template that helps shape your bracelets. You can even use a sturdy cardboard tube!
- Scissors: Sharp scissors are crucial for cutting rubber bands to your desired lengths.
- Glue (optional): If you want to create more intricate designs, a strong adhesive can help secure pieces together.
- Beads and Charms (optional): Add some flair! Personalize your bracelets with decorative elements to make them truly unique.
- Measuring Tape: To ensure your bracelets fit perfectly, measuring tape is a must-have.
- Work Surface: A clean, flat surface will make your crafting experience smoother and more enjoyable.
Once you have all these materials at hand, you're well on your way to crafting stunning rubber bracelets. Don’t hesitate to get creative and experiment with different colors and patterns. The sky's the limit!
Also Read This: Making Money on Picfair: A Comprehensive Guide
Step-by-Step Instructions for Making Rubber Bracelets
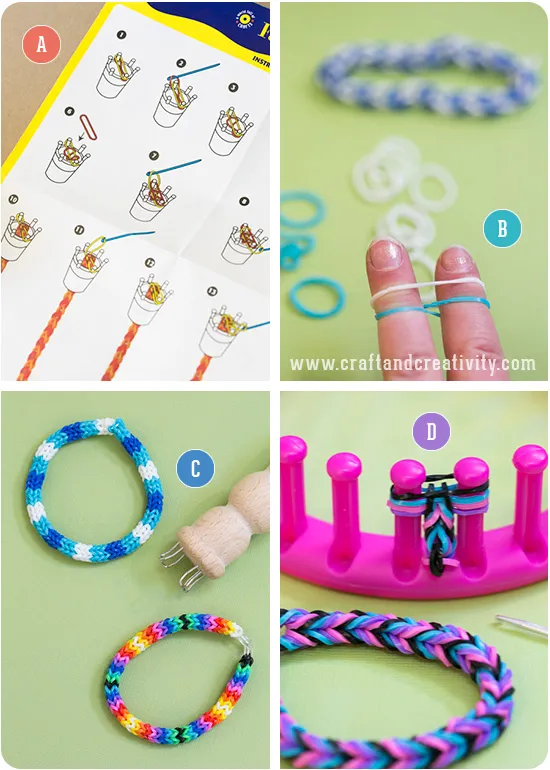
Crafting your own rubber bracelets can be a fun and rewarding experience! Whether you’re making them for a special event, a fundraiser, or simply as a gift, the process is straightforward. Here’s a simple guide to get you started:
- Gather Your Materials: You’ll need:
- Rubber bands (choose various colors)
- Scissors
- Measuring tape or ruler
- Clasp (optional, for a finished look)
- Beads or charms (optional, for added flair)
- Measure Your Wrist: Use the measuring tape to determine the circumference of your wrist. This will help you decide how long your rubber bracelet should be.
- Cut the Rubber Bands: Depending on your measurement, cut the rubber bands to the desired length. Typically, you’ll want the length to be about 1-2 inches longer than your wrist measurement for a comfortable fit.
- Assemble the Bracelet: Start by looping the rubber bands together. You can create different patterns by alternating colors or using different sizes of bands.
- Add Beads or Charms: If you want to personalize your bracelet, now’s the time to thread on some beads or attach charms!
- Finish Off Your Bracelet: If you’re using a clasp, secure it at both ends. Otherwise, simply tie the ends of the rubber bands together in a tight knot.
- Test the Fit: Slip the bracelet onto your wrist and adjust as necessary to ensure a snug but comfortable fit.
And just like that, you’ve crafted your very own rubber bracelet! Feel free to experiment with different colors, sizes, and designs to make something truly unique.
Also Read This: Understanding the Cost and Features of Adobe Stock Premium Plan
Creative Design Ideas for Your Bracelets
Now that you know how to make rubber bracelets, why not get a bit creative with your designs? Here are some fun and imaginative ideas to inspire you:
- Color Themes: Pick a color palette based on a theme such as:
- Seasonal colors (pastels for spring, warm tones for autumn)
- Your favorite sports team’s colors
- Colors that represent a cause (like pink for breast cancer awareness)
- Patterns and Textures: Create interesting patterns by:
- Weaving different sized bands together (think checkerboard or spiral patterns)
- Using textured rubber bands for added grip and style
- Personalization: Use alphabet beads to spell out names or meaningful words. This gives your bracelet a personal touch!
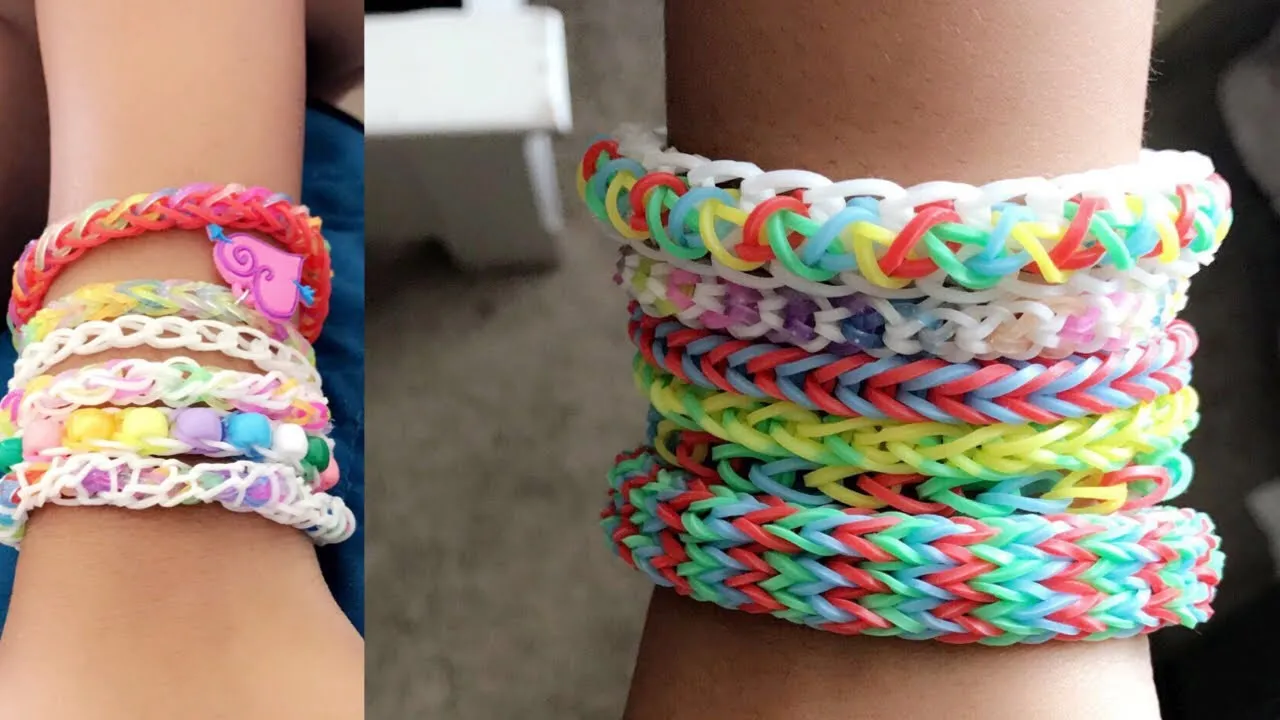
- Layering: Make multiple bracelets and wear them stacked together. Mixing and matching different styles can create a trendy boho look.
- Themed Bracelets: Consider creating sets based on hobbies or interests, like:
- Music-themed bracelets with musical note charms
- Nature-inspired designs using leaf or flower charms
With these creative design ideas, the possibilities are endless! Let your imagination run wild, and have fun creating unique rubber bracelets that reflect your personality.
Also Read This: Canva Transparent Image Saving
5. Tips for Enhancing Your Rubber Bracelet Making Skills
So, you've dipped your toes into the world of rubber bracelet making, and you’re eager to improve your skills. That's fantastic! Here are some handy tips that can help you elevate your craft:
- Experiment with Colors: Don’t stick to the basic colors. Mix and match! Use vibrant shades or even pastel tones to create eye-catching designs.
- Invest in Quality Materials: The quality of your rubber bands can make a significant difference. Look for durable, stretchable rubber that won’t easily break or lose its shape.
- Practice Different Techniques: Try various methods like braiding, weaving, or layering. This will not only enhance your skills but also expand your design repertoire.
- Watch Tutorials: YouTube and other platforms are teeming with tutorials. Watching experienced crafters can provide you with new ideas and techniques.
- Join Crafting Communities: Engage with other crafters online. They can offer invaluable tips and support, and you might even pick up a few tricks!
Remember, the more you practice, the better you’ll get. Don’t be afraid to make mistakes; they’re just stepping stones to improvement!
Also Read This: Reviving Teammates in My Hero Ultra Rumble Explained
6. Where to Share and Showcase Your Creations
Once you've created some stunning rubber bracelets, you’ll probably want to share your work with the world! Here are some great platforms where you can showcase your creations:
| Platform | Description |
|---|---|
| A visual platform perfect for sharing your bracelet designs with hashtags like #rubberbracelets or #handmadejewelry. | |
| Facebook Groups | Join crafting groups where you can post your creations, get feedback, and connect with fellow enthusiasts. |
| Pin your designs to inspire others and drive traffic to your own blog or shop. | |
| Etsy | Set up an online shop to sell your creations and reach a larger audience of potential buyers. |
| Craft Fairs | Participate in local craft fairs to meet customers face-to-face and showcase your creations in person. |
Sharing your work not only boosts your confidence but also allows you to connect with others who share your passion. So, go ahead and showcase those beautiful rubber bracelets!
Conclusion and Final Thoughts on DIY Rubber Bracelets
Creating your own rubber bracelets can be a fun and rewarding experience. Not only do you get to express your creativity, but you also have the opportunity to design unique pieces that can share messages, support causes, or simply serve as fashion statements. Whether you’re making them for a special event, fundraising purposes, or personal use, the process of crafting rubber bracelets allows for endless customization. With a variety of materials, colors, and techniques available, the possibilities are truly limitless. Remember to gather the necessary supplies, plan your design, and enjoy the crafting process. So, roll up your sleeves, unleash your creativity, and start making your own DIY rubber bracelets today!