Making bracelets with string is a fun and creative activity that anyone can enjoy! Whether you’re looking to craft something special for yourself, make a thoughtful gift for a friend, or just want to dive into a new hobby, this step-by-step guide will help you navigate the process with ease. From choosing the right materials to mastering various techniques, you’ll be amazed at how fulfilling it is to create beautiful jewelry with your own hands. So, let’s get started on this colorful journey of bracelet-making!
Materials Needed

Before jumping into the crafting process, it's essential to gather all the materials you'll need. Having everything on hand will make your bracelet-making experience smoother and more enjoyable. Here’s a comprehensive list of the basic materials you'll require:
- String or Cord: You can choose from a variety of strings such as embroidery floss, hemp cord, leather, or elastic. Each type gives a different look and feel to your bracelet.
- Scissors: A good pair of scissors is necessary for cutting your string to the desired length.
- Tape or Clip Board: To hold your string in place while you work, tape or a clip board can be incredibly useful.
- Beads (Optional): If you want to add some flair to your bracelet, consider incorporating beads. You can choose from a wide range of styles, colors, and sizes!
- Measuring Tape: To ensure you cut your string to the right length, having a measuring tape on hand is a great idea.
- Clips or Clasps (Optional): If you intend to create a more polished bracelet, you may want clips or clasps to secure the ends.
Once you have all these materials ready, you’ll be well-equipped to start creating stunning bracelets that showcase your personal style!
Also Read This: How to Change Your Email Address on LinkedIn
Choosing the Right String
When it comes to making bracelets, the type of string you choose can make all the difference in the world. Not only does it affect the look of your bracelet, but it also influences its durability and comfort. So, let's dive into the various options available!
Here are some popular types of strings you might consider:
- Embroidery Floss: This versatile string comes in a rainbow of colors and is perfect for making vibrant bracelets. It's made of six strands that can be separated for finer work.
- Macramé Cord: If you're looking for something thicker and sturdier, macramé cord is a great choice. It's often used for more intricate patterns and can hold up well over time.
- Nylon String: Known for its strength, nylon string is ideal for bracelets that need to withstand a lot of wear and tear. It's perfect for outdoor activities!
- Beading Wire: If you're planning to incorporate beads into your bracelet, this is your go-to. Beading wire is flexible yet strong, making it perfect for intricate designs.
- Leather Cord: For a more rustic look, leather cord adds a touch of elegance. It’s durable and comfortable to wear, making it a popular choice for men’s bracelets.
When choosing your string, consider factors such as:
- The style of the bracelet you'll be making
- Your personal preferences for texture and color
- The intended use of the bracelet
Take your time and choose a string that speaks to your creativity!
Also Read This: How to Identify Scam Jobs on LinkedIn and Protect Yourself
Basic Techniques for Bracelet Making
Once you’ve chosen the right string, it’s time to roll up your sleeves and get creative! There are several basic techniques you can use to start making your bracelets. Don't worry if you’re a beginner; these techniques are easy to learn and can lead to beautiful results!
Here are some fundamental techniques to get you started:
- Simple Knotting: This is the foundation of many bracelet designs. To create a simple knot, take two strands of string, tie them together at one end, and pull them tight.
- Braiding: A classic technique that involves three strands. Simply divide your strands into three sections and alternate crossing them over each other. It’s as simple as that!
- Macramé Knots: This technique uses a series of knots to create intricate patterns. The most common knots include the square knot and the half knot. With a little practice, you can create stunning designs!
- Beading: If you’re looking to add a little flair, incorporating beads into your design is a fantastic option. Simply thread your beads onto the string as you work, and watch your bracelet come to life!
- Loop and Knot Closure: To finish your bracelet, use a loop and knot closure. Create a small loop at one end of the bracelet, and secure it with a knot. This allows for easy wearing and removal!
Practice these techniques, and don’t be afraid to experiment. Each bracelet you make will be a unique expression of your creativity, so have fun with it!
Also Read This: Effective Ways to Block YouTube on Your Computer
5. Step-by-Step Instructions
Making bracelets with string is not only a fun activity but also a fantastic way to express your creativity. Let’s walk through the process step by step, so you can create your very own unique bracelet!
- Gather Your Materials: You'll need some string (like embroidery floss or nylon cord), scissors, and optional beads or charms for extra flair.
- Choose Your Length: Decide how long you want your bracelet to be. A good rule of thumb is to measure around your wrist and add a few inches for tying knots. Cut your string accordingly.
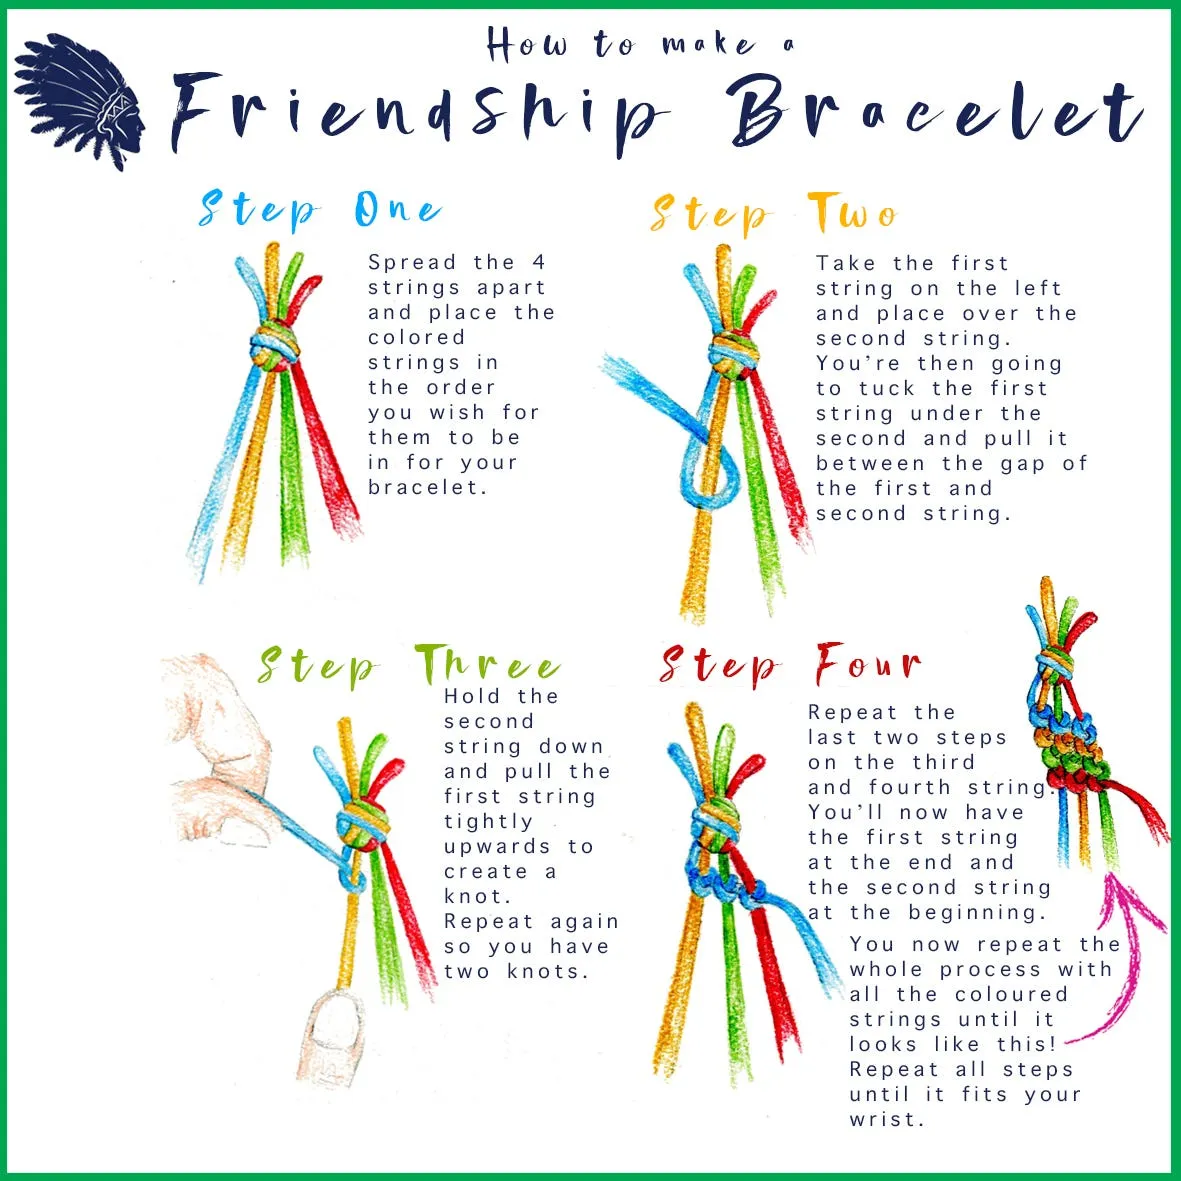
- Prepare the String: If you’re using multiple strands, cut them to the desired length and align them. A common combination is four strands for a thicker bracelet.
- Secure Your String: Use a clipboard or tape to hold your string in place while you work. This helps prevent any tangling.
- Begin Knotting: Start with a simple knot. Tie a knot at one end of the string to secure it. This will serve as the base for your bracelet.
- Choose a Pattern: Decide on a pattern you want to follow—whether it’s a simple braid, a spiral, or a more complex design. Follow the pattern, knotting or weaving the string accordingly.
- Add Beads (Optional): If you want to incorporate beads, thread them onto the string as you go. Make sure to leave enough space for tying knots later.
- Finish with a Knot: Once you reach the desired length, tie off the end with a secure knot. You can double knot for extra security.
- Trim Excess String: Use scissors to trim any excess string, but make sure to leave enough for the knot.
- Wear or Gift Your Bracelet: Slip it on your wrist and enjoy your creation! You can also wrap it up as a thoughtful gift for someone special.
Also Read This: Can You Watch Me TV on YouTube TV What Fans Should Know
6. Creative Variations and Designs
Once you’ve mastered the basic bracelet-making technique, it's time to get creative! There are countless variations to explore, each adding a unique touch to your handmade jewelry. Here are some fun ideas:
- Color Combinations: Use different colors of string to create vibrant patterns. Think about complementary colors or even a gradient effect!
- Bead Incorporation: Mix in various types of beads—wooden, glass, or even metallic—to enhance your design. You can arrange them in patterns or randomly for a boho look.
- Layering: Create multiple bracelets with different designs and wear them together for a layered effect. This trend is fun and eye-catching.
- Charm Additions: Attach charms that are meaningful to you. Whether it’s a small heart, star, or initial, charms can personalize your bracelet.
- Macrame Techniques: Explore macrame knotting for a more intricate design. This technique creates beautiful textures and patterns.
- Friendship Bracelets: Make matching bracelets for friends! Use similar colors or designs to symbolize your friendship.
- Seasonal Themes: Get creative with themes based on holidays or seasons—think autumn colors for fall or pastel shades for spring.
Remember, the only limit is your imagination! Feel free to mix and match these ideas to create something truly one-of-a-kind. Happy crafting!
Also Read This: Mastering Dailymotion Video Downloader for Effortless Video Saving
7. Tips for Beginners
Starting your bracelet-making journey can be incredibly rewarding, but it can also feel a bit overwhelming at first. Here are some handy tips to help you get started on the right foot:
- Choose the Right Materials: Begin with soft, flexible strings like embroidery floss or thin cotton. These materials are easier to work with and can help you practice your techniques without frustration.
- Start Simple: Before diving into complex patterns, try a basic design like a simple braid or a basic knot bracelet. This will help you get comfortable with the movements and techniques involved.
- Measure Your String: It’s essential to cut your string to the right length. A good rule of thumb is to cut it at least four times the length of your wrist for a comfortable fit.
- Use Clips or Tape: To keep your bracelet steady while you work, secure it to your workspace using clips or tape. This will make it easier to manage your strings and focus on the design.
- Practice Patience: Don’t rush the process! Take your time, especially when you’re learning new techniques. Mistakes are part of the journey, so embrace them and keep going.
- Watch Tutorials: There’s a wealth of online resources available. Watching videos can help you visualize the techniques and patterns you want to try.
Remember, everyone starts somewhere! The more you practice, the better you'll become. Enjoy the process and have fun creating!
8. Conclusion
Making bracelets with string is not just a crafty pastime; it's a beautiful way to express your creativity and make personalized gifts for friends and family. Whether you're a complete beginner or someone looking to refine your skills, following the steps outlined in this guide can help you create beautiful accessories that reflect your unique style.
As you embark on your bracelet-making journey, keep in mind the following points:
- Experiment: Don’t be afraid to try new patterns and materials. The world of bracelet-making is vast, and each piece can showcase your individual flair.
- Share Your Creations: Once you've made some bracelets, share them with friends or on social media. You might inspire someone else to start crafting!
- Join a Community: Consider joining online forums or local crafting groups. Connecting with fellow enthusiasts can provide support and spark new ideas.
Above all, remember that the process of creating is just as important as the final product. Enjoy each knot you tie and every color you choose. Happy crafting, and may your bracelet-making adventures be filled with joy and creativity!