Ready to soar into the skies? Making a kite is not just a fun activity; it's a delightful way to reconnect with nature and unleash your creativity! Whether you're a seasoned DIY enthusiast or a curious beginner, this step-by-step guide will help you craft a kite that dances in the wind. Grab your materials, let’s get started, and soon you’ll be watching your handiwork flutter against the blue sky!
Materials Needed
Before diving into the kite-making process, gather your supplies. Here’s a handy list of what you’ll need:
- Kite Frame: You can use lightweight materials like bamboo skewers, wooden dowels, or even flexible plastic straws.
- Kite Sail: Choose a sturdy yet lightweight material such as plastic bags, tissue paper, or fabric. Consider bright colors for a cheerful look!
- Adhesive: A strong glue like hot glue or craft glue is essential for securing the frame and sail together.
- String: A durable kite string to help your creation soar high in the sky.
- Scissors: For cutting your materials to size.
- Ruler: To measure dimensions accurately.
- Pens or Markers: Perfect for decorating your kite and adding personal flair.
- Washi Tape or Duct Tape: Great for reinforcing joints or adding decorative touches.
Here’s a quick overview in table format:
| Material | Purpose |
|---|---|
| Kite Frame | Creates the structure of the kite. |
| Kite Sail | The main body that catches the wind. |
| Adhesive | Holds everything together. |
| String | For flying the kite. |
| Scissors | To cut materials. |
| Ruler | For accurate measurements. |
| Pens or Markers | For decoration. |
| Washi Tape or Duct Tape | For reinforcement and decoration. |
Now that you have all your materials ready, you’re one step closer to flying your very own kite!
Also Read This: Download Free PowerPoint Templates from Canva PowerPoint Templates Free Download
Step 1: Preparing the Frame
Creating a sturdy frame is crucial for your kite's flight success! The frame provides the structure and support that helps your kite soar through the sky. Here’s a simple guide to get you started:
- Materials Needed:
- Bamboo or fiberglass rods (about 1/4 inch thick)
- String or twine for binding
- Scissors
- Tape (optional)
- Choose Your Design: Decide whether you want a simple diamond shape or something more intricate. For beginners, a diamond kite is a great choice.
- Measure and Cut: Cut the rods to the following dimensions:
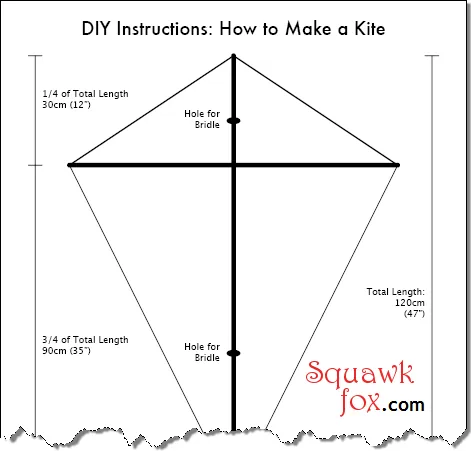
- Two vertical rods (for the height, typically 30-40 inches)
- One horizontal rod (the width, around 24-30 inches)
- Assemble the Frame: Lay the two vertical rods parallel and use the horizontal rod to form a cross. Secure them with string or twine, ensuring it's tight but not overly so to avoid breakage.
- Strengthen the Joints: Use tape or additional string at the joints to give extra strength. This is vital since the joints endure the most stress during flight.
And there you have it! Your kite frame is ready to take flight. Ensure everything is secure before moving onto the next step!
Also Read This: Claim Your YouTube Music Artist Profile with Ease
Step 2: Creating the Sail
The sail is what catches the wind and allows your kite to fly, so let’s make it both functional and attractive! Follow these steps to create a beautiful sail:
- Materials Needed:
- Lightweight fabric (like nylon or plastic sheets)
- Markers or paint for decoration
- Scissors
- Glue or double-sided tape
- Measure the Sail: Lay your frame over the fabric and cut a piece that’s at least 2 inches larger on all sides than your frame.
- Design Your Sail: Before attaching it to the frame, this is the time to get creative! Use markers or paint to add colorful designs, patterns, or even your favorite characters. Let it dry completely.
- Attach the Sail: Start from the top of the frame, pulling the fabric tightly down to each corner. Use glue or double-sided tape to secure the fabric to the frame, making sure there are no wrinkles.
- Trim Excess Fabric: Once attached, carefully trim off any excess fabric, leaving about an inch around the edges that can be folded over for extra security.
Now your sail is ready! This is where your creativity shines, so don’t hesitate to make it as vibrant as you like. Next up, we’ll prepare for the final assembly!
Also Read This: eStockPhoto: High-Quality Travel and Nature Videos
Step 3: Assembling the Kite
Now that you’ve cut out all the necessary parts for your kite, it’s time to put everything together! Assembling your kite can be both fun and rewarding. Let’s break it down step by step:
- Gather Your Materials: Make sure you have everything you need:
- Your kite frame (made from sticks or dowels)
- The kite sail (made from paper or plastic)
- Glue or tape
- String for the bridle
- Scissors
- A ruler or measuring tape
- Attach the Frame: Start by taking the two main sticks of your frame. Use glue or tape to secure them at the intersection. This is where you’ll form the shape of your kite. Make sure they’re perpendicular for stability!
- Secure the Sail: Once the frame is dry, lay the kite sail over the frame. Trim any excess material if needed. Use glue or tape to secure the sail to the frame—be generous with your adhesive to prevent any flapping during flight.
- Create the Bridle: Cut a length of string and attach it to the top of your frame. This is important because it helps balance your kite in the wind. Make sure it’s taut but not too tight!
- Final Check: Once everything is assembled, double-check all your connections. Ensure that the sail is smooth and tight, and the frame feels sturdy.
Congratulations! Your kite is now assembled and ready for the next step!
Also Read This: Understanding Shipping Times with Millers and ShootProof
Step 4: Adding the Tail
The tail is not just for decoration; it plays a crucial role in stabilizing your kite while it's soaring through the sky. Let’s dive into how to add that essential tail:
- Choose the Right Material: The tail can be made from various materials, such as:
- Fabric strips
- Ribbons
- Plastic streamers
- Even old t-shirts can work!
- Decide on the Length: A good rule of thumb is to make the tail about 3 times the height of your kite. This will provide ample stability.
- Attach the Tail: Securely fasten one end of the tail to the bottom of the frame. You can use glue, tape, or even tie it on if you prefer a more flexible approach.
- Add Some Flair: If you want, you can create a segmented tail with knots or bows every few inches. This not only looks great but also adds extra stability!
- Testing Stability: Give your kite a gentle shake and observe. The tail should sway slightly, ensuring your kite will fly straight.
And there you have it! Your kite is fully equipped with a tail and ready to take to the skies. Let’s get ready for the big moment—flying your creation!
Also Read This: How to Earn Money from Behance
Step 5: Attaching the String
Now that your kite frame is ready and covered, it’s time to attach the string. This step is crucial because a well-anchored string will ensure your kite flies smoothly and stably in the sky. Here’s how you can do it:
- Choose the Right String: Opt for a strong, lightweight string. Nylon or polyester strings are great choices as they have excellent tensile strength and minimal stretch.
- Prepare the Spool: If you’re using a spool, ensure it’s secure and easy to handle. You want to be able to reel in and let out the string with ease while flying your kite.
- Attach to the Bridle: The bridle is the structure that connects the kite to the string. It is usually made of light string or fishing line. Tie the end of your flying line to the bridle securely using a double knot for added strength.
- Check for Stability: Hold the kite up and assess if it feels balanced. The bridle should hold the kite at a slight angle, allowing it to catch the wind effectively.
- Make Final Adjustments: If the kite leans to one side, adjust the bridle until it sits evenly. This will help it fly straighter and higher.
Once you’ve attached the string securely, you’re almost ready for flight! Just a few more preparations and you’ll be soaring high.
Also Read This: Finding your Behance link
Tips for Flying Your Kite
Flying a kite is as much about technique as it is about the kite itself. Here are some handy tips to ensure your kite flying experience is enjoyable and successful:
- Choose the Right Location: Find a wide, open space away from trees, power lines, and buildings. Parks or beaches are great options!
- Check the Wind: Ideal wind conditions are between 5 to 20 mph. Too little wind, and your kite won’t lift; too much, and it may crash.
- Launch Properly: Hold the kite against the wind and let out the string slowly while running forward. This gives the kite enough lift.
- Watch for Changes: Keep an eye on the wind direction and strength. If it suddenly changes, be ready to adjust your technique.
- Practice Landing: To bring your kite down safely, slowly pull on the string while walking towards it to avoid damage.
Remember, flying a kite is all about having fun and enjoying the moment. So, take a deep breath, let your kite soar, and embrace the joy of being outdoors!
Step by Step Guide to Making a Kite
Kite flying is a delightful outdoor activity that combines creativity and engineering. Making your own kite can be a fulfilling experience, and it is simpler than you might think. This guide will take you through the process step by step.
Here’s a list of materials you will need:
- Lightweight paper or plastic (for the sail)
- Wooden dowels or flexible fiberglass rods (for the frame)
- String (for the tail and flying line)
- Glue or tape (for assembly)
- Scissors
- Ruler
- Pencil
Follow these simple steps to create your kite:
- Design the Kite: Use a pencil to sketch your kite shape on the lightweight paper. Common shapes include diamond, box, or delta.
- Cut the Sail: Carefully cut out the sail shape you have drawn. Ensure the edges are smooth.
- Prepare the Frame: Cut two wooden dowels; one longer for the spine and a shorter one for the crossbar. The typical ratio is 2:1 for spine to crossbar.
- Assemble the Frame: Use glue or tape to attach the crossbar to the spine, forming a T-shape.
- Attach the Sail: Lay the frame on the back side of the sail and secure it using glue or tape.
- Add the Tail: Cut a strip of paper or fabric and attach it to the bottom of the kite for stability.
- Attach the String: Create a loop at the top of the spine to attach the flying line.
Now that you have your kite ready, find a suitable open space, and enjoy flying your creation!
Conclusion: Making a kite is a fun and engaging project that allows for creativity and hands-on activity, making it a perfect family or solo endeavor to enjoy the outdoors.