If you've ever found yourself admiring those luscious curls while holding a straightener, you're not alone! Curling your hair with a straightener is not only a fantastic way to achieve beautiful waves, but it's also a super convenient method that can save you time and effort. In this guide, we’ll walk you through the process step by step, ensuring you can create stunning curls that last. Whether you're prepping for a special occasion or just want to switch up your everyday look, we’ve got you covered. Let’s dive in!
What You Will Need
Before we get started on the curling process, it’s essential to gather all the tools and products you’ll need. Here’s a handy list to make sure you’re fully prepared:
- Hair Straightener: Look for a straightener that has a smooth plate and can heat up to at least 350°F (180°C). The wider the plate, the larger the curls you can create!
- Heat Protectant Spray: Protecting your hair from heat damage is crucial. A good heat protectant will shield your strands and keep them healthy.
- Hair Clips: Use these to section your hair for easier curling. This ensures you don’t miss any strands and helps to manage your hair.
- Comb or Brush: A comb or brush will help you detangle your hair before you start curling, ensuring a smooth finish.
- Hairspray: For holding those curls in place, a light mist of hairspray can work wonders.
- Mirror: A good mirror is essential to see what you’re doing! A handheld mirror can be helpful for checking the back.
Once you have everything on this list, you're ready to move on to the fun part—curling your hair!
Also Read This: Effective Strategies to Promote Your Behance Project and Increase Visibility
3. Preparing Your Hair
Before you dive into curling your hair with a straightener, proper preparation is key to achieving those beautiful, bouncy curls you desire. Here’s a simple step-by-step guide to getting your hair ready:
- Start with Clean Hair: It’s always best to style clean hair. Wash your hair with a gentle shampoo and conditioner to remove any product buildup. This helps the curls hold better and look shinier.
- Dry Your Hair: Dry your hair thoroughly, either by air-drying or using a blow dryer. If your hair is damp, the heat from the straightener can cause damage and may not curl effectively.
- Use a Heat Protectant: Apply a heat protectant spray or serum to shield your hair from damage. This is crucial! Look for products that are lightweight and designed for heat styling.
- Detangle Your Hair: Use a wide-tooth comb or a brush to remove any knots. Tangles can cause uneven curls and make the process more difficult.
- Section Your Hair: Divide your hair into manageable sections. Clip the top half of your hair up and work with the bottom half first. This ensures you don’t miss any spots and helps create more uniform curls.
By following these steps, you’ll set yourself up for success and ensure that your curls come out looking fabulous!
Also Read This: How to Remove Backgrounds from Shutterstock Images Efficiently
4. Choosing the Right Straightener
Selecting the right straightener is crucial for curling your hair. Not all straighteners are created equal, and using the right one can make a significant difference. Here’s what to consider:
- Plate Material: Look for straighteners with ceramic, tourmaline, or titanium plates. Ceramic plates distribute heat evenly, while tourmaline helps reduce frizz and adds shine. Titanium heats up quickly and is great for thicker hair.
- Plate Width: The width of the plates matters. For fine or short hair, opt for a straightener with narrower plates (1 inch). For longer or thicker hair, wider plates (1.5 to 2 inches) can cover more area quickly.
- Temperature Settings: Choose a straightener that offers adjustable temperature settings. Fine hair typically needs lower heat (300°F), while thicker hair may require higher heat (up to 400°F or more).
- Weight and Design: A lightweight, ergonomic design can make it easier to maneuver the straightener while curling. Look for a model that feels comfortable in your hand.
- Reviews and Recommendations: Check out user reviews and recommendations. Sometimes the best way to find the right tool is to see what others have experienced.
Taking the time to choose the right straightener will not only help you curl your hair effectively but also minimize damage and improve the overall look of your curls!
Also Read This: How to Download a Project from Behance
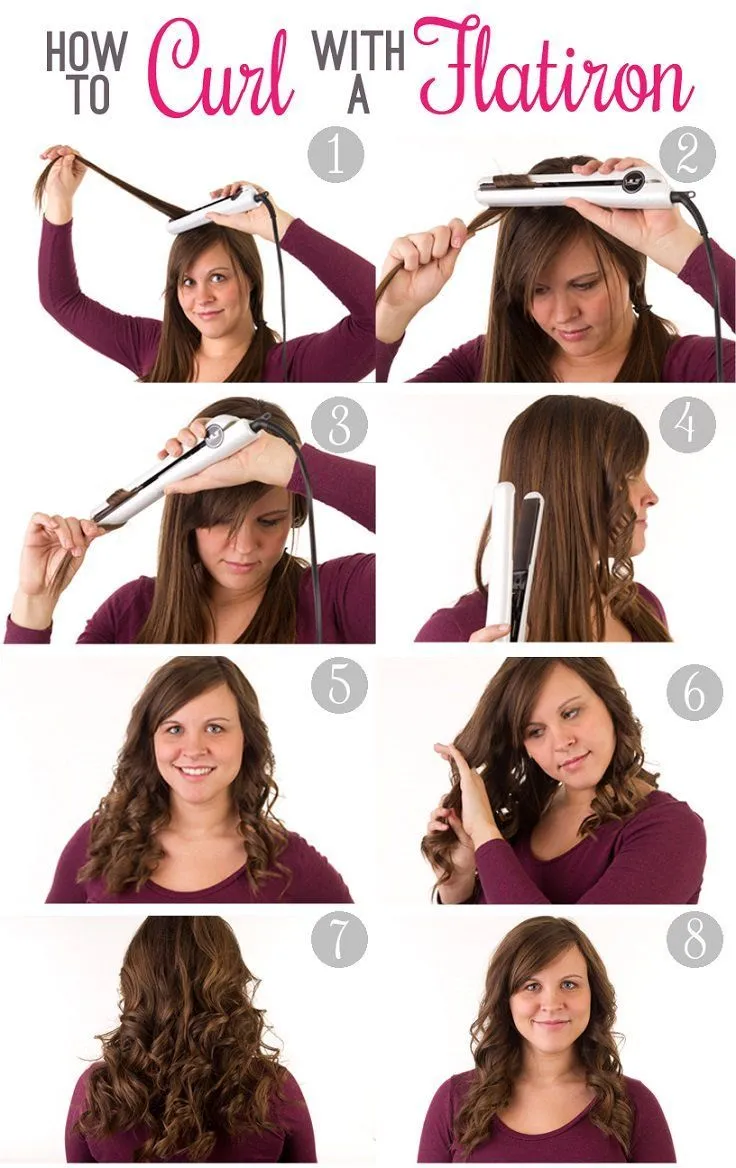
5. Step-by-Step Curling Technique
Curling your hair with a straightener might seem daunting at first, but once you get the hang of it, you'll wonder why you ever used a curling iron! Here's a straightforward, step-by-step guide to help you achieve those gorgeous curls effortlessly.
- Start with Clean, Dry Hair: Make sure your hair is completely dry and free from any product buildup. It's best to start with freshly washed hair, as this helps the curls hold better.
- Apply Heat Protectant: Always use a heat protectant spray to shield your hair from damage. Spray evenly and comb through your hair to distribute the product.
- Section Your Hair: Divide your hair into manageable sections using hair clips. This will ensure you curl every strand without missing any spots. Generally, 2-4 sections work well depending on your hair thickness.
- Heat the Straightener: Preheat your straightener to a temperature suitable for your hair type – around 300°F for fine hair and up to 400°F for thicker hair.
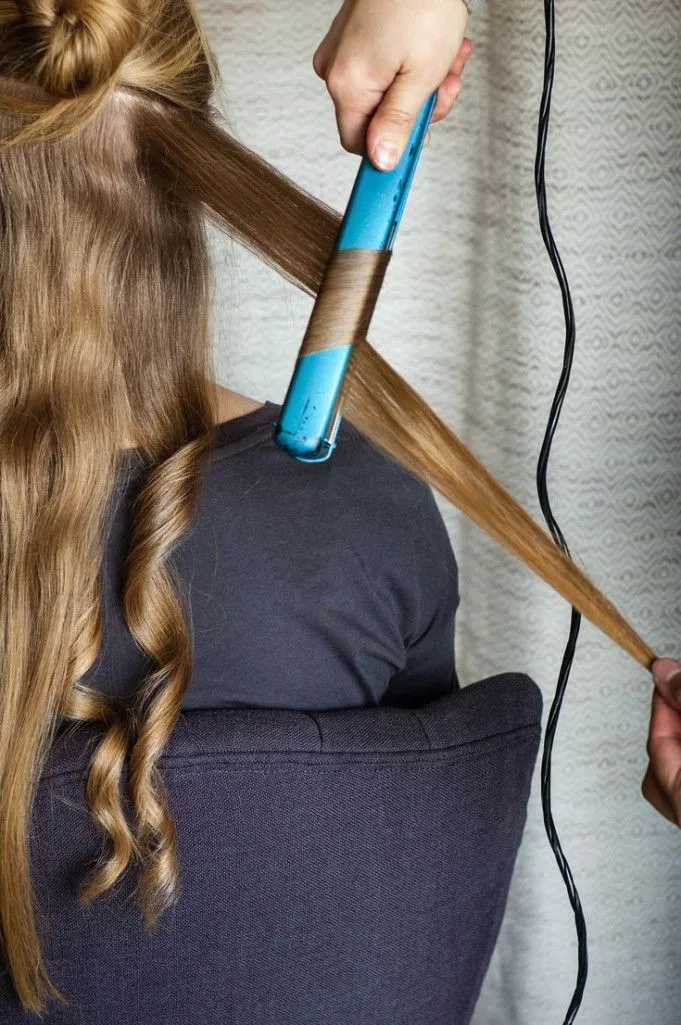
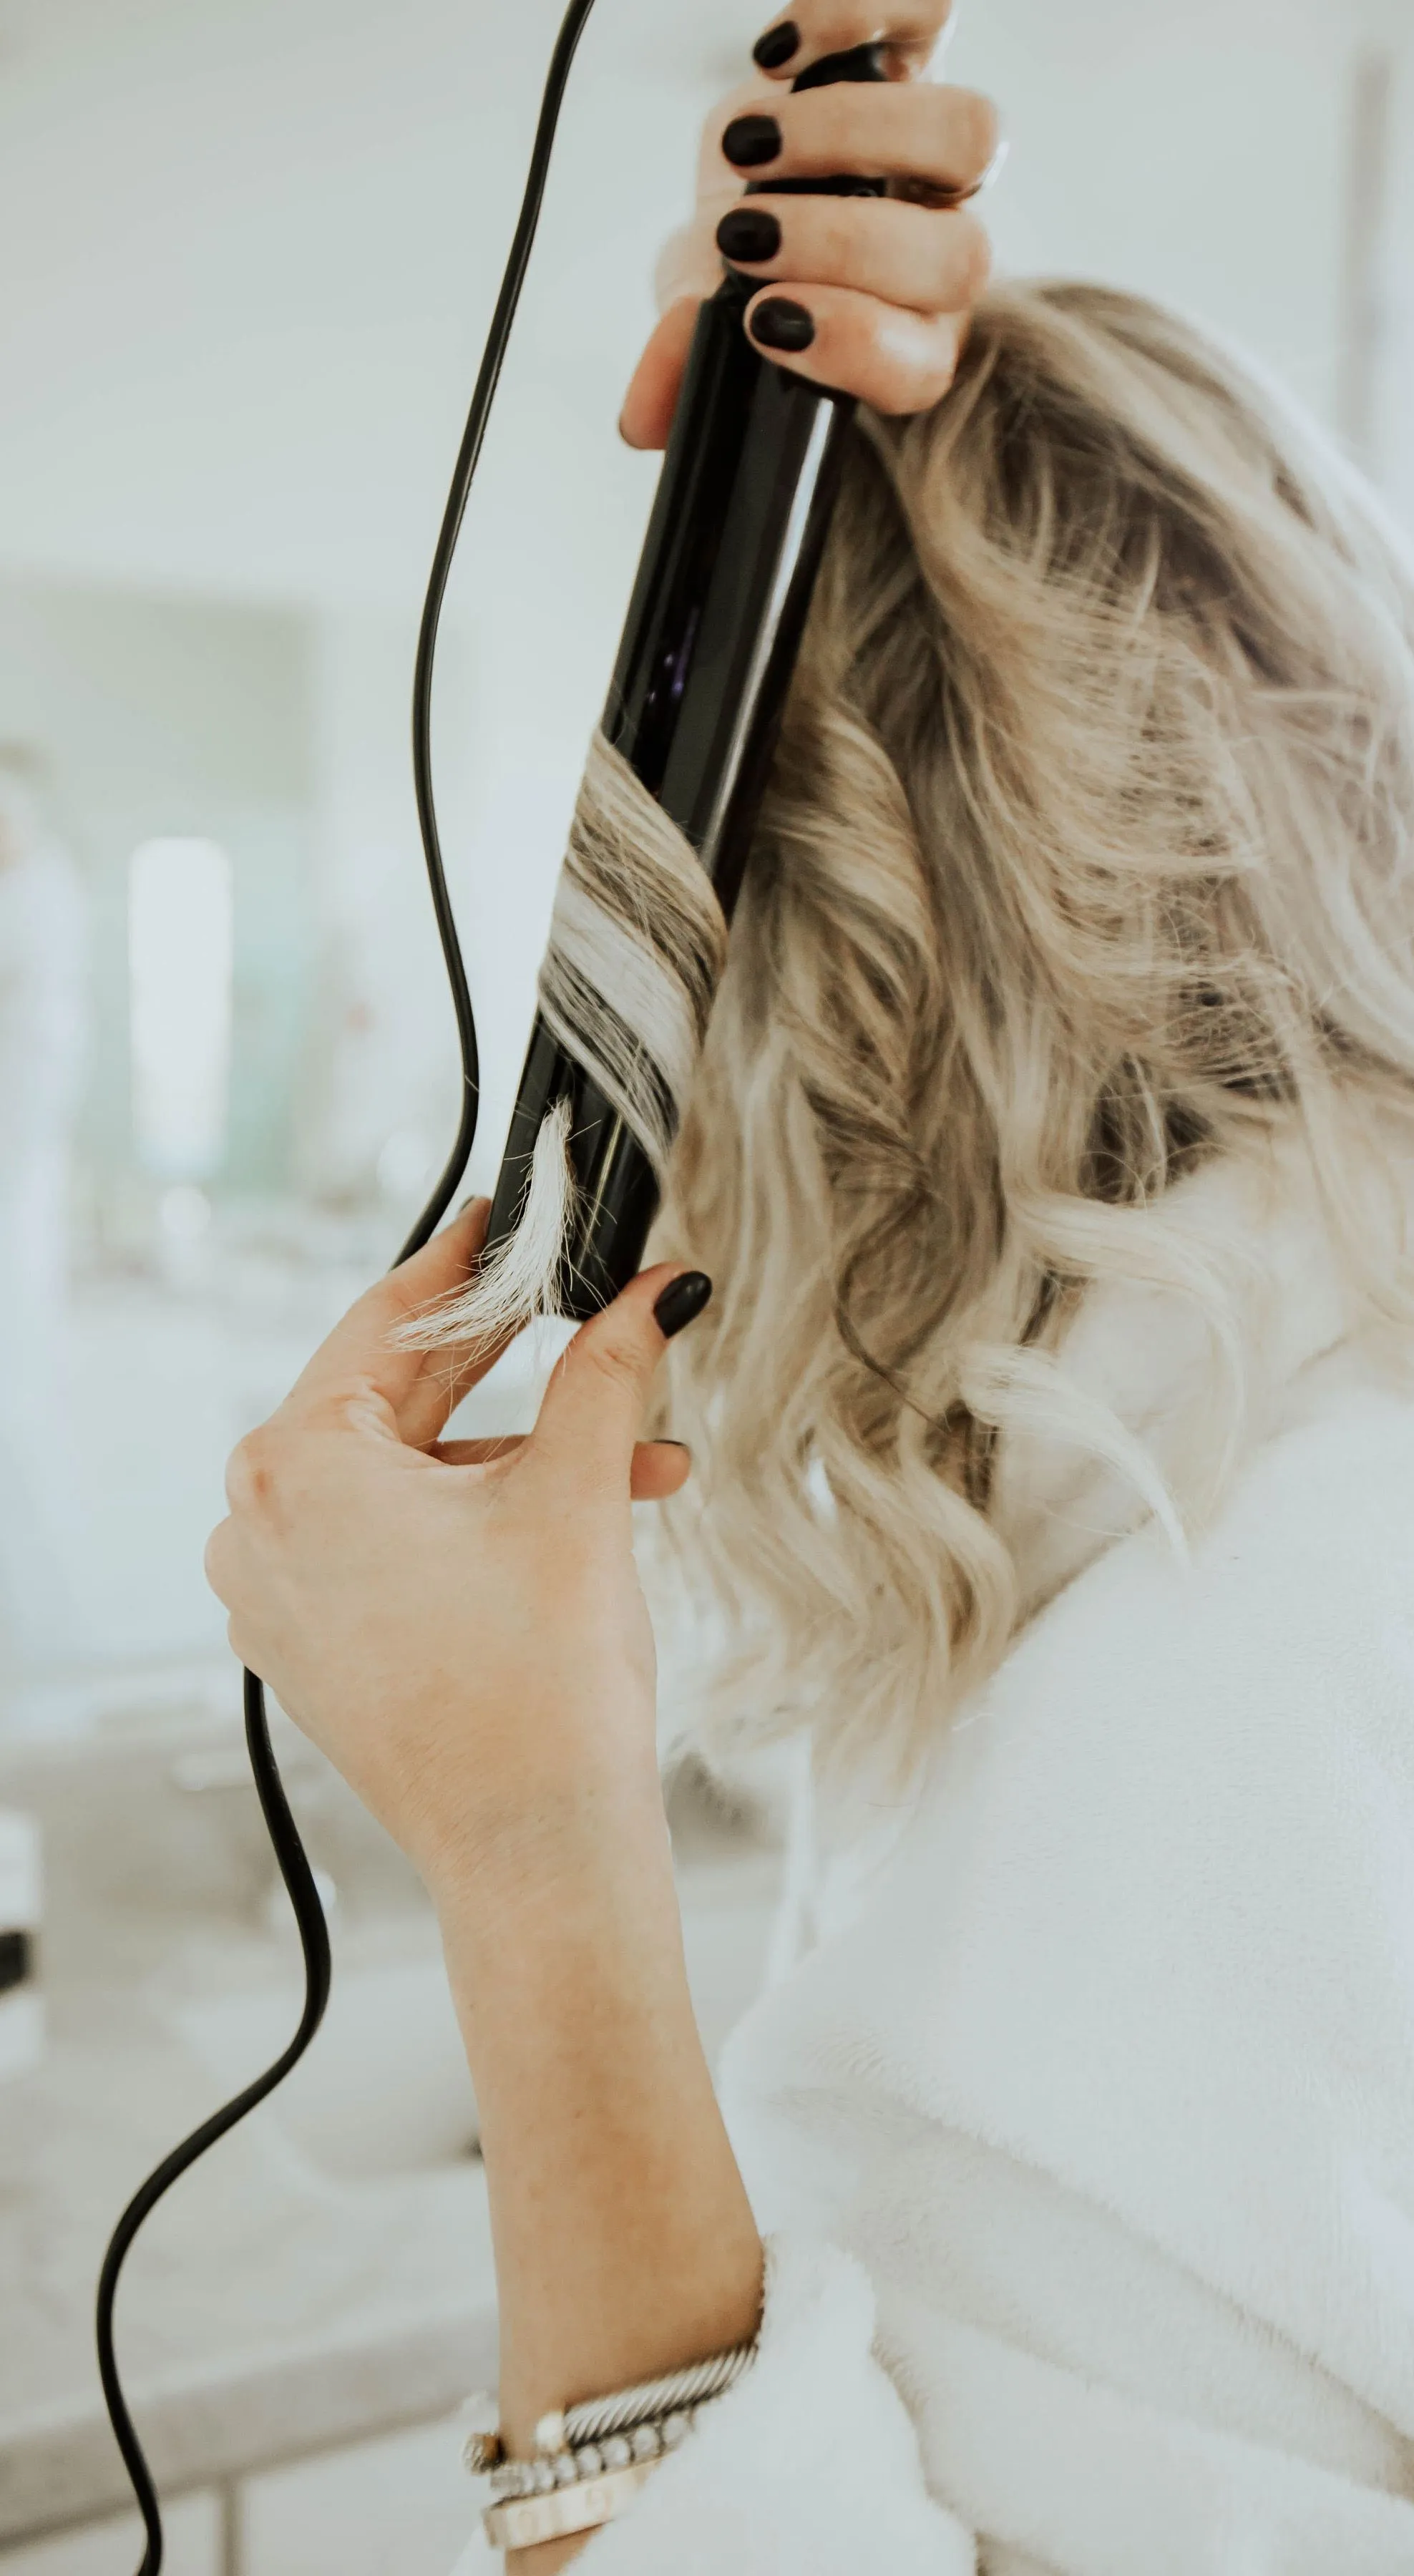
- Take a Small Section: Working with smaller sections (1-2 inches wide) will give you tighter, more defined curls. Grab a section of hair and place it between the plates of the straightener.
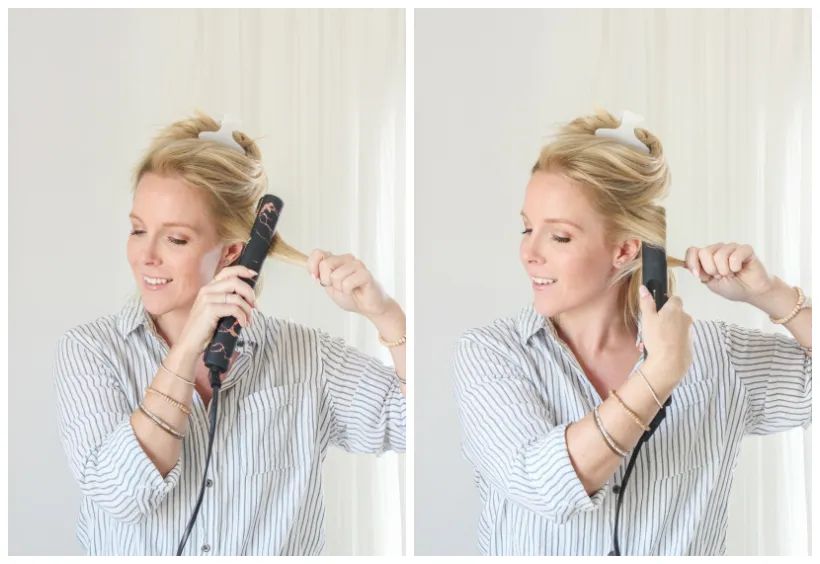
- Twist and Slide: Close the straightener, twist it 180 degrees away from your face, and slowly glide it down the length of your hair. The slower you go, the more defined your curl will be.
- Release and Hold: Once you reach the end, carefully release the hair. You can hold the curl in your hand for a few seconds to help it set before letting it fall.
- Repeat: Continue this process for all sections of your hair, adjusting the twist direction for a more natural look.
- Finish with Hairspray: Once you're done curling, spritz some hairspray to hold the curls in place. Opt for a lightweight formula to maintain bounce and movement.
Also Read This: Personalize Your Race Bibs with Canva Templates
6. Tips for Long-lasting Curls
Now that you've mastered the curling technique, let’s talk about how to make those curls last all day! Here are some handy tips to ensure your beautiful curls endure through sweat, wind, and play.
- Use the Right Products: Before curling, use a volumizing mousse or styling cream. After curling, a lightweight hairspray will help maintain the shape without weighing your curls down.
- Don’t Overheat: While it's tempting to crank up the heat for quick results, overheating can damage your hair and lead to curls dropping faster. Stick to the recommended heat settings for your hair type.
- Pin Curls: For extra hold, consider pinning each curl to your scalp with a bobby pin as you finish curling each section. Allow them to cool in this position before letting them down.
- Keep Hair Dry: Avoid touching your hair with wet hands or getting caught in the rain. Water can loosen curls faster than anything else!
- Avoid Heavy Oils: While oils are great for hydration, they can weigh down curls. If you need to tame frizz, use a light serum sparingly.
- Sleep with a Silk Pillowcase: Switching to a silk or satin pillowcase can help reduce friction, keeping your curls intact while you sleep.
- Refresh Curls: If your curls start to fall flat by the end of the day, use a curling wand or the straightener on the ends to give them a quick refresh.
With these techniques and tips, you're all set to rock those curls! Happy styling!
Also Read This: Craft Informative Pamphlets with Canva Pamphlet Template
7. Finishing Touches
Alright, you've curled your hair with a straightener, and it looks fabulous! But let's talk about those all-important finishing touches that can really elevate your look to the next level. These final steps are essential for ensuring that your curls stay bouncy and beautiful throughout the day.
First off, let's consider using a good hairspray. Not all hairsprays are created equal, so look for one that offers a flexible hold. You want your curls to stay in place without feeling crunchy. A light mist will do the trick! Here’s how to apply it:
- Hold the hairspray about 10-12 inches away from your head.
- Spray in a circular motion, ensuring even coverage.
- Focus on the ends of your curls for extra hold.
Next up, if you want to add a little shine, consider using a shine serum or oil. Just a tiny amount can make your curls look glossy and healthy. Here’s a quick tip:
- Take a pea-sized amount of serum and rub it between your palms.
- Gently scrunch your curls to enhance the shine.
Finally, don’t forget to adjust your parting. Whether you prefer a middle part, side part, or no part at all, how you style your hair can change the whole vibe. Experiment and find what suits you best!
8. Conclusion
And there you have it! Curling your hair with a straightener may seem daunting at first, but with a little practice and the steps outlined in this guide, you'll be a pro in no time. Remember, the key is to take your time and have fun with it!
Don't forget that hair styling should reflect your personality and style. Experiment with different sizes of curls, try out various products, and don’t shy away from making it your own. You might find that you love loose waves one day and tighter curls the next. Here’s a quick recap of what we covered:
| Step | Description |
|---|---|
| Preparation | Start with clean, dry hair and apply heat protectant. |
| Sectioning | Divide your hair into manageable sections for easier curling. |
| Curling | Use the straightener to create curls by twisting and pulling. |
| Finishing Touches | Apply hairspray, add shine, and adjust your parting. |
With these tips and tricks in your toolkit, you’ll be ready to rock those curls like a superstar. Thanks for joining me on this journey, and happy styling!