Welcome to the world of creativity! If you're looking to add a touch of elegance to your artwork, learning to draw roses is a fantastic skill to acquire. Not only are roses stunning, but they also symbolize love and beauty, making them a popular choice for artists of all skill levels. In this blog post, we'll explore simple ways to draw roses step by step, utilizing helpful Dailymotion tutorials. Whether you're a beginner or just want to brush up on your drawing skills, we've got you covered! So, grab your materials and let’s get started!
Gathering Your Materials
Before diving into the artistic process of drawing roses, you'll want to make sure you have all the necessary materials. Having the right tools at your disposal not only makes the drawing process smoother but also enhances your overall experience. Here’s a checklist of materials you might need:
- Pencils: A range of pencils, including HB for sketching, 2B for shading, and a mechanical pencil for fine lines.
- Eraser: A good quality eraser is essential for correcting mistakes and refining your drawing.
- Paper: Choose smooth drawing paper or sketch paper that can handle pencil and ink.
- Blending Stumps: These are great for smoothing out pencil shading and giving your roses a more realistic look.
- Colored Pencils or Markers: If you want to add some color to your roses, have a selection of colored pencils or markers handy.
- Ruler: A ruler can help you create guidelines for your drawing if needed.
- Reference Images: Having a few images of roses can be incredibly helpful for getting the shapes and proportions right.
Once you've gathered these materials, you're all set to embark on your rose-drawing journey. Remember, the most important thing is to have fun and enjoy the process! Happy drawing!
Also Read This: Understanding Earnings Potential and Payout Information from Getty Images
Basic Shapes and Guidelines for Drawing Roses
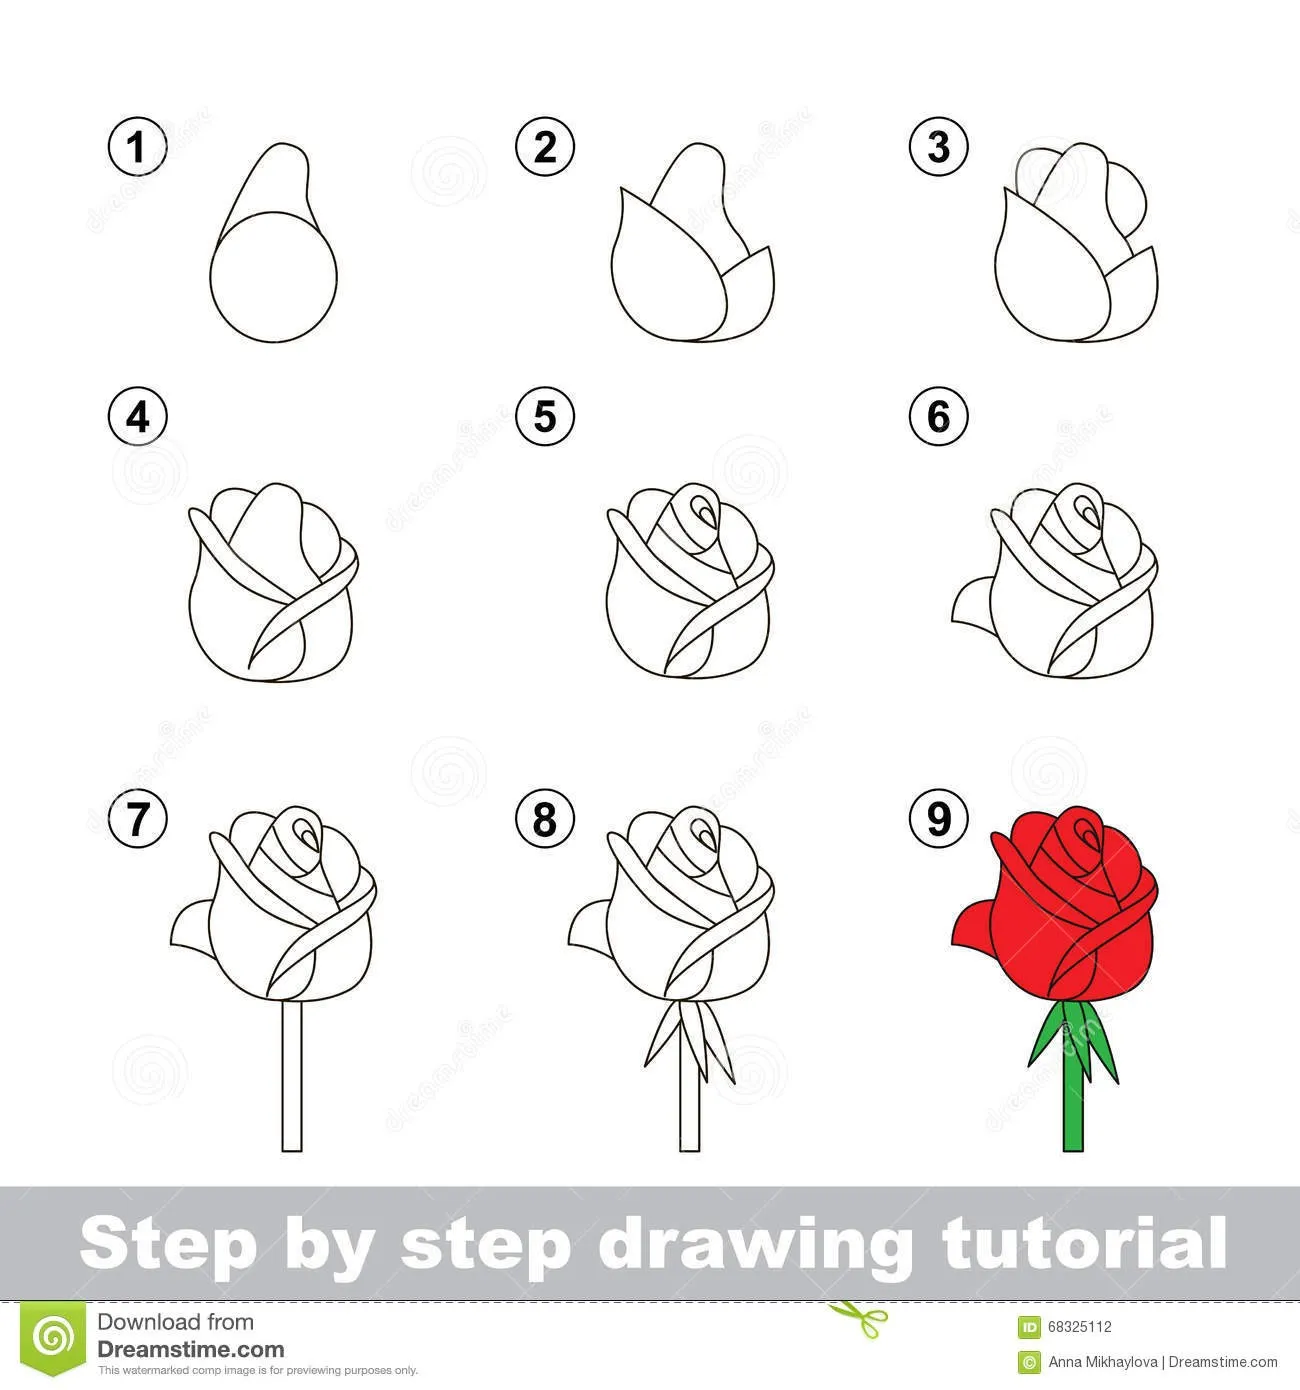
When it comes to drawing roses, starting with basic shapes can make the process much easier and more enjoyable. It’s like building a house; you need a solid foundation before you can add the beautiful details. Here are some simple guidelines to help you get started:
- Start with a Circle: Begin by drawing a small circle in the center of your paper. This will represent the heart of the rose.
- Add Petal Guidelines: Draw a series of curved lines around the circle. These lines will act as guides for the petals. Think of them as the skeleton of your rose.
- Create Overlapping Petals: To give your rose depth, draw larger oval shapes that overlap the smaller circle. Vary the size and shape to create a more natural look.
- Outline the Stem and Leaves: Draw a straight line down from the bottom of your rose for the stem. Add elongated shapes on either side for the leaves.
Using these basic shapes, you can create a structure for your rose that’s easy to refine later. Remember, it’s all about practice! The more you draw, the more comfortable you’ll become with the shapes and the overall look of a rose.
Also Read This: Copyright Vigilance: How Getty Images Finds and Addresses Copyright Infringement
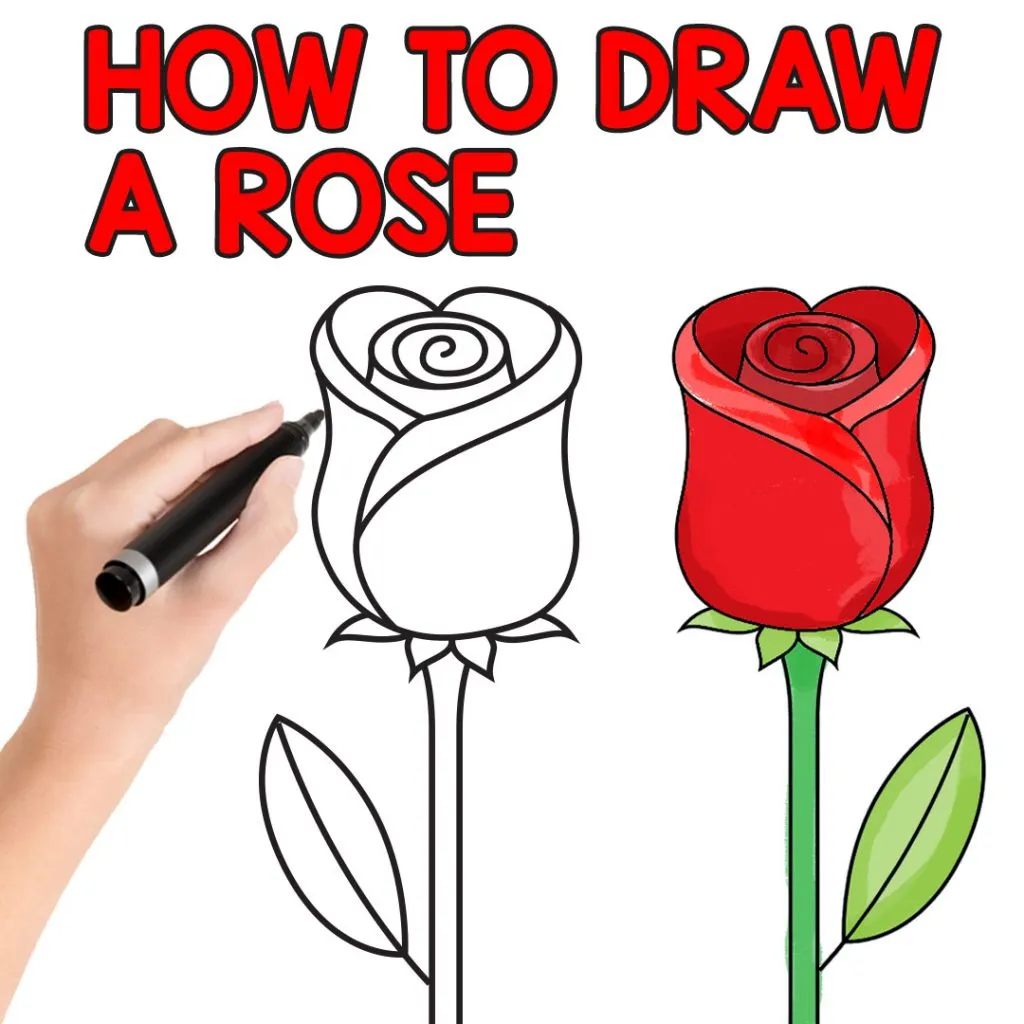
Step-by-Step Tutorial for Drawing a Rose
Ready to bring your rose to life? Follow this simple step-by-step tutorial, and you'll have a beautiful rose drawn in no time! Grab your pencil, paper, and let’s get started!
- Draw the Center: Begin by sketching the small circle in the middle of your page. This will be the heart of your rose.
- Add Petals: Using the petal guidelines you made earlier, start drawing the outer petals. Make sure to curve them around the center to create a natural flow.
- Refine the Petals: Go over your initial petal sketches and refine the shapes. Make some petals larger and others smaller to add variety.
- Include Details: Add texture by drawing lines within the petals to mimic the natural veining seen in real roses.
- Draw the Stem: From the base of your rose, draw two parallel lines downwards to create the stem. Make sure it’s thick enough to support the flower.
- Add Leaves: On either side of the stem, draw leaves using elongated shapes. Don’t forget to add serrated edges for a realistic touch!
- Final Touches: Erase any unnecessary lines and refine your drawing. Once satisfied, you can choose to color it or leave it as a beautiful pencil sketch.
And there you have it! With a little practice and patience, you’ll be creating stunning roses that showcase your artistic flair. If you’re looking for more visual guidance, check out the Dailymotion tutorials that can help you further enhance your skills!
Also Read This: How to View and Download Thumbnails on YouTube
5. Adding Details and Shading
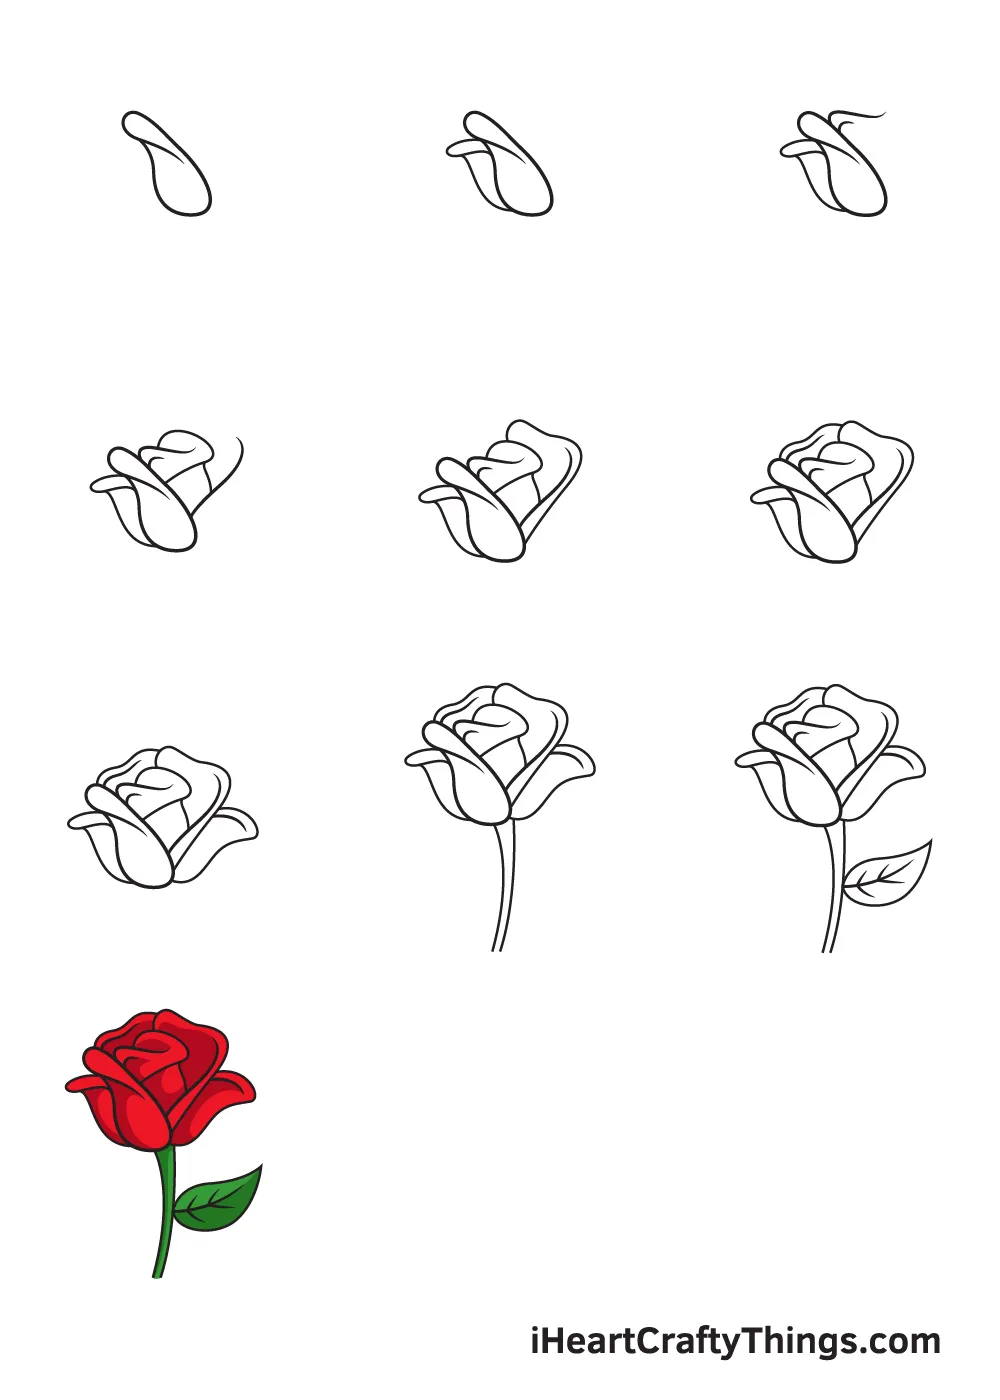
Once you’ve sketched the basic shape of your rose, it’s time to enhance its beauty by adding details and shading. This step is crucial because it transforms a simple outline into a vibrant, lifelike flower.
Here’s how to do it:
- Refine the Petals: Start by going over the edges of each petal. Add gentle curves and slight indentations to mimic the natural folds of a rose. Roses have layers, so don’t be afraid to show overlapping petals!
- Draw the Stem and Leaves: Create a sturdy stem by making it thicker at the base and tapering it towards the flower. Add leaves by sketching their pointed shapes, ensuring they have some veins for realism.
- Add Texture: Use short, curved lines within each petal to suggest texture. Remember, petals are not smooth; they have a delicate, velvety appearance.
- Shading: Choose a light source direction. Shade the petals on the opposite side to create depth. Use a pencil or shading tool to gently blend the darker areas into lighter ones, achieving a soft gradient.
To really make your rose pop, consider using colored pencils or markers. Layering colors can add even more depth and realism. Remember, practice makes perfect, so don’t get discouraged if your first few attempts don’t turn out exactly how you envisioned!
Also Read This: How to Wear Hijab with Dupatta for a Stylish Look
6. Using Dailymotion Tutorials for Visual Guidance
One of the most effective ways to learn how to draw roses is by utilizing video tutorials. Dailymotion is a fantastic platform that offers a variety of drawing tutorials, including step-by-step guides specifically for roses.
Here’s why Dailymotion tutorials are an excellent resource:
- Visual Learning: Watching someone else draw can provide insight into techniques and tips that you might miss by just reading instructions.
- Step-by-Step Guidance: Many tutorials break down the drawing process into manageable steps, making it easier to follow along, even for beginners.
- Variety of Styles: You can find tutorials that suit your style, whether you prefer realistic roses or more stylized interpretations.
- Access Anytime: Dailymotion allows you to pause, rewind, or replay sections of the tutorial, so you can learn at your own pace.
To find the best tutorials, simply search for "how to draw roses" on Dailymotion. You’ll be amazed at the wealth of content available. As you watch, grab your drawing supplies and follow along. You’ll be creating beautiful roses in no time!
Simple Ways to Draw Roses Step by Step with Dailymotion Tutorials
Learning how to draw roses can be an enjoyable and fulfilling creative pursuit. With the help of Dailymotion tutorials, you can easily master this beautiful flower in just a few simple steps. Here, we will explore effective techniques and resources to help you become proficient in drawing roses.
Why Choose Dailymotion Tutorials?
Dailymotion offers a variety of video tutorials that cater to all skill levels. These visual guides can enhance your learning experience by providing:
- Clear Visual Instructions: Follow along with artists as they demonstrate each step.
- Multiple Styles: Explore different artistic styles, from realistic to abstract.
- Expert Tips: Gain insights from experienced artists on techniques and materials.
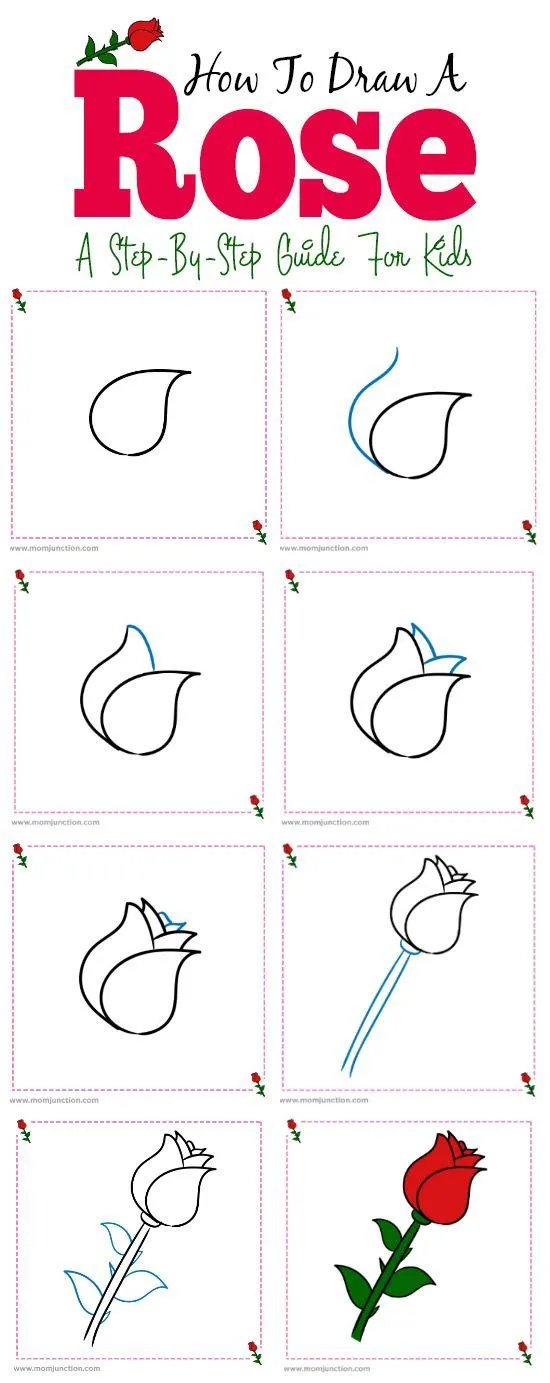
Step-by-Step Drawing Process
Here’s a simple step-by-step guide to drawing roses:
- Start with the Center: Draw a small spiral to form the rose’s core.
- Add Petals: Sketch curved shapes around the spiral to create petals.
- Layer the Petals: Continue adding petals, overlapping them for a natural look.
- Draw the Stem and Leaves: Create a long line for the stem, and add leaves on either side.
- Refine Your Drawing: Use an eraser to clean up lines and enhance details.
Recommended Dailymotion Tutorials
| Tutorial Title | Duration | Skill Level |
|---|---|---|
| Easy Rose Drawing for Beginners | 10 minutes | Beginner |
| Realistic Rose Drawing Techniques | 15 minutes | Intermediate |
| Watercolor Roses Step by Step | 20 minutes | Advanced |
Conclusion and Final Tips
Drawing roses can be a rewarding experience, especially when guided by helpful Dailymotion tutorials. Remember to practice regularly, be patient with yourself, and explore various styles to find your unique artistic voice. Happy drawing!