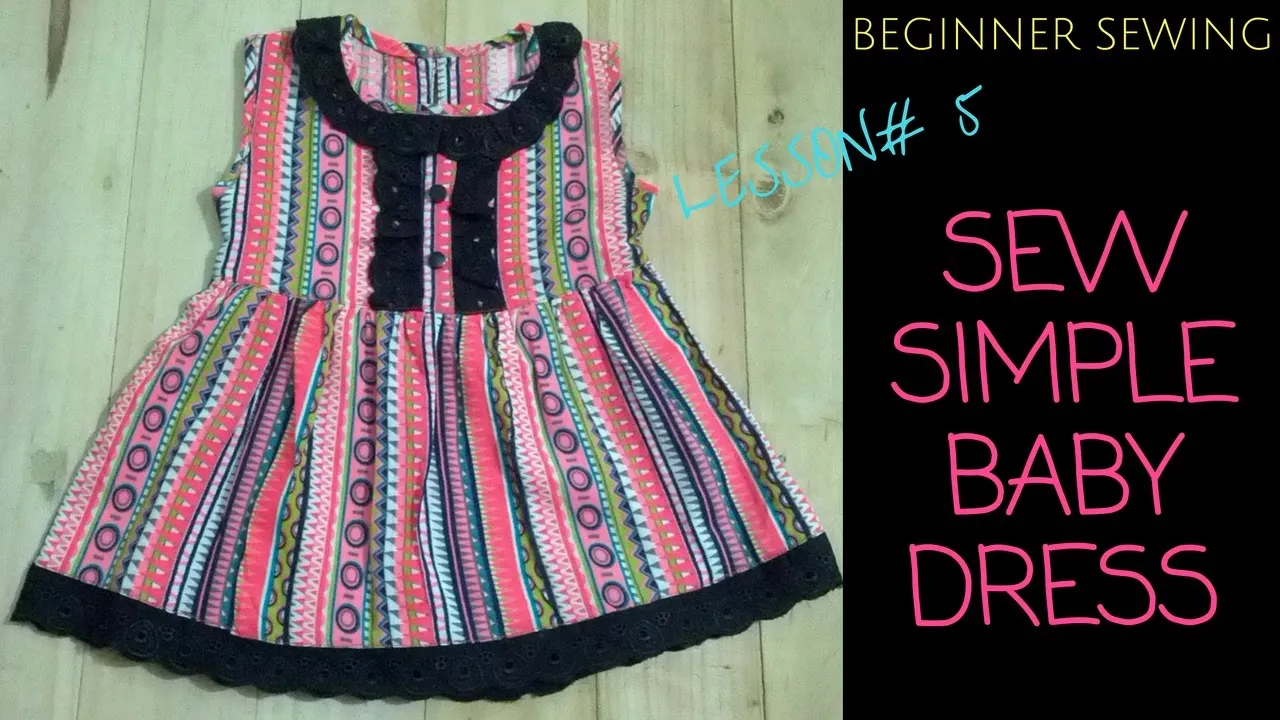
Welcome to our simple DIY guide on making a baby dress! Whether you're a seasoned seamstress or a complete beginner, crafting a charming dress for your little one can be both fun and rewarding. Making your own baby dress allows you to express your creativity and customize it to match your baby's personality. Plus, it can be a heartfelt gift for new parents or a special outfit for a memorable occasion. In this guide, we'll walk you through the process step by step, starting with all the materials you'll need. Let's dive in!
Materials Needed
Before you begin your DIY baby dress project, it's essential to gather all the necessary materials. Here's a handy list to help you get started:
- Fabric: Choose a soft, breathable fabric suitable for babies, such as cotton, linen, or jersey knit. Aim for about 1-2 yards, depending on the size of the dress.
- Thread: Select a thread that matches your fabric color. Opt for high-quality, durable thread to ensure the seams hold up.
- Pattern: You can either purchase a baby dress pattern or create your own. Look for simple designs that suit your skill level.
- Sewing Machine: A sewing machine will make the process much easier, but you can also sew by hand if you prefer.
- Scissors: A sharp pair of fabric scissors is essential for cutting your materials accurately.
- Pins or Fabric Clips: These help hold your fabric pieces together while you sew, ensuring neat and precise seams.
- Measuring Tape: Accurate measurements are crucial for a well-fitting dress.
- Iron: Pressing your fabric before and after sewing helps create crisp edges and a polished look.
- Embellishments (optional): Consider adding buttons, lace, or ribbons for a personal touch!
With these materials in hand, you’re ready to start your project. Gather your supplies, and let's make a beautiful dress for that special little one!
Also Read This: Can YouTubers See Who Watched Their Video? An In-Depth Look at Viewer Analytics
Choosing the Right Fabric
When it comes to making a baby dress, the fabric you choose is crucial. Not only does it affect the overall look of the dress, but it also impacts the comfort and durability. So, let's dive into some fabric options that are perfect for little ones!
- Cotton: This is one of the most popular choices for baby clothes. It's soft, breathable, and easy to wash. Look for 100% cotton fabric to ensure it's gentle on your baby's skin.
- Muslin: Often used for swaddles, muslin is lightweight and airy, making it ideal for warm weather. It's also super easy to sew, which is a bonus for beginners!
- Seersucker: This crinkled fabric is not only adorable but also breathable. It's perfect for summer dresses as it keeps your baby cool and comfortable.
- Flannel: If you're making a dress for cooler weather, flannel is a great option. It's soft and warm, but make sure to choose a lightweight flannel for better comfort.
- Jersey Knit: For a more casual look, jersey knit is stretchy and soft, making it easy for babies to move around.
When selecting fabric, consider the dress style and the season. Additionally, always wash and pre-shrink your fabric before cutting to avoid any surprises later. Remember, the right fabric can make all the difference in ensuring your little one looks cute and feels comfy!
Also Read This: How to Make Rose Water at Home with a Natural DIY Recipe
Measuring and Cutting the Fabric
Now that you've chosen the perfect fabric, it's time to measure and cut. This step is essential to ensure your baby dress fits well and looks fabulous. Don’t worry; it’s easier than it sounds!
Here’s how to do it:
- Gather Your Tools: You'll need a measuring tape, fabric scissors, a fabric marker or chalk, and a ruler to help you get straight lines.
- Measure Your Baby: Take the following measurements:
- Chest: Measure around the fullest part of the chest.
- Waist: Measure around the natural waistline.
- Length: Measure from the shoulder down to the desired length of the dress.
And there you have it! With your fabric measured and cut, you're one step closer to creating that adorable baby dress. Just remember, measuring accurately is key to a successful DIY project!
Also Read This: How to Make Easy Donuts with a Fun Recipe
Sewing the Dress Together
Alright, let’s get to the fun part—sewing the dress together! This step is where all your hard work really starts to come together, and it’s exciting to see your fabric transform into a cute little dress.
First, you’ll want to lay out your fabric pieces. Make sure you have:
- The front piece
- The back pieces
- The sleeves (if you're adding them)
- The skirt pieces
- Any embellishments you plan to add later
Next, grab your sewing machine and set it up with the appropriate thread. If you’re using a patterned fabric, choose a thread color that complements your design.
Now, follow these simple steps:
- Join the Shoulders: Start by sewing the front and back pieces at the shoulders. Pin them in place, then sew along the edge, using a straight stitch.
- Attach the Sleeves: If you’re adding sleeves, pin them to the armholes and sew them on. Ensure they’re even and aligned.
- Sew the Sides: With the dress inside out, pin the side seams and sew from the underarm down to the hem. This gives the dress its shape.
- Add the Skirt: Gather the top of the skirt pieces if needed, then sew them to the bodice of the dress. Make sure everything aligns nicely.
- Finish the Hem: Fold the bottom of the dress up and sew a hem. This can be a simple straight stitch or a decorative one if you’re feeling fancy!
And there you go! You’ve successfully sewn the main parts of the dress together. It’s starting to look like a beautiful baby dress!
Adding Finishing Touches
Now that your dress is all sewn up, let’s talk about those delightful finishing touches that will make your creation truly special. These little details can elevate your dress from cute to absolutely adorable!
Here’s what you can do:
- Adding a Lining: If you want a more polished look, consider adding a lining. This not only adds comfort but also gives the dress a professional finish.
- Decorative Stitching: Use a contrasting thread to add decorative stitching along the seams or hem. It’s an easy way to add flair.
- Buttons and Bows: Sew on some cute buttons or a lovely bow at the waist. These small details can really bring your dress to life!
- Embellishments: Get creative! You can add fabric flowers, rhinestones, or even lace trim to enhance the dress’s charm.
If you want to add a personal touch, consider:
- Monogramming: A little monogram or the baby’s name adds a special element that makes the dress unique.
- Custom Tags: Create a sweet tag that says “Handmade with Love” to attach to the dress.
Finally, give the dress a good press with an iron to smooth out any wrinkles. Once it’s looking sharp, your adorable DIY baby dress is ready for its debut!