Canva is a popular design tool that allows anyone, regardless of their experience, to create professional-looking graphics. From presentations to social media posts, Canva offers an intuitive drag-and-drop interface, making it easy to design just about anything.
One of Canva’s standout features is the ability to share templates with others. Whether you’re working with a team, sharing your design with clients, or simply helping a friend, sharing templates saves time and ensures consistency in design. It’s especially helpful for collaborative projects where everyone needs access to the same layout and style.
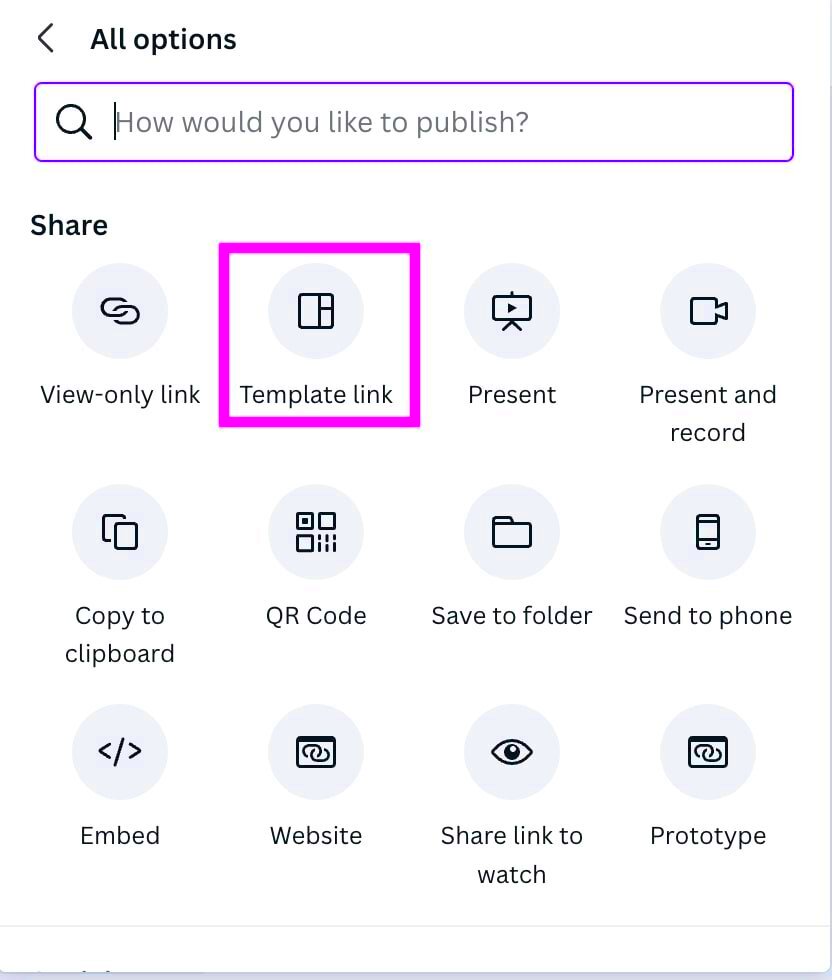
Ways to Share Canva Templates with Others
Sharing Canva templates is simple, and there are multiple ways to do it based on your needs. Let’s take a quick look at the different options available:
- Share via Link: Canva allows you to generate a shareable link that you can send to anyone. This is perfect when you want to share a template quickly.
- Invite to Collaborate: You can invite others to edit the template by assigning roles. This is useful for team-based projects where you need feedback or contributions.
- Download and Share: Sometimes, you might want to download the template as a file and share it offline. Canva supports various formats such as PDF, PNG, or JPEG.
- Use Canva’s Brand Kit: For businesses, sharing templates with a consistent brand identity is important. Canva’s Brand Kit helps ensure that shared templates follow specific guidelines.
Each method has its own benefits depending on how you want to share your designs and with whom. Whether it’s a quick link or a more formal collaboration, Canva has made sharing a breeze.
Also Read This: Fee Breakdown for Shutterstock
Step-by-Step Guide to Share a Canva Template via Link
Sharing a Canva template via a link is one of the easiest methods. Here’s a simple guide to walk you through the process:
- Open the Canva Template: First, make sure you are logged into your Canva account and open the design template you want to share.
- Click on the Share Button: In the top-right corner, you’ll see a “Share” button. Click on it to open the sharing options.
- Select “Share Link to Edit” or “Share Link to View”: You’ll have two options—either share a link that allows others to edit the template or one that only allows them to view it. Choose the option that fits your needs.
- Generate and Copy the Link: After selecting the desired sharing option, Canva will generate a unique link for your template. Click the “Copy Link” button.
- Send the Link to Others: Now, simply paste the link in an email, message, or any platform where you want to share the template. The recipient can now view or edit the design, depending on the permissions you’ve set.
This method is fast and effective, especially when you need to share a template with someone who doesn’t have a Canva account. Plus, you remain in control by deciding whether they can just view or fully edit the template.
Also Read This: What to Do When YouTube Stops Working on Your Phone
Sharing Canva Templates by Assigning Roles
If you’re working on a team project, assigning roles in Canva can make the process smoother. When you assign roles, you control who can view, edit, or manage the template. This ensures that everyone knows their part, preventing any accidental changes or confusion.
Here’s how assigning roles works in Canva:
- Viewer: Viewers can look at the design but can't make any edits. This role is perfect for clients or team members who need to review the template.
- Editor: Editors can make changes to the template. This role is ideal for collaborators who are actively involved in the design process.
- Template Owner: The owner has full control over the template. They can make edits, manage permissions, and share the template with others.
To assign roles, follow these steps:
- Open the template: Start by opening the design you want to share in Canva.
- Click the Share button: In the top-right corner of the screen, click the “Share” button.
- Invite people: You can invite others by entering their email addresses. Make sure to select the correct role—Viewer, Editor, or Owner—before sending the invitation.
- Manage permissions: You can always go back and adjust the roles if needed. This helps maintain control over who does what with your template.
Assigning roles keeps the design process organized, ensuring that only the right people make changes while others can simply review the template.
Also Read This: Understanding Ideal Retention Rates on YouTube and Tips for Engaging Viewers
How to Use Canva’s Collaboration Feature for Sharing
Canva’s collaboration feature is designed for team projects, allowing multiple users to work on a design simultaneously. This feature is ideal for businesses, creative teams, or anyone working on a project with several contributors.
Here’s how you can use Canva’s collaboration feature:
- Open the design: Open the Canva design you want to collaborate on.
- Share the design: Click on the “Share” button in the top-right corner. From here, you can invite people by email or generate a shareable link.
- Select collaboration options: Choose whether collaborators can edit or just view the design. If you want everyone to work together, select the “edit” option.
- Work together in real-time: Once shared, everyone with editing access can start working on the design. Changes made by each person will be visible in real-time, ensuring smooth collaboration without needing to email files back and forth.
This feature helps streamline group projects, ensuring that everyone can contribute ideas and feedback without unnecessary delays. Whether it’s brainstorming or finalizing details, Canva’s collaboration tool is an efficient way to get things done.
Also Read This: Creating an Adorable Owl Charm with Dailymotion DIY Tips
Why Sharing with Canva’s Brand Kit Can Be Helpful
For businesses and organizations, maintaining brand consistency is crucial, especially when sharing designs across teams or with clients. Canva’s Brand Kit feature is specifically designed to help with this, ensuring that every design follows your brand guidelines.
Here’s why the Brand Kit is so helpful when sharing templates:
- Consistent Branding: The Brand Kit stores your brand’s colors, fonts, and logos, so every shared template stays on-brand without needing manual adjustments.
- Easy Access for Team Members: When you share a template with others, the Brand Kit is available to them, making it easy for everyone to maintain the same look and feel in their designs.
- Time-Saving: Instead of reapplying brand elements to every design, the Brand Kit automates this, allowing you and your team to focus on the creative side.
For businesses, the Brand Kit adds a layer of professionalism to every shared design. By using it, you ensure that every team member or collaborator works within the boundaries of your brand identity.
Also Read This: Blocking the YouTube Ad Blocker Pop-Up Effectively
Potential Challenges When Sharing Canva Templates
While sharing Canva templates is usually straightforward, there can be a few challenges along the way. Understanding these potential issues will help you avoid frustrations and ensure a smooth process.
Here are some common challenges you might face:
- Permission Confusion: Sometimes, people might not understand the difference between viewing and editing permissions. A viewer may expect to make changes but can’t, which can cause delays.
- Compatibility Issues: Not everyone might have access to certain Canva features, especially if they’re on a free account while you're using premium elements in your design. This could limit their ability to edit or view specific parts of the template.
- Accidental Edits: If someone has editing access, there’s always the chance they might accidentally alter or delete key elements in the template. This is why assigning roles carefully is important.
- Link Expiry or Revocation: If you’ve shared a link and later revoke access or the link expires, the other person will no longer be able to access the template. This can be confusing if they are unaware of the change.
- File Size Limitations: Depending on the complexity of the design, file size can sometimes be an issue when downloading or sharing templates, especially if images or elements are large.
By being aware of these challenges, you can take steps to manage permissions carefully and communicate effectively with the people you’re sharing the templates with.
Also Read This: Canva Circular Image Creation
Frequently Asked Questions
Here are some common questions that people have when sharing Canva templates:
| Question | Answer |
|---|---|
| Do I need a Canva Pro account to share templates? | No, you can share templates with a free account. However, certain features like the Brand Kit and premium elements are only available with Canva Pro. |
| Can others edit my template without a Canva account? | No, the person you share the template with will need a Canva account to make any edits. They can, however, view it without an account if the link is set to view-only. |
| How do I prevent someone from making changes to my template? | When you share the template, choose the “View only” option. This allows others to see the design without making any edits. |
| What happens if I delete a template I’ve shared? | If you delete the template from your Canva account, others won’t be able to access it anymore, even if they have the link. |
Final Thoughts on Sharing Canva Templates
Sharing Canva templates can significantly streamline your workflow, whether you're collaborating with a team, sharing designs with clients, or helping a friend with a project. By choosing the right sharing method—whether via link, collaboration, or role assignments—you can ensure that the process is easy and efficient.
While there might be a few challenges, such as managing permissions or dealing with compatibility issues, these can be easily managed by staying aware and proactive. Canva’s tools are designed to make sharing as seamless as possible, allowing you to focus more on creativity and less on technical hurdles.
In the end, sharing templates on Canva is a powerful way to collaborate and ensure consistency across all your designs. Just be sure to choose the right options for your needs, and you’ll be all set!