Hey there, creative minds! If you’ve ever found yourself struggling with how to showcase your design projects online, you're in the right place. Behance is a fantastic platform for sharing your work, and Adobe Illustrator is a powerhouse tool for creating stunning designs. In this guide, we’ll walk you through the seamless process of uploading your projects from Illustrator to Behance, ensuring that your work shines just as brightly online as it does on your screen. Let’s dive in!
Preparing Your Illustrator Project for Upload
Before you hit that upload button, it’s crucial to prepare your Illustrator project properly. This ensures that your work not only looks great but also meets the specifications required by Behance. Here’s a step-by-step guide to help you get ready:
- Finalize Your Design: Make sure your project is complete. Review all elements, colors, and typography. It's the little details that make a big difference!
- Optimize Your Artboard: Set your artboard to the desired size for Behance. A common size is 1920 x 1080 pixels for a landscape orientation. This resolution is great for clarity.
- Flatten Layers: If your design has multiple layers, consider flattening them. This helps in reducing file size and ensures that your design appears as intended.
- Save in the Right Format: Export your project as a high-quality PNG or JPEG. These formats are ideal for online sharing. To do this, go to File > Export > Export As, and select your preferred format.
- Check Color Profiles: Ensure your color profile is set to RGB. This is crucial for accurate color representation on web platforms.
- Create a Compelling Title and Description: Think about how you want to present your work. A catchy title and an engaging description can draw viewers in and provide context for your project.
By following these steps, you’ll make sure your project is polished and ready for the Behance stage. Trust me, a little preparation goes a long way in making your work stand out! Happy designing!
Also Read This: Behance template usage tips
Exporting Your Artwork from Illustrator
Exporting your artwork from Adobe Illustrator is a crucial step before showcasing your projects on Behance. The process is straightforward, but there are a few important details to keep in mind to ensure your work looks fantastic online.
First, you need to prepare your artwork. Here's how to do it:
- Check Your Artboard Size: Make sure your artboard is the correct size for your intended display. Behance supports various formats, but a common size is 1920px by 1080px for landscape orientation.
- Finalize Your Design: Review your design elements, ensuring everything is aligned and visually appealing. Clear any unnecessary layers or elements that may clutter your project.
- Color Mode: Set your document color mode to RGB, as this is the standard for digital displays.
Now, let’s get to exporting:
- Go to the File menu in Illustrator.
- Select Export > Export As.
- Choose your desired file format. For Behance, JPEG or PNG are popular options due to their quality and file size.
- Adjust the quality settings if necessary (higher quality means larger file size).
- Click Export, and you’re done!
Remember, a well-exported image will make your work stand out on Behance, so take your time to ensure it’s perfect!
Also Read This: How to Remove Background in Freepik: A Step-by-Step Guide
Creating a Behance Account (If You Don't Have One)
If you’re looking to showcase your creative projects, having a Behance account is essential. Creating an account is quick and easy, and it opens up a world of opportunities to connect with other creatives and potential clients.
Here’s a step-by-step guide to get you started:
- Visit the Behance Website: Go to Behance.net.
- Click on 'Sign Up': You’ll see a prominent button for signing up. Click it!
- Choose Your Signup Method: You can sign up using your email address or connect through your Adobe ID or social media accounts like Facebook or Google.
- Fill in Your Details: If you’re creating an account with your email, provide your name, email address, and a secure password. Make sure to choose a unique username that reflects your creative identity.
- Agree to Terms: Don’t forget to read and accept Behance’s terms and conditions.
- Verify Your Email: After signing up, check your email for a verification link. Click on the link to activate your account.
Congratulations! You’re now part of the Behance community. Don’t forget to complete your profile by adding a profile picture, a bio, and linking your social media accounts. This helps in showcasing your personality and attracting followers!
Also Read This: Why Your Video Fails to Upload on YouTube and How to Resolve It
5. Steps to Upload Your Project to Behance
Uploading your project to Behance is a straightforward process that can be done in just a few steps. Let’s break it down:
- Prepare Your Project Files: Before you start uploading, ensure your project files are ready. This might include images, videos, or even PDFs. It's essential to have high-quality files that showcase your work professionally.
- Log In to Behance: Head over to the Behance website and log in to your account. If you don’t have an account yet, you can easily sign up for free.
- Create a New Project: Once logged in, click on the “Create a Project” button. This will take you to the project editor where you can begin uploading your files.
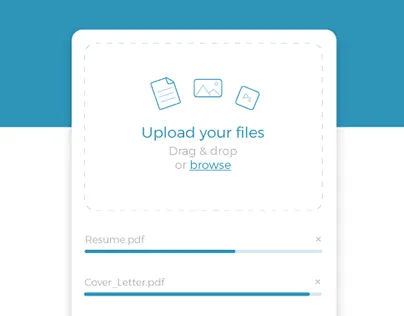
- Upload Your Files: You can drag and drop your files directly into the project editor or use the upload button. Behance allows you to upload multiple files at once, so feel free to select everything you want to include.
- Add Descriptions and Tags: After uploading, you can add a project title, description, and relevant tags. This step is crucial as it helps people find your work. Be descriptive and engaging!
- Choose a Cover Image: Select a striking cover image for your project. This is the first thing viewers will see, so make it eye-catching!
- Publish Your Project: Once you’re satisfied with how everything looks, hit the “Publish” button. Congratulations! Your project is now live on Behance!
6. Enhancing Your Project Presentation on Behance
Once you’ve successfully uploaded your project to Behance, the next step is to make it stand out even more. Here are some tips to enhance your project presentation:
- Use High-Quality Images: Always opt for high-resolution images. Blurry or pixelated images can detract from the quality of your work.
- Tell a Story: Use the project description to narrate the story behind your work. Discuss your inspiration, the process, and any challenges you overcame. This adds depth and context.
- Organize Your Content: Structure your project logically. Group similar images or sections together to create a cohesive flow. Use headings and subheadings to guide viewers through your project.
- Utilize Videos: If applicable, include videos to showcase your project process or final results. This can engage viewers and provide a dynamic element to your presentation.
- Incorporate Mockups: Presenting your designs in realistic mockups can help viewers visualize your work in context. This is especially effective for branding projects.
- Engage with Your Audience: Don’t forget to respond to comments and feedback on your project. Engaging with your audience can encourage further interaction and sharing.
- Share on Social Media: After publishing, promote your Behance project on your social media channels. This can drive more traffic and increase visibility.
By following these tips, you can create a compelling presentation that highlights your creativity and attracts a broader audience on Behance!