In today's fast-paced digital world, maximizing your workflow is essential, especially for creatives. Adobe's Creative Cloud and Behance integration offers a powerful solution to streamline your projects and showcase your work. Whether you're a graphic designer, photographer, or artist, this combination allows you to not only create but also share your work with a vibrant community. Let’s dive into what Creative Cloud and Behance are all about and how they complement each other to elevate your creative process.
Understanding Creative Cloud and Behance
Adobe Creative Cloud is a comprehensive suite of applications that cater to various creative fields, from graphic design to video editing. Some popular tools include:
- Photoshop: For image editing and compositing.
- Illustrator: Great for vector graphics and illustrations.
- InDesign: Perfect for layout design and publishing.
- Premiere Pro: For video editing and production.
This suite allows you to work seamlessly across different projects, ensuring that all your files are accessible and editable from anywhere. The cloud storage feature also means you can collaborate in real-time, sharing feedback and making adjustments without the hassle of emailing files back and forth.
On the other hand, Behance is an online platform specifically designed for creatives to showcase their work, gain exposure, and connect with other professionals. Here’s what makes Behance stand out:
- Portfolio Creation: Easily create visually stunning portfolios to display your work.
- Community Engagement: Connect with other creatives, receive feedback, and collaborate on projects.
- Job Opportunities: Find freelance gigs or full-time positions through the platform.
When you integrate Creative Cloud with Behance, you create a seamless workflow where you can directly publish your projects to your Behance portfolio. This integration not only saves time but also allows you to keep your audience updated with your latest creations effortlessly.
Also Read This: Mastering the Art of Selling Your Video and Photos to Getty
Benefits of Integrating Creative Cloud with Behance
Integrating Creative Cloud with Behance can significantly enhance your creative workflow. Here are some compelling benefits:
- Seamless Project Sharing: With this integration, you can easily share your projects directly from Creative Cloud to your Behance profile. This means less time spent on uploads and more time showcasing your work to the world!
- Broader Audience Reach: Behance is a vibrant community of creatives. By integrating it with your Creative Cloud apps, your projects gain exposure to potential collaborators, employers, and fans, thus expanding your network.
- Real-Time Feedback: When you share your work on Behance, you can receive constructive feedback from peers. This real-time interaction helps you improve your skills and refine your projects.
- Portfolio Building: Behance serves as an online portfolio. By integrating with Creative Cloud, you can curate and showcase your best work effortlessly, making it easier for clients to find and appreciate your style.
- Enhanced Collaboration: If you’re working with other creatives, the integration allows for easier collaboration. You can share assets and updates in a streamlined manner, ensuring everyone is on the same page.
Also Read This: How to Loop a YouTube Video on iPhone or iPad
Step-by-Step Guide to Setting Up the Integration
Ready to connect your Creative Cloud with Behance? Follow this step-by-step guide to get started:
- Open Creative Cloud: Launch your Creative Cloud desktop app and ensure you're logged into your Adobe account.
- Navigate to Preferences: Click on the gear icon in the upper right corner to access the settings menu, and select "Preferences."
- Link Behance Account: In the Preferences window, look for the “Behance” tab. Click on it and then hit “Connect to Behance.”
- Authenticate: A new window will pop up asking you to log into your Behance account. Enter your credentials and allow permissions for the integration.
- Adjust Settings: Once connected, you can customize your sharing settings, choosing what projects to share and how often.
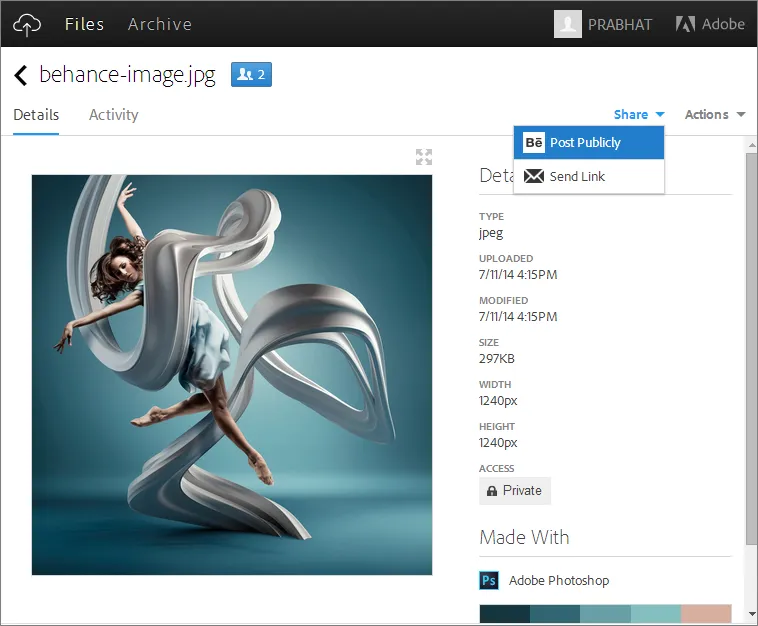
- Begin Sharing: Now you’re ready! Open any project in Creative Cloud, and select the “Share” option to send your work directly to Behance.
And there you have it—a simple way to enhance your creative journey by integrating two powerful platforms! Happy creating!
Also Read This: Download Videos from Dailymotion Without Software or Plugins
5. Tips for Streamlining Your Workflow
Maximizing your workflow is all about finding ways to make your creative process smoother and more efficient. Here are some practical tips to help you streamline your workflow while using Creative Cloud and Behance:
- Utilize Cloud Storage: Keeping all your projects in Adobe's cloud storage allows you to access them from anywhere. This flexibility is crucial for creative professionals on the go.
- Organize Your Assets: Create a systematic folder structure for your files in Creative Cloud. Use clear naming conventions and categorize your assets (e.g., logos, images, videos) to speed up your search process.
- Take Advantage of Presets: Adobe applications like Photoshop and Illustrator let you save presets for brushes, styles, and templates. This not only speeds up your work but also helps maintain consistency across projects.
- Automate Repetitive Tasks: Use Adobe's scripting capabilities or built-in automation features to handle repetitive tasks. For example, batch processing images in Photoshop can save you hours.
- Collaborate Effectively: Leverage the collaboration features in Creative Cloud. Share links to your projects directly with clients or teammates for instant feedback, making the revision process smoother.
Also Read This: How to Use Canon 60D on Dailymotion
6. Showcasing Your Work on Behance
Behance is not just a platform for displaying your portfolio; it’s a community where you can connect with other creatives and potential clients. Here’s how to make the most of showcasing your work on Behance:
- Create Engaging Projects: When uploading work, don’t just add images; tell a story! Include a project description that explains your thought process, goals, and challenges.
- Use High-Quality Images: Ensure that the images you upload are high resolution. This makes your work look more professional and appealing to viewers.
- Incorporate Process Shots: Showing behind-the-scenes images can captivate your audience. Include sketches, drafts, and iterations to highlight your creative process.
- Engage with the Community: Don’t just post your work and disappear! Comment on others’ projects, give appreciations, and join conversations to build relationships.
- Utilize Tags and Keywords: Make your projects discoverable by using relevant tags and keywords. This way, when potential clients search for specific styles or services, your work is more likely to appear.
Maximizing Your Workflow with Creative Cloud Behance Integration
In today's fast-paced digital landscape, integrating tools that enhance your productivity is essential. Adobe Creative Cloud and Behance offer a powerful combination that allows creatives to streamline their workflow and showcase their work effectively. By leveraging this integration, you can enhance collaboration, increase visibility, and improve project management.
Benefits of Creative Cloud and Behance Integration:
- Seamless Project Uploads: Easily upload your projects from Adobe applications like Photoshop, Illustrator, and InDesign directly to Behance, saving time and effort.
- Real-time Feedback: Share your work-in-progress with peers and clients, enabling you to receive constructive feedback and make necessary adjustments on the fly.
- Expanded Portfolio: Use Behance as a dynamic portfolio to showcase your best work. The integration allows for automatic updates, ensuring your portfolio reflects your latest creations.
- Networking Opportunities: Connect with other creatives and professionals in your industry. Behance's community features allow you to network, collaborate, and gain visibility.
- Enhanced Visibility: By sharing your work on Behance, you increase your chances of getting discovered by potential clients and employers, enhancing your professional opportunities.
How to Integrate Creative Cloud with Behance:
- Log in to your Adobe Creative Cloud account.
- Connect your Behance account to your Creative Cloud profile.
- Open your preferred Adobe application and start your project.
- Once completed, select the option to share directly to Behance.
In conclusion, the integration of Adobe Creative Cloud and Behance is a game-changer for creatives. By maximizing this synergy, you can enhance your productivity, showcase your work to a larger audience, and foster meaningful professional connections.