Drawing eyes can seem daunting at first, but it's one of the most rewarding skills to master in sketching. Eyes are often referred to as the "windows to the soul," and capturing their essence can bring your artwork to life. Whether you’re aiming for realism or a more stylized approach, understanding the fundamentals of eye drawing sets the foundation for your artistic journey. In this section, we’ll explore the importance of eye drawing and how it enriches your overall skill set.
Understanding Eye Anatomy
Before diving into the actual drawing process, it’s essential to grasp the basic anatomy of the eye. Knowing how each part contributes to the overall appearance will enhance your ability to draw them accurately. Let’s break down the key components:
- Iris: The colored part of the eye, which can vary widely in color and size.
- Pupil: The black circle in the center of the iris that changes size based on light exposure.
- Sclera: The white outer layer of the eyeball, which provides shape and protects the inner structures.
- Cornea: The transparent front part of the eye that covers the iris and pupil, crucial for focus.
- Eyebrow: While not part of the eye itself, eyebrows impact the expression and framing of the eye.
Here’s a simple table to visualize the parts:
| Part | Description |
|---|---|
| Iris | The colored, circular part. |
| Pupil | The dark center that adjusts for light. |
| Sclera | The protective white layer. |
| Cornea | The clear front covering. |
| Eyebrow | Frames and expresses the eye. |
By understanding these elements, you’ll be better equipped to represent eyes in your sketches. Observing real-life examples and practicing these parts individually will deepen your knowledge and improve your drawing skills.
Also Read This: Searching for Telegram Groups on Reddit and Beyond
3. Gathering Your Materials
Before diving into the world of eye drawing, it's essential to gather the right materials. Having the proper tools can significantly enhance your drawing experience and ensure you achieve the best results. Here’s a quick rundown of what you’ll need:
- Pencils: A range of pencils (H, B, and 2B) can help you create different textures and shades. H pencils are great for light lines, while B pencils deliver darker shades.
- Paper: Choose sketch paper that can handle erasing and layering. Look for something with a bit of texture to help your pencil grip.
- Erasers: A regular eraser and a kneaded eraser will allow you to make precision corrections and soften edges.
- Blending Tools: Stumps or tortillons are fantastic for blending pencil lines, giving your eyes a smooth, realistic look.
- Reference Images: Gather a collection of eye photographs or your own images to study various shapes, colors, and expressions.
Having these materials handy will set you up for success. Remember, it’s not just about the tools; it’s about how you use them! So, don’t hesitate to experiment with different items as you progress.
Also Read This: Effortlessly Remove Shows from Your YouTube TV Library
4. Basic Eye Shapes and Structures
Understanding the basic shapes and structures of the eye is crucial for any sketch artist. The eye isn't just one solid shape; it's a complex structure composed of various parts. Let’s break it down:
| Part of the Eye | Description |
|---|---|
| Iris | The colored part of the eye that surrounds the pupil, usually circular. |
| Pupil | The dark center of the eye, which adjusts to light. |
| Sclera | The white part of the eye that provides structure. |
| Upper and Lower Eyelids | These parts protect the eye and help express emotions. |
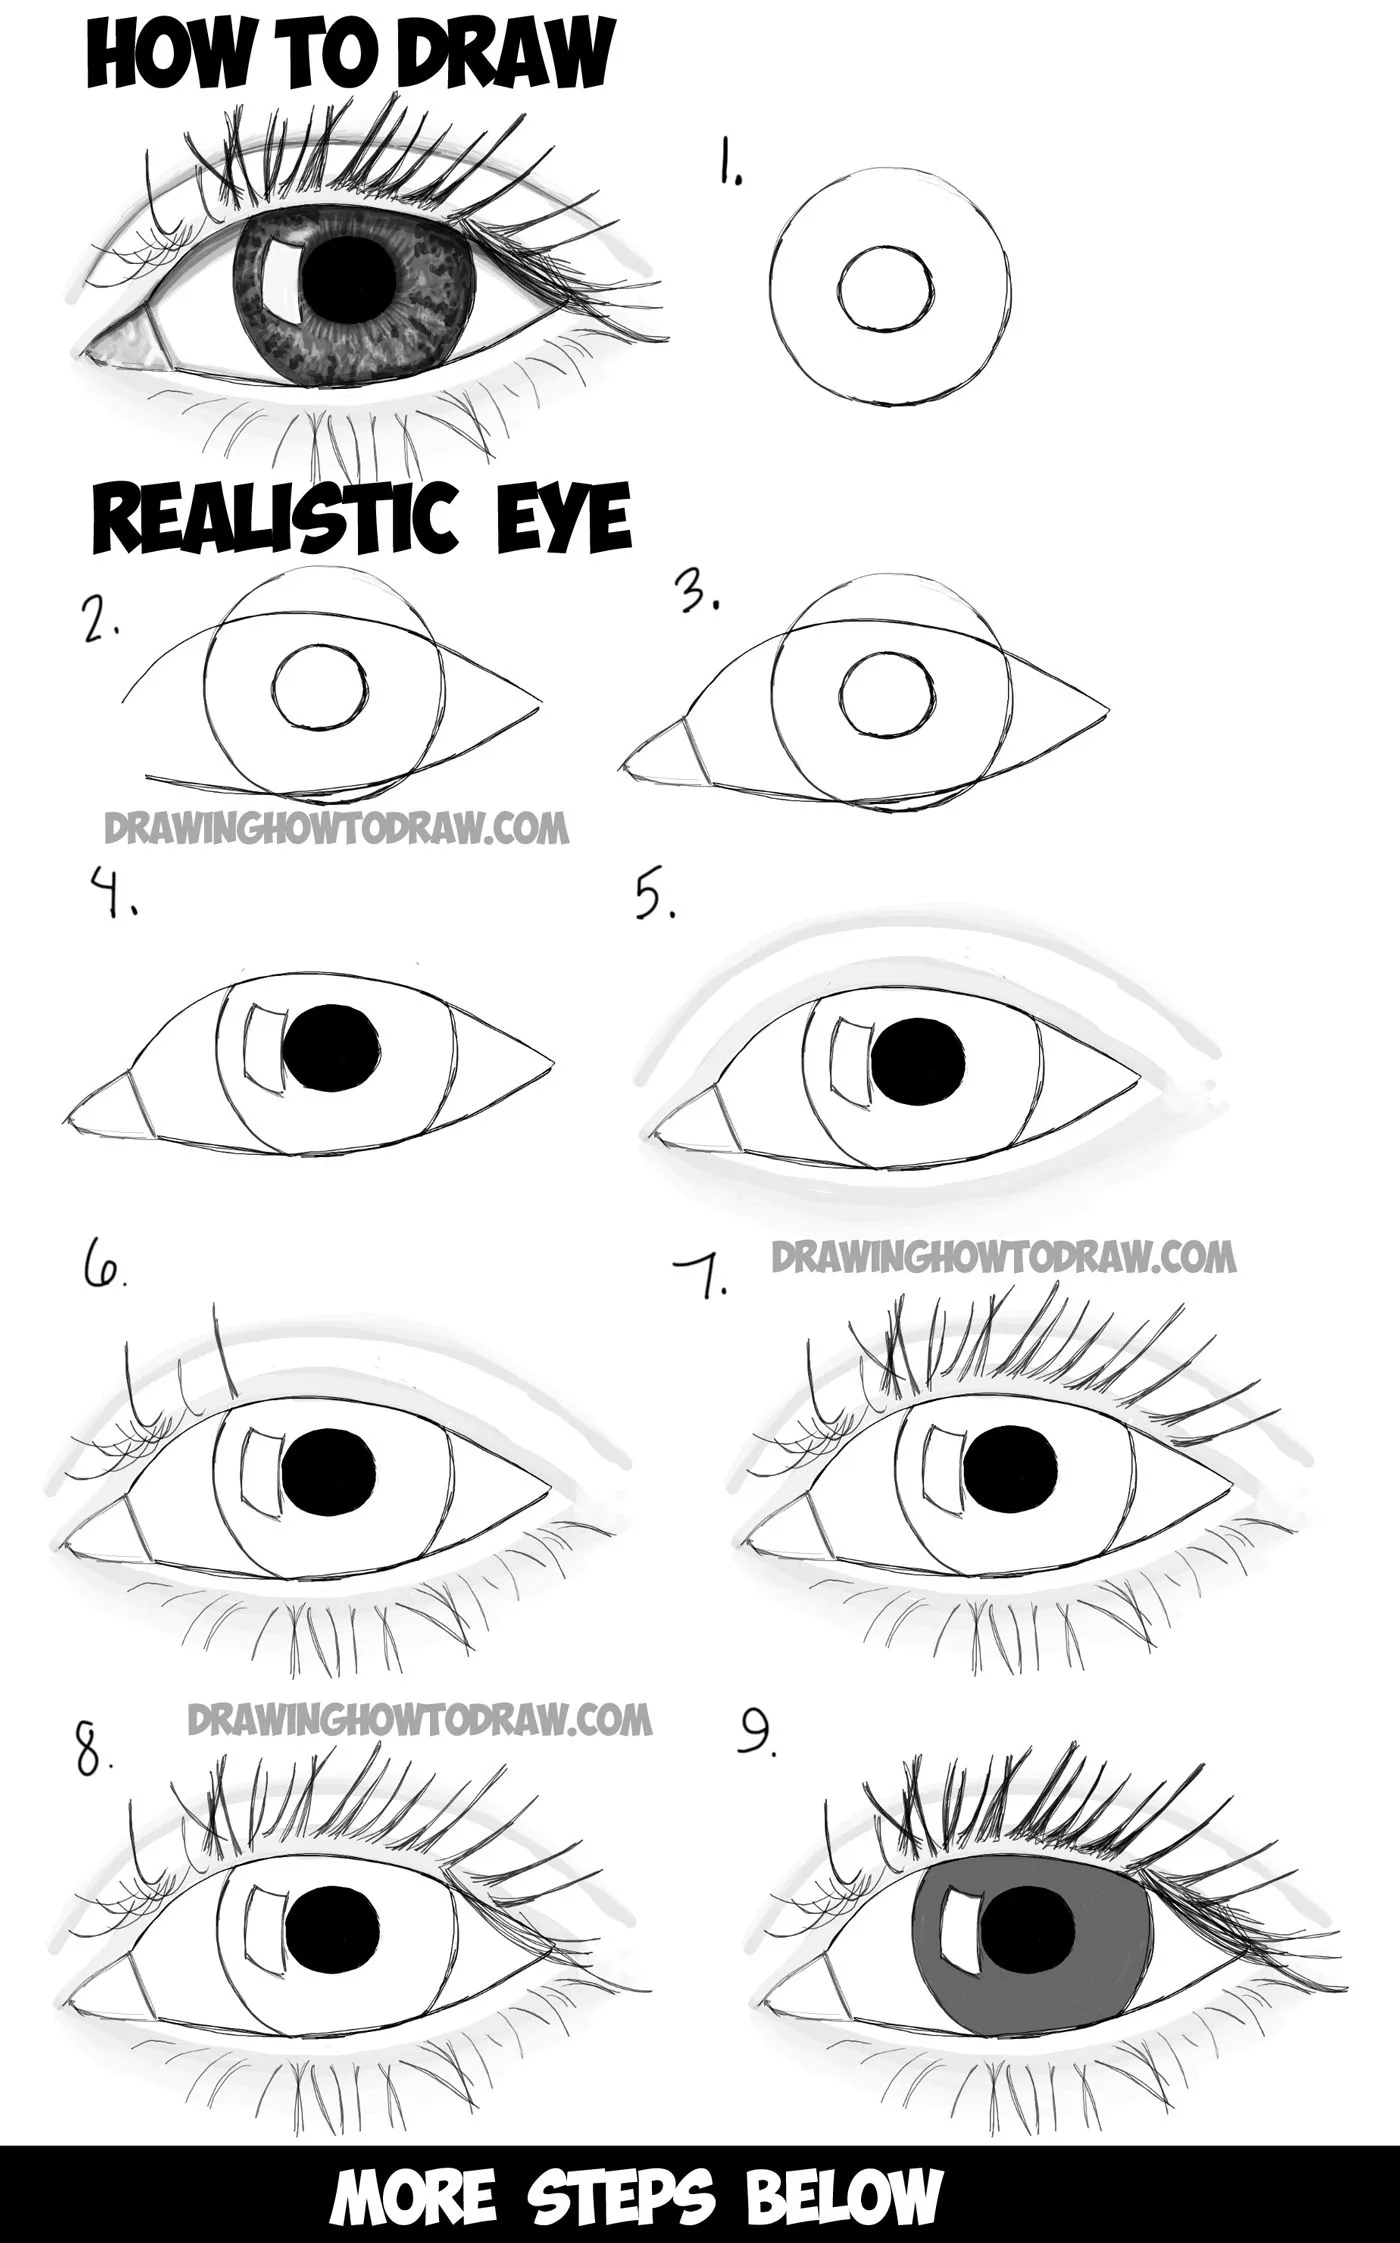
To start drawing, visualize the eye as a combination of basic shapes:
- A *circle for the iris.
- A smaller circle for the pupil.
- An oval* for the overall eye shape.
Practice sketching these shapes in various angles and expressions. Understanding these fundamentals will give you a solid foundation to build more intricate drawings and bring your characters to life!
Also Read This: How to Effectively Utilize Getty Images for Research Projects
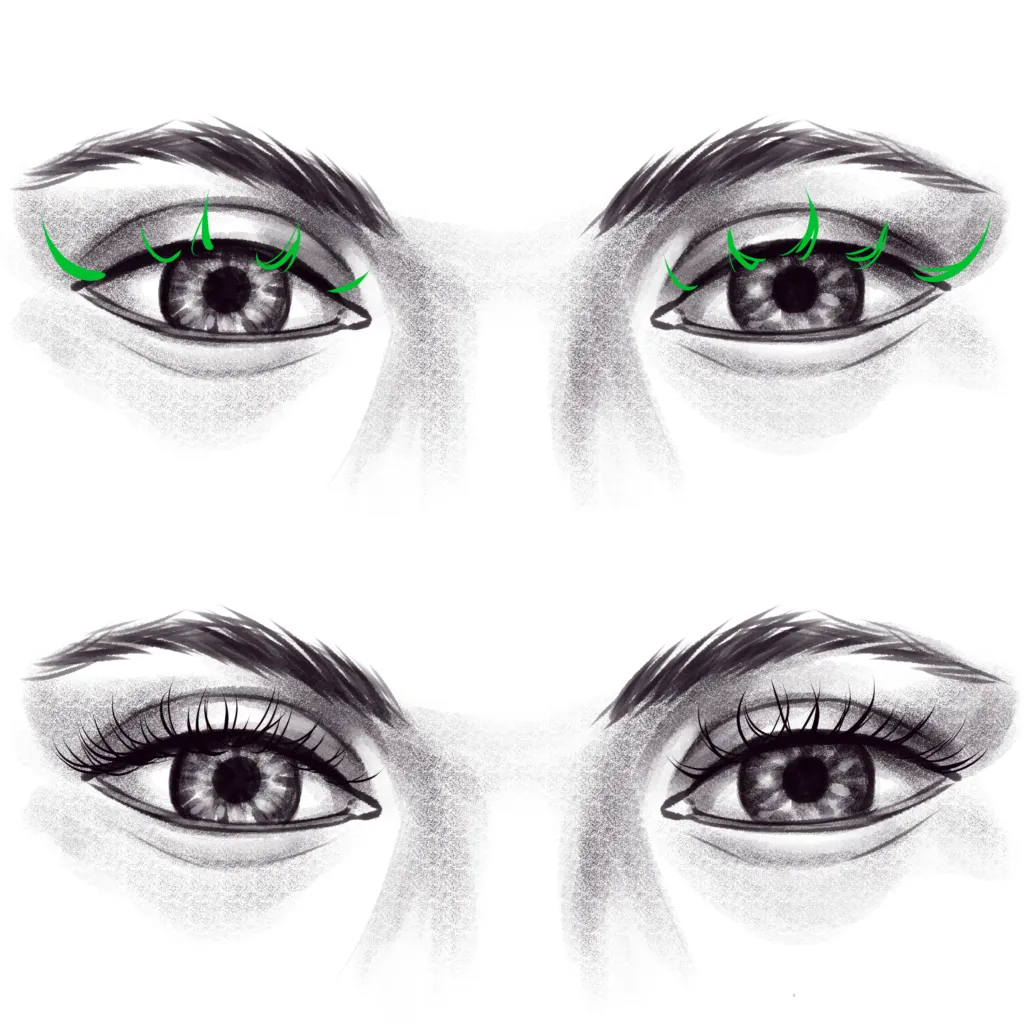
Adding Details: Lashes, Eyebrows, and Iris
When you think about the eye, it’s the little details that truly bring it to life. Let's dive into three crucial components: lashes, eyebrows, and the iris. Each element offers a chance to enhance your sketch's personality and depth.
1. Lashes: These can dramatically change the expression of your eye. Start by observing real lashes—notice how they curve and vary in length. Use quick, flicking motions with your pencil to mimic that natural growth direction. Here’s a quick breakdown:
- Length: Vary the length of the lashes for realism.
- Direction: Lashes usually fan out; ensure to reflect that in your drawing.
- Volume: Thicker lashes can suggest more femininity or intensity.
2. Eyebrows: They frame the eyes and can convey a vast range of emotions. Pay close attention to their shape and thickness. For a more realistic effect:
- Shape: Follow the natural curves and angles.
- Texture: Use short strokes to replicate hair texture.
3. Iris: This is where the magic truly happens. The iris is more than just a circle; it has depth and color variations. To master the iris:
- Color: Use colored pencils or watercolors to blend shades.
- Detail: Add tiny lines radiating from the pupil to evoke realism.
With these details in place, your eyes will not only look more realistic but also convey emotion and character.
Also Read This: How to Make Samosa Patti in Urdu Simple Cooking Guide
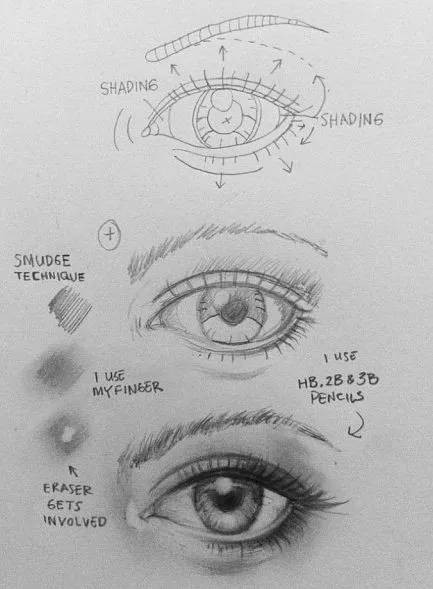
Shading Techniques for Realistic Eyes
Shading is essential to create depth and dimension in your eye sketches. Let’s explore some effective shading techniques that can elevate your artwork.
1. Gradation: Start with a light hand and gradually increase pressure on your pencil. This creates a smooth transition between light and dark. Use this technique on the whites of the eyes to give them a natural shine.
2. Cross-Hatching: This involves drawing intersecting lines to build up texture. It’s particularly useful for the iris and eyelashes, where you can create depth by layering lines:
| Technique | Description |
|---|---|
| Light Cross-Hatching | Use fine lines for subtle shading. |
| Heavy Cross-Hatching | Apply more pressure for darker areas. |
3. Blending: After applying your initial shading, use a blending stump or your finger to soften the edges. This works wonders around the iris and can help create a more realistic look.
4. Highlights: Don’t forget to leave some areas white or lightly shaded to represent reflections! This will add a sparkle to the eyes.
Combining these shading techniques will help you achieve that lifelike quality you aim for in your eye sketches, making them captivating and dynamic.
Also Read This: Design Zines Using Canva Zine Template
Common Mistakes to Avoid
When it comes to drawing eyes, even seasoned artists can stumble over certain pitfalls. Here are some common mistakes you should watch out for:
- Ignoring Proportions: One of the biggest errors is not paying attention to the proportions of the eye. Remember, the eye is not just a simple oval; it has depth and structure. Use reference images to guide you.
- Flat Shading: Avoid flat shading techniques that can make the eye look lifeless. Incorporate gradients and highlights to create a three-dimensional effect. Practice blending with different tools can really help here.
- Overemphasizing Details: While details are important, overly focusing on them can detract from the overall look. Make sure you're capturing the essence and expression of the eye instead of just replicating every tiny feature.
- Neglecting the Surrounding Area: The eye doesn’t exist in isolation. Pay attention to how the eye interacts with the surrounding features like brows, lashes, and skin. This will give your eye drawing more context and realism.
- Not Experimenting: Sticking to one style or technique can hinder your growth. Experiment with different mediums—pencil, charcoal, or digital tools—to discover what works best for you.
By keeping these common mistakes in mind, you can refine your drawing skills and create more lifelike eyes that truly captivate your audience.
Also Read This: Design Unique Menus with Canva Menu Template
Final Touches and Enhancements
Once you've completed your eye drawing, adding those final touches can elevate your work from good to stunning. Here’s how to enhance your artwork:
- Highlights: Adding small white highlights can create a sparkling effect in the eye, making it appear more alive. Place them strategically, often where the light source hits.
- Refining Details: Go over the eyelashes and iris details to make them pop. Darkening the outer edges can give depth while leaving the inner parts lighter creates contrast.
- Color Adjustments: If using color, consider adjusting hues and saturation. Experiment with vibrant colors in the iris and subtle tones in the sclera to create realism.
- Shadows: Adding shadows around the eye area can enhance depth. Use a soft blending technique to create a natural transition between light and dark.
- Textural Effects: For realism, consider using different techniques for texture. For example, stippling for the iris or soft smudging for skin around the eye can add a lifelike quality.
These final touches not only refine your work but also express your unique artistic voice. So, take your time and enjoy the process of enhancement!
Mastering Eye Drawing Techniques in Sketch
Drawing eyes can be one of the most challenging yet rewarding aspects of sketching. The eye is often considered the window to the soul, conveying emotions and character. To effectively capture this intricacy, artists can employ various techniques and tips to enhance their skills.
Essential Techniques for Eye Drawing
Here are some key techniques to master eye drawing:
- Observation: Spend time observing real eyes. Note the variations in shape, color, and texture.
- Proportions: Understand the basic proportions of the eye. The average human eye is about 1 inch wide and 0.5 inches tall.
- Construction Lines: Use construction lines to lay out the basic shape and position of the eye before adding details.
- Shading: Use different shading techniques (like hatching, cross-hatching, and blending) to create depth and realism.
- Highlighting: Add highlights to the eye to give it life and sparkle. Use an eraser or a lighter pencil for this effect.
Common Mistakes to Avoid
Here are some mistakes that many budding artists make:
| Mistake | Solution |
|---|---|
| Ignoring Proportions | Always start with basic shapes and proportions. |
| Over-Detailing | Focus on key features and avoid cluttering the drawing with unnecessary details. |
| Flat Shading | Utilize highlights and shadows to create dimension. |
By practicing these techniques and being mindful of common mistakes, you can significantly improve your eye drawing skills. Remember, mastery comes with time and persistence.
Conclusion
Mastering eye drawing techniques requires patience and practice. By honing your skills with observation, understanding proportions, and applying effective shading, you can create compelling and expressive eyes that enhance your sketches.
Resources
- ArtStation - A platform for artists to showcase their work, find inspiration, and connect with others.
- YouTube - Search for tutorials on eye drawing to see techniques in action.
- Skillshare - Offers online courses on drawing and sketching techniques.