Contouring makeup is like a magic trick for your face! It’s all about using shadows and highlights to enhance your features and create the illusion of a more sculpted look. Whether you're getting ready for a special occasion or just want to elevate your everyday makeup routine, mastering contouring can make a significant difference. In this blog post, we’ll dive into the world of contouring makeup and guide you through a comprehensive video tutorial available on Dailymotion. So grab your brushes and let’s get started!
Understanding the Basics of Contouring
Before jumping into the application techniques, it's important to understand the fundamentals of contouring. At its core, contouring uses two key elements: shadows and highlights. Here’s a breakdown of the basics:
- Shadows: These are typically darker shades that you apply to areas of your face where you want to create depth. Think of the natural shadows that occur on your face; you want to enhance those!
- Highlights: These are lighter shades that bring attention to certain areas, creating a radiant and lifted effect. Highlights simulate the look of light hitting your face.
To get the most out of contouring, you need to know where to apply these products. Here’s a quick guide:
| Area of Face | Shadow Application | Highlight Application |
|---|---|---|
| Forehead | Along the hairline | Center of the forehead |
| Nose | Along the sides | Down the bridge |
| Cheeks | Underneath the cheekbones | Top of the cheekbones |
| Jawline | Along the jawline | Center of the chin |
Remember, the key to effective contouring lies in blending. You want the transitions between shadows and highlights to be seamless for a natural look. With practice and the right products, you'll be able to sculpt your features beautifully. Stay tuned for our Dailymotion video tutorial where we’ll bring these concepts to life with practical demonstrations!
Also Read This: How to Save a Live YouTube Video for Offline Viewing
Essential Tools and Products for Contouring

Before diving into the world of contouring, it’s crucial to have the right tools and products at your disposal. This ensures that your makeup application is not only effective but also enjoyable. Here’s a list of essential tools and products that will help you achieve that chiseled look:
- Contour Products: You can choose between creams, powders, or sticks. Creams are great for a dewy finish, while powders offer a matte look. Sticks are perfect for on-the-go touch-ups.
- Highlighter: A good highlighter can bring luminosity to your features. Look for one that complements your skin tone, whether it’s a warm gold or a cool silver.
- Blush: While not strictly a contouring tool, blush adds color to your cheeks and helps blend your contour seamlessly.
- Brushes: Invest in a variety of brushes, such as a flat contour brush for precise application and a fluffy brush for blending. A fan brush is also great for applying highlighter.
- Beauty Blender or Makeup Sponge: These tools are perfect for buffing out cream products, giving you a smooth, airbrushed finish.
- Setting Powder: A translucent setting powder can help lock in your look, preventing your contour from fading throughout the day.
Having these tools and products on hand will make your contouring journey much smoother. Remember, practice makes perfect, so don’t be afraid to experiment until you find what works best for you!
Also Read This: How to Unban Your Telegram Account with Effective Solutions
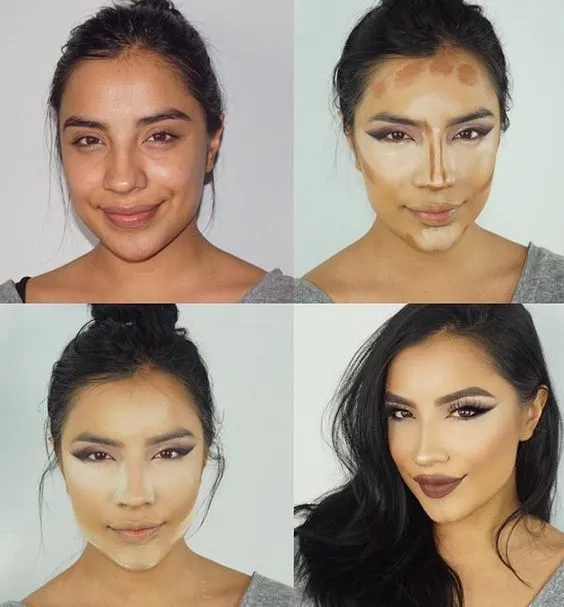
Step-by-Step Contouring Techniques
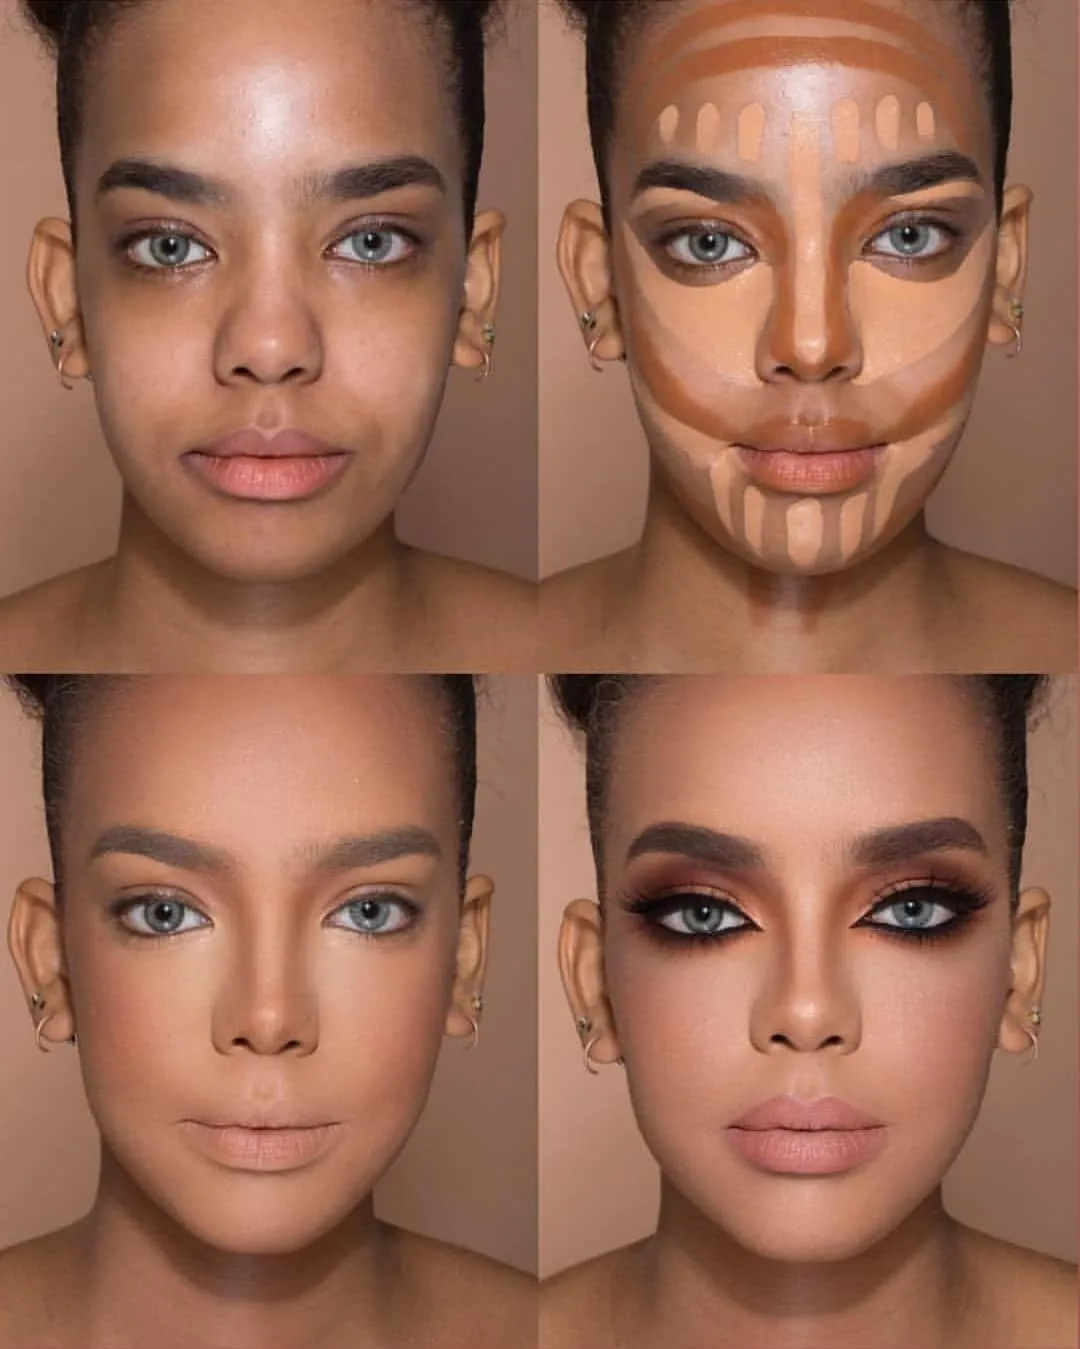
Now that you have your tools ready, let’s dive into some simple yet effective contouring techniques. Contouring isn’t just for professionals; with a little guidance, you can master it right at home. Here’s a step-by-step approach:
- Prep Your Skin: Start with a clean, moisturized face. Apply your primer to create a smooth canvas.
- Apply Foundation: Use a foundation that matches your skin tone to even out your complexion. Blend it well using a beauty sponge or brush.
- Map Out Your Contour: Using your contour product, apply it to the hollows of your cheeks, along your jawline, and on the sides of your nose. A good rule of thumb is to create a '3' shape on each side of your face.
- Highlight: Apply highlighter on the high points of your face—on your cheekbones, brow bone, and the bridge of your nose. This step adds dimension and brightness to your look.
- Blend, Blend, Blend: Use a fluffy brush or sponge to blend out the contour and highlight. The key is to avoid harsh lines, resulting in a seamless transition between shades.
- Set Your Makeup: Finish with a setting powder to lock everything in place. This helps your makeup last longer and look fresher throughout the day.
And there you have it! By following these steps, you’ll be well on your way to achieving a beautifully contoured look. Don’t hesitate to practice and tweak these techniques to suit your unique features!
Also Read This: Who Won the Greatest Royal Rumble Match?
Video Tutorial Overview on Dailymotion
If you're looking to elevate your makeup game, the video tutorial on Dailymotion is your ultimate guide to mastering the art of contouring! This comprehensive video walks you through every step of the contouring process, making it easy for both beginners and seasoned makeup enthusiasts to follow along.
The video kicks off with an introduction to the basic tools and products you'll need, including:
- Contour and Highlight Products: Creams, powders, and sticks.
- Brushes and Sponges: For blending and applying products smoothly.
- Setting Spray: To ensure your look stays put all day.
Next, the tutorial delves into the different face shapes and how to contour them effectively. This section is especially valuable, as it tailors techniques to your unique features. You’ll learn how to:
- Identify your face shape.
- Apply contour in the right areas.
- Highlight to enhance your best features.
Throughout the tutorial, the instructor shares tips and tricks to avoid common pitfalls and achieve a seamless finish. The video concludes with a stunning reveal of the final look, complete with a list of recommended products. By the end of it, you’ll feel confident enough to tackle contouring on your own!
Also Read This: The Best Way to Upload Brochures on Behance
Common Mistakes to Avoid While Contouring
Contouring can be a bit tricky, especially if you're just starting out. To help you achieve that flawless look, it’s essential to be aware of some common mistakes that many makeup lovers make. Here’s a list of pitfalls to steer clear of:
- Using the Wrong Shade: Picking a contour shade that's too dark or too light can lead to an unnatural appearance. Aim for a shade that’s a few tones darker than your skin tone for contouring.
- Overdoing It: Less is often more. Applying too much product can leave you looking harsh or overly made-up. Start with a small amount and build up as needed.
- Neglecting Blending: Harsh lines are a big no-no. Always blend your contour and highlight well to create a seamless transition and a natural finish.
- Skipping the Highlight: Contouring without highlighting can flatten your face. Make sure to highlight the high points of your face for dimension.
- Ignoring Face Shape: Forgetting to tailor your contouring technique to your face shape can lead to unflattering results. Always consider your unique features!
By keeping these common mistakes in mind, you’ll be well on your way to perfecting your contouring skills. Remember, practice makes perfect, so don’t be afraid to experiment and find what works best for you!
Also Read This: How to Achieve a Smooth Finish with Loose Powder on Your Face
7. Tips for Different Face Shapes
Contouring isn't a one-size-fits-all technique; it varies based on your face shape. Knowing your face shape can significantly enhance your contouring game. Here’s a quick guide to help you master contouring for various face shapes:
- Oval Face: With balanced proportions, focus on enhancing your natural shape. Lightly contour the sides of the forehead and under the cheekbones. Highlight the chin and center of the forehead for a fresh look.
- Round Face: To create the illusion of length, contour the sides of the forehead and the edges of your cheeks. A bit of contour along the jawline can help define your face, while highlighting the center of the forehead, chin, and cheekbones adds dimension.
- Square Face: Soften strong jawlines with contouring. Apply contour along the sides of the forehead, under the cheekbones, and along the jawline. Highlighting above the brows and on the chin can balance the face.
- Heart-Shaped Face: Focus on the forehead and chin. Contour along the temples and under the cheekbones to create balance. Highlighting the center of the forehead and the chin draws attention to the eyes and gives a lovely lift.
- Long Face: To shorten the appearance, contour the forehead and under the chin. Highlighting the cheeks and the center of the forehead can add fullness and warmth.
Remember, the key is to play with shadows and highlights to achieve the look you desire. Don't hesitate to experiment until you find the perfect technique for your unique features!
8. Conclusion and Final Thoughts
Mastering contouring makeup is like learning a new art form; it takes practice, patience, and a bit of creativity. With the comprehensive techniques shared in our Dailymotion video tutorial, you’re well on your way to achieving that coveted sculpted look. Here are some final thoughts to keep in mind:
- Practice Makes Perfect: Don’t be discouraged if you don’t get it right the first time. Keep practicing, and soon contouring will feel as natural as applying foundation.
- Know Your Tools: Invest in quality brushes and products tailored to your skin type. The right tools can make a significant difference in your application.
- Lighting is Key: Always check your makeup in natural light. This helps ensure that your contouring looks flawless and not overly harsh.
- Blend, Blend, Blend: The secret to seamless contouring is blending. Take your time to blend out harsh lines for a more natural finish.
- Have Fun! Makeup is meant to be fun and expressive. Don’t take it too seriously; enjoy the process of discovering what works best for you.
So there you have it! Whether you're just starting or looking to refine your skills, contouring can be an exciting adventure. Grab your makeup brushes, check out the tutorial, and let your creativity shine!