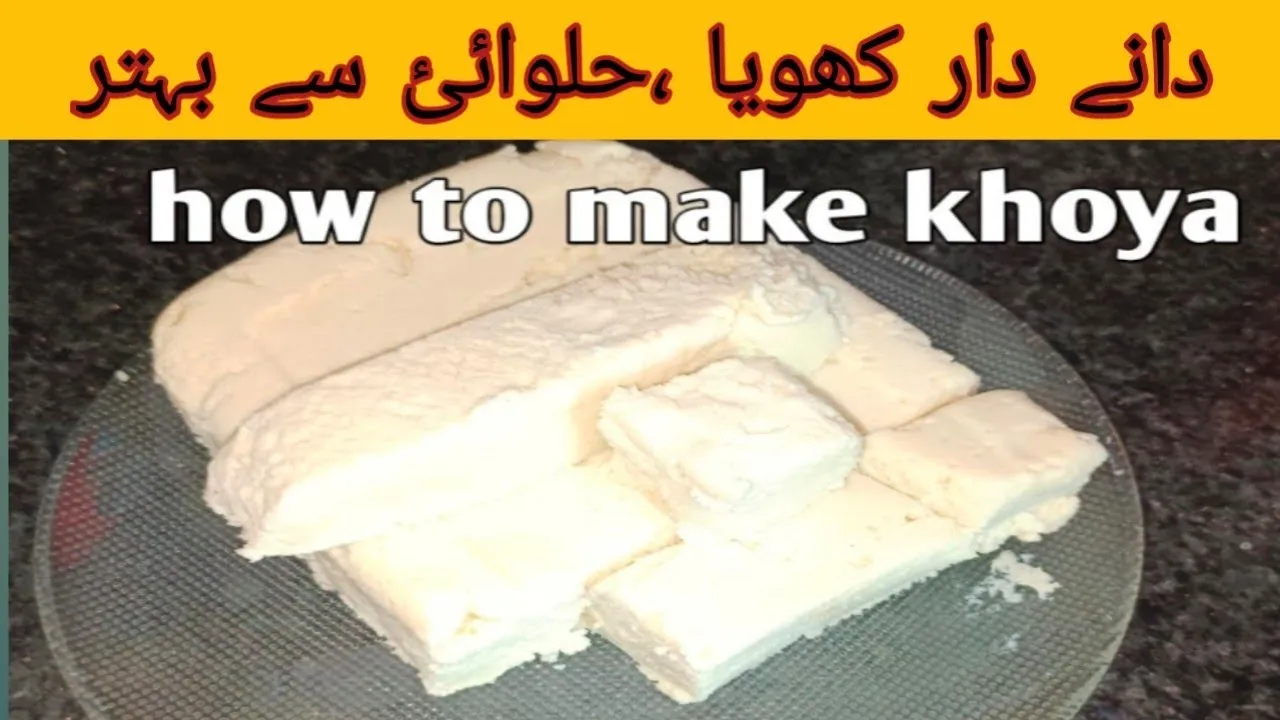
Khoya, also known as mawa, is a rich dairy product widely used in Indian sweets and desserts. It’s made by simmering milk until it thickens and reduces, resulting in a creamy, dense texture. Traditionally, khoya is the heart of various celebratory dishes like gulab jamun, barfi, and peda. The allure of khoya lies not just in its rich flavor but also in its versatility, making it a beloved ingredient in many kitchens across India.
Creating khoya at home might sound daunting, but with a little patience and the right methods, you can easily master this essential ingredient. Plus, when you make it yourself, you have complete control over the quality of the milk and the sugar content, ensuring a fresh and delicious outcome every time!
Benefits of Making Khoya at Home
Making khoya at home comes with a myriad of benefits that elevate your culinary experience. Here are some key advantages:
- Freshness: Homemade khoya is fresher than store-bought options, giving your sweets a richer flavor.
- Quality Control: You choose the milk quality, ensuring no additives or preservatives ruin your recipes.
- Cost-Effective: Making khoya at home can be more economical than purchasing it, especially if you plan to use it frequently.
- Customizable: You can adjust the sweetness or thickness according to your preference, tailoring khoya to your specific recipes.
- Skill Development: Learning to make khoya enhances your cooking skills, opening doors to numerous delectable Indian desserts.
In summary, making khoya at home is not just a rewarding experience; it also adds a personal touch to your culinary creations. Whether you’re planning a festive feast or a simple family treat, homemade khoya will undoubtedly elevate your dishes to the next level!
Also Read This: Design Frames with Canva Frame Template
Essential Ingredients for Khoya
To whip up a delicious batch of khoya at home, you'll need just a few essential ingredients. The beauty of khoya lies in its simplicity and the rich flavors that come from these basic components. Here’s what you’ll need:
- Full-Fat Milk: This is the star ingredient! Using full-fat milk provides the richness and creaminess that khoya is known for. Aim for about 2 liters, as it reduces down to a smaller quantity.
- Lemon Juice or Vinegar: A tablespoon will help in curdling the milk to create chenna, which is crucial for the texture. You can also use citric acid if you prefer.
- Ghee (Clarified Butter): A couple of tablespoons of ghee enhance the flavor of khoya and give it that luxurious feel. Plus, it helps in the cooking process!
- Cardamom Powder: Adding ½ teaspoon of cardamom powder will give the khoya a fragrant aroma and a hint of sweetness.
- Optional Ingredients: You might want to add a pinch of saffron or nuts like almonds and pistachios for garnish, depending on how indulgent you want your khoya to be.
With these ingredients in hand, you're all set to embark on your khoya-making adventure!
Also Read This: Understanding LinkedIn Message Read Receipts
Step-by-Step Tutorial for Making Khoya
Making khoya at home may seem daunting, but with this easy-to-follow tutorial, you'll find it a breeze! Let’s break it down step by step:
- Boil the Milk: In a heavy-bottomed pan, pour in the full-fat milk and bring it to a boil over medium heat. Stir occasionally to prevent it from burning.
- Curdle the Milk: Once the milk comes to a boil, add the lemon juice or vinegar gradually while stirring. You’ll see the milk curdling and separating into curds and whey. Turn off the heat and let it sit for a few minutes.
- Strain the Curdled Milk: Use a muslin cloth or a fine sieve to strain the curds. Rinse with cold water to remove any acidity. Squeeze out excess water gently.
- Cook the Chenna: Transfer the curds back to the pan. Cook on low heat, stirring continuously. The chenna will start to dry out, so be patient!
- Add Ghee and Cardamom: Once the mixture reduces and thickens, add ghee and cardamom powder. Cook for another 10-15 minutes until it forms a dough-like consistency.
- Cool and Store: Let the khoya cool completely before storing it in an airtight container. It can be refrigerated for up to a week!
And there you have it! Your homemade khoya is ready to be used in a variety of Indian sweets or enjoyed on its own. Dive into the delicious world of khoya-making today!
Also Read This: A Step-by-Step Guide to Selling Your Photos to Shutterstock
Common Mistakes to Avoid
Making khoya at home can be a delightful experience, but it's easy to stumble into a few common pitfalls. Here’s a rundown of mistakes you definitely want to avoid for that perfect khoya!
- Not Using the Right Milk: Always opt for full-fat milk. Skim or low-fat milk won’t yield the rich, creamy texture you’re after. When it comes to khoya, rich milk is your best friend!
- Rushing the Cooking Process: Patience is key! Cooking the milk too quickly can lead to uneven consistency and burnt flavor. Make sure to simmer it gently over a low flame, stirring frequently.
- Ignoring Stirring: Stirring is crucial to prevent the milk from sticking to the bottom of the pan and burning. Make it a habit to stir consistently while it reduces.
- Not Monitoring the Consistency: Keep an eye on the milk as it reduces. It should become thick and creamy, but if you cook it too long, it can turn into a hard mass!
- Using Any Pan: A heavy-bottomed pan is essential for even heat distribution. Thin pans can cause hot spots, leading to burnt milk.
By steering clear of these mistakes, you'll be well on your way to crafting the perfect khoya at home!
Also Read This: A Beginnerâs Guide to Creating Your First Account on OK.ru
Creative Ways to Use Khoya in Recipes
Khoya, with its rich flavor and creamy texture, opens up a world of culinary possibilities! Here are some creative ways to incorporate khoya into your recipes:
- Burfi: This popular Indian sweet is a must-try! Mix khoya with sugar, cardamom, and nuts, then set it in a tray for delicious squares.
- Gulab Jamun: Use khoya to make these soft and syrup-soaked dumplings. They will melt in your mouth!
- Kheer: Add khoya to this rice pudding for an extra creamy texture. It elevates the dish beautifully!
- Stuffed Parathas: Blend khoya with sugar and spices to create a sweet filling for parathas. Serve them hot with a drizzle of ghee.
- Ice Cream: Make homemade ice cream by combining khoya with milk and your favorite flavors. It’s rich, creamy, and oh-so-delicious!
With these ideas, you can take your culinary skills to the next level, making every meal a special occasion. Enjoy experimenting!
Making Khoya at Home with Easy Tutorials on Dailymotion
Khoya, also known as mawa, is a traditional Indian dairy product made from milk. It is a key ingredient in many Indian sweets and desserts, contributing rich flavor and creamy texture. Making khoya at home is not as daunting as it may seem, and with the help of easy tutorials available on Dailymotion, you can master this culinary art in no time.
Here are some simple steps to make khoya at home:
- Ingredients:
- 2 liters of full-fat milk
- A heavy-bottomed pan
- Stirring spatula
- Procedure:
- Pour the milk into a heavy-bottomed pan and bring it to a boil over medium heat.
- Once boiled, reduce the heat and let it simmer, stirring continuously to prevent it from burning.
- Continue simmering until the milk reduces and thickens, leaving a soft mass. This process can take around 1-2 hours.
- When the milk has reduced to a thick consistency, remove it from the heat and let it cool.
- Once cooled, it can be shaped into balls or blocks for storage.
Dailymotion offers a variety of video tutorials that can visually guide you through the process, making it even easier to replicate. Just search for "Making Khoya at Home" on the platform, and you’ll find numerous resources.
Storage Tips:
- Store khoya in an airtight container in the refrigerator for up to 2 weeks.
- For longer storage, freeze it in small portions.
In conclusion, making khoya at home is a straightforward process that enhances your culinary skills and allows you to enjoy fresh, homemade delicacies. With the help of Dailymotion tutorials, you can easily create this versatile ingredient and elevate your desserts to a whole new level.